|
|
What’s New in APM 7.17
Contents
** Mandatory Environment Password
For instructions on adding passwords, see APM Upgrade Guide.Asset Specifications
Oil and Gas Asset Specifications
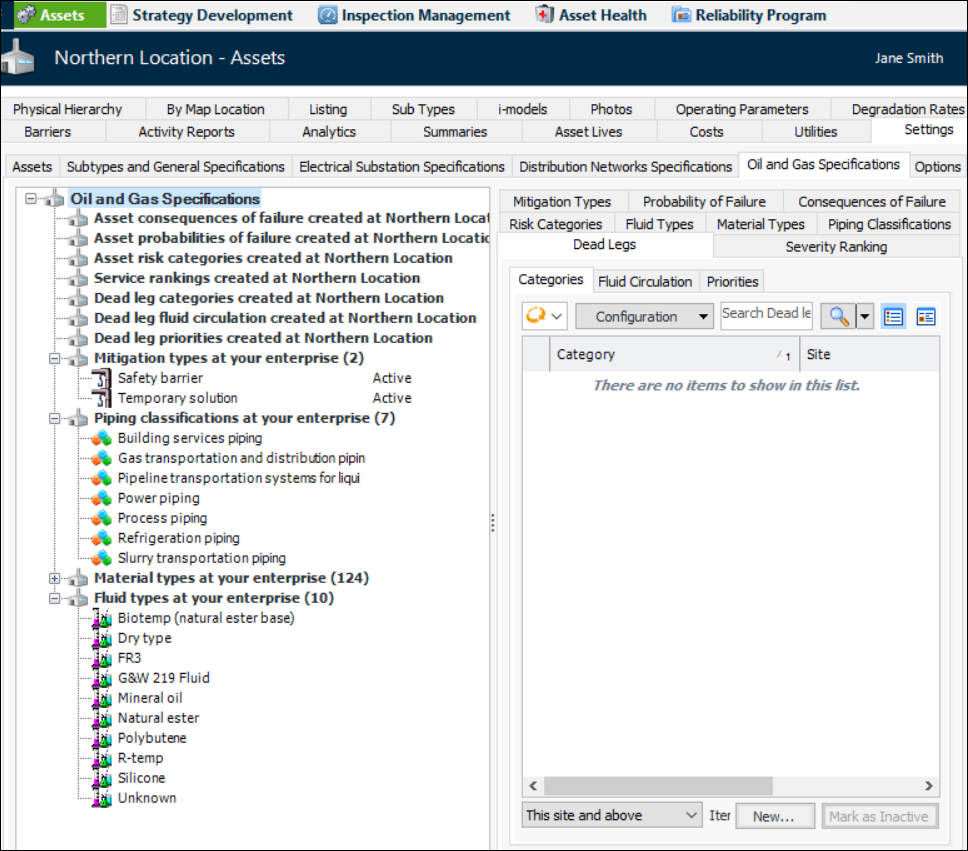
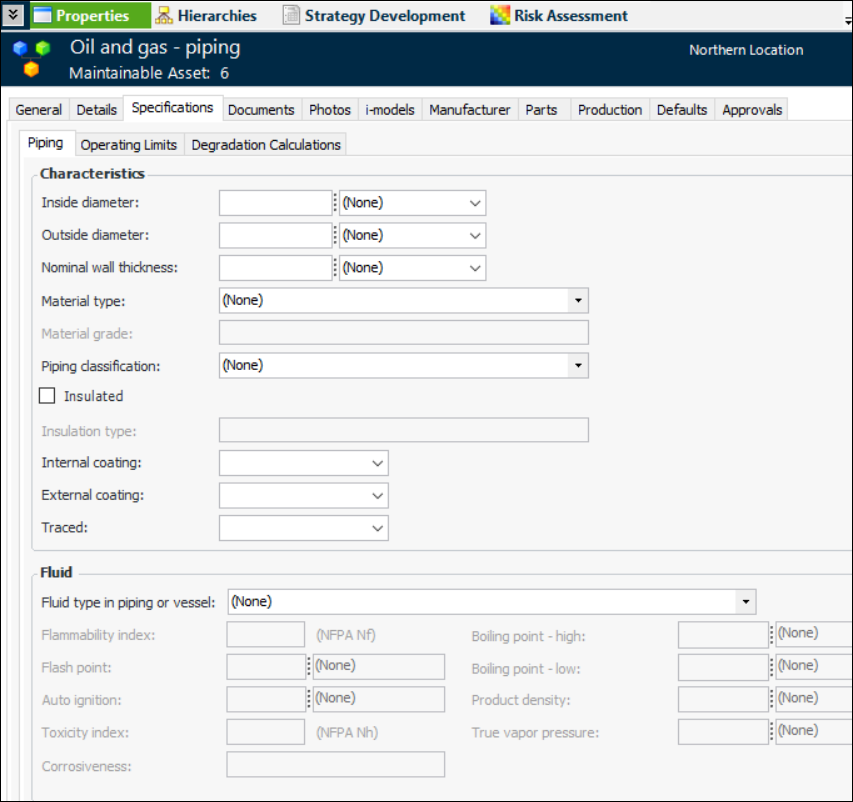
Note: The Oil and gas asset specifications are “generally available” product features. You must first enable features 91 and 93 to use the functionality in APM. In the Enterprise window, select the Features view and the Enabled Features tab. Click Browse, select “Support for Oil and Gas asset specifications” and “Support for Oil Drilling Platform asset specifications” and click OK. If APM is running as a smart client, click Refresh Enabled Features on the server. Then restart the client to use the functionality.To view the new value lists, select the site’s Assets view, Settings tab, Oil and Gas Specifications tab. For example:Assets of the type display the Specifications tab in the Asset window, Properties view. Here is an example of the piping specification:
Dead Leg Asset Specifications
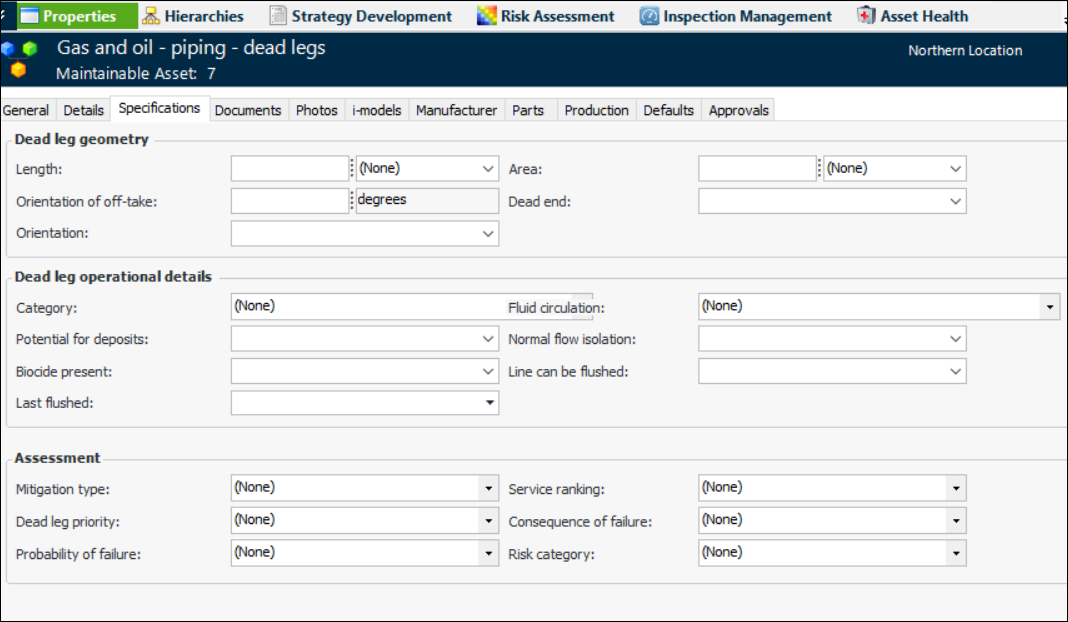
Note: Support for dead leg specifications is a “generally available” product feature. You must first enable feature 96, as well as 91, to use the functionality in APM. In the Enterprise window, select the Features view and the Enabled Features tab. Click Browse, select “Support for Dead Leg Piping section asset specifications” and click OK. If APM is running as a smart client, click Refresh Enabled Features on the server. Then restart the client to use the functionality.To use the specification, add it to an asset type and select the panel “Asset specifications - Oil and Gas - Dead leg piping”. Assets of the type display the Specifications tab on the Asset window, Properties view. For example:Distribution Networks Asset Specifications
AWEIS
Distribution Network Information in Work Documents
You can now set an option in work type site settings to display the Completion Info tab in interop work document windows. Completion information is only pertinent for work documents that display information about electrical equipment in a distribution network.Note: Support for distribution network information is a “generally available” product feature. You must first enable feature 62 to use the functionality in APM. In the Enterprise window, select the Features view and the Enabled Features tab. Click Browse, select “Distribution Network work information on AssetWise Interoperability work documents” and click OK. If APM is running as a smart client, click Refresh Enabled Features on the server. Then restart the client to use the functionality.In the Request for Work window, Distribution Networks Info tab, “Conductor type” was changed to “Conductor / equipment type”. The label “Primary” was changed to “Primary conductor”.Hide Labor Requirement in Interop Work Documents
In the work type’s site settings, you can now set the labor requirement to read-only. In the Work Type and Site Settings window, select the Requests and Read Only tabs and select Labor requirement. In work documents of the type, the Labor tab is hidden.Recommendations from Events
Controlling Whether Interop Documents can be Redrafted
APM Install Database and AWEIS Activation
As of this release, interoperability is not active by default on any of the sites in the install database. For related information, see Overview of Setting up APM for AWEIS.AWEIS – Solution Package Levels
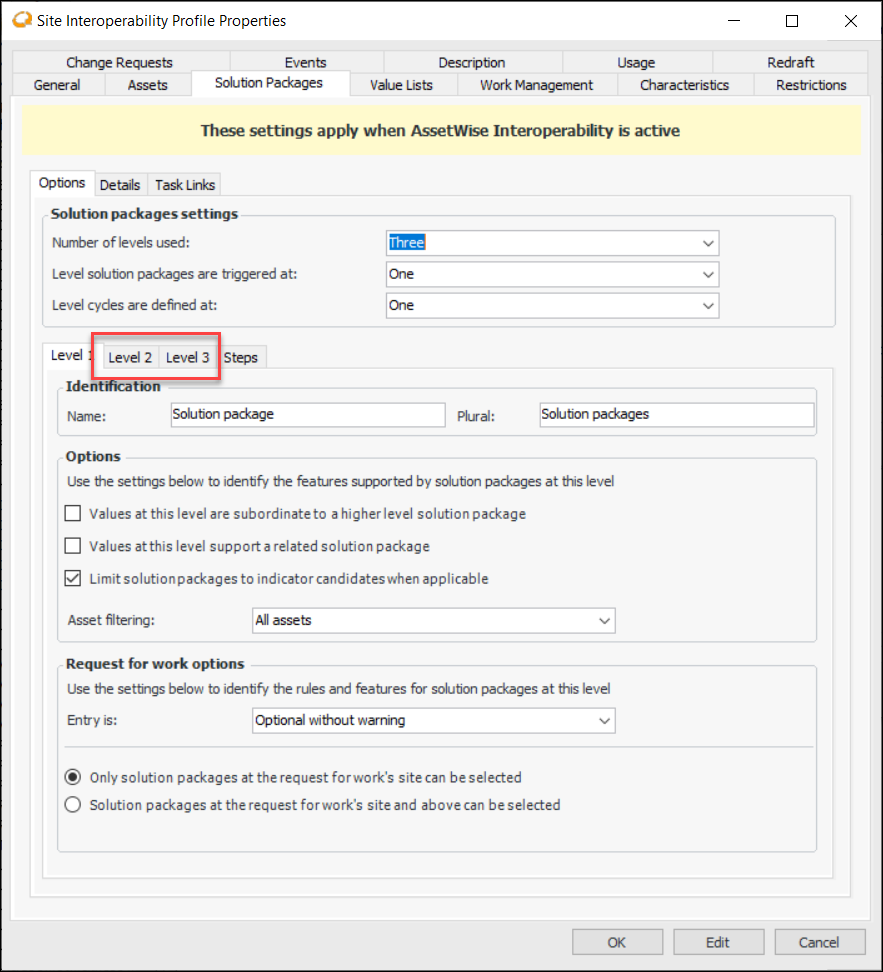
Setting up Solution Package Levels in APM
In the Site Interoperability Profile window, specify how solution package levels will be used at the site. For example, if you choose three levels, Level 2 and Level 3 tabs are added so that you can specify options for each level:Click the Steps tab to select the level that supports steps and provide a name that will be used in the user interface.Interop Work Documents and Solution Package Levels
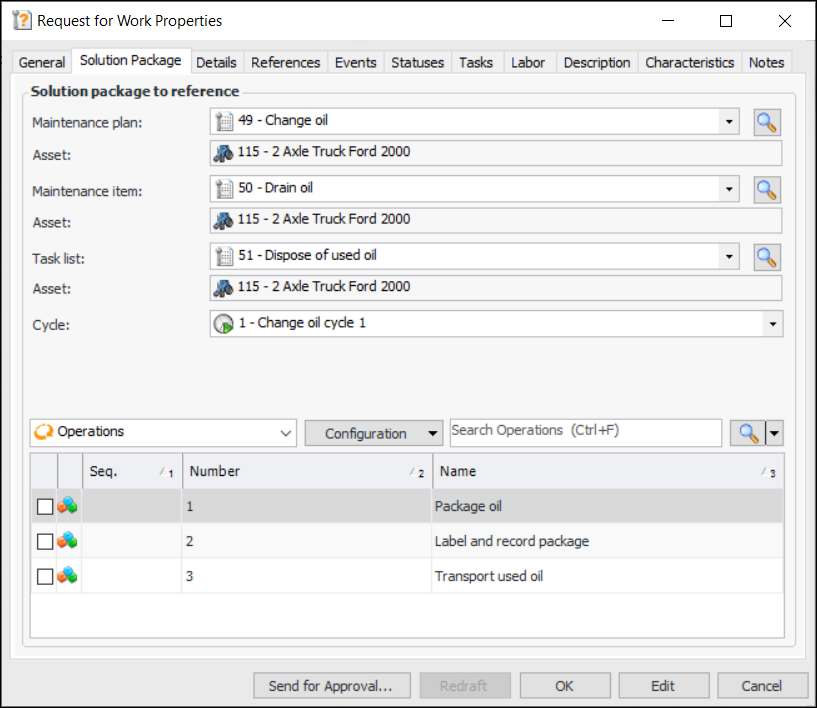
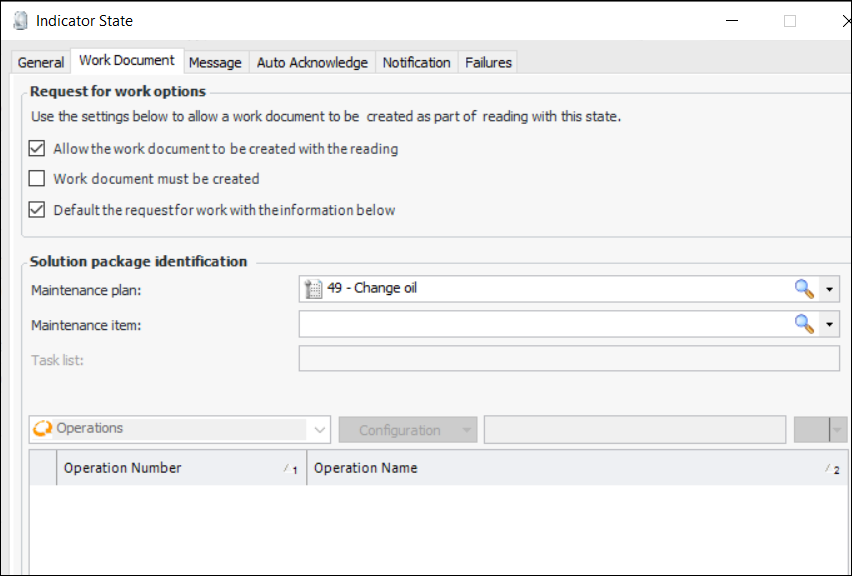
Requests for work support solution package levels. For example, the Request for Work Properties window displays the Solution Package tab, where you can select solution packages at one or more levels.When you request a solution package trigger, the Solution Package tab is replaced by the Trigger tab, where you can select the solution package levels, a cycle, and steps.
Next Due On Date
To view the next-due-on date, open the Solution Package window, select the Properties view and the Next Due on tab. This tab shows the next due on date and time and lists the associated standard tasks.Mapping Characteristics for Steps
Construction Management
Remote Computer Restriction
“Asset Name” Replaced “Description”
In the New Construction Form Assets window and elsewhere, the Description field was renamed Asset name to clarify its purpose.French and Spanish Translations Updated
Inspection Management
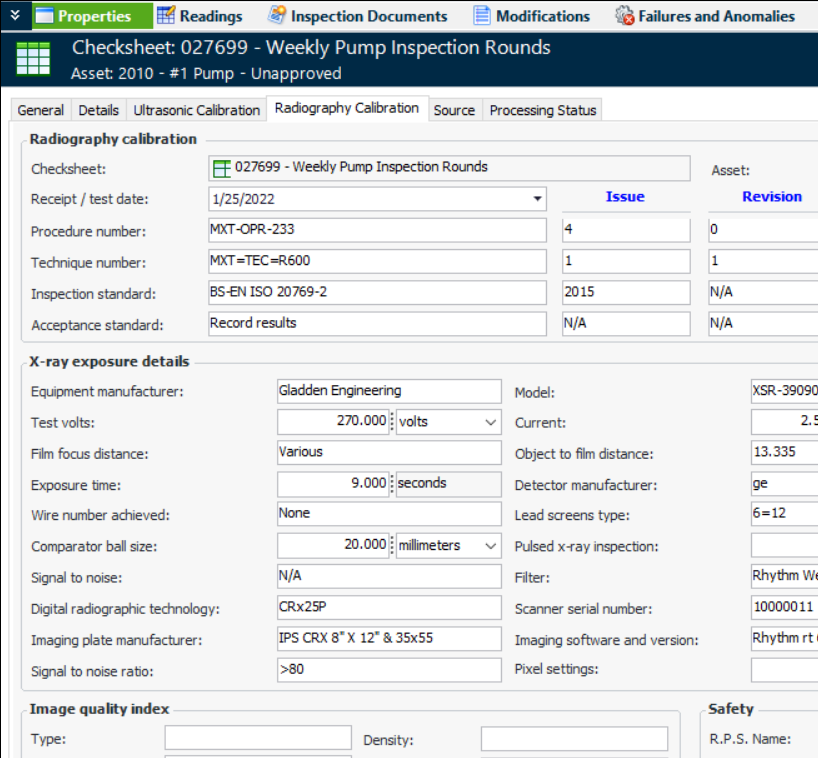
Checksheet Subtypes
This release introduces checksheet subtypes for Radiography and Ultrasonic calibration. When a subtype is assigned to a checksheet type, checksheets of that type display a Calibration tab. For example, here is a Radiography Calibration tab:Checksheet Export – Collected By
When you export simple checksheet readings, the Excel workbook now includes the Collected By column on the Readings sheet. A drop-down list allows you to select an employee number from the checksheet’s site and above.Note: Checksheets that record measurement point readings do not include the Collected By column.Indicator Readings Tab – Default Date Range
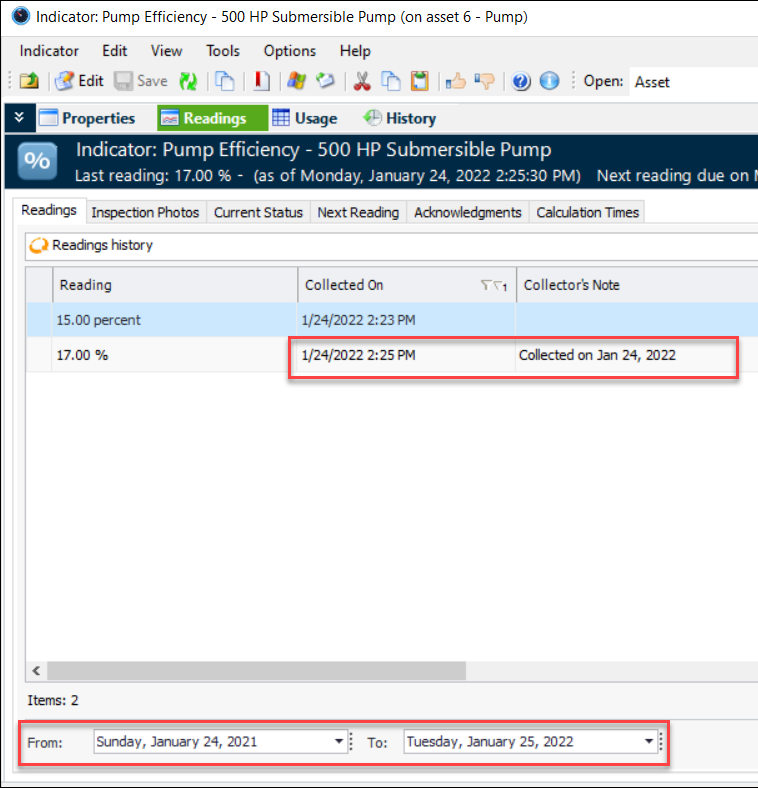
In the Indicator window, Readings view and tab, the dates at the bottom of the tab now default to the following.
APM Remote Indicators Support States Based on Calculations
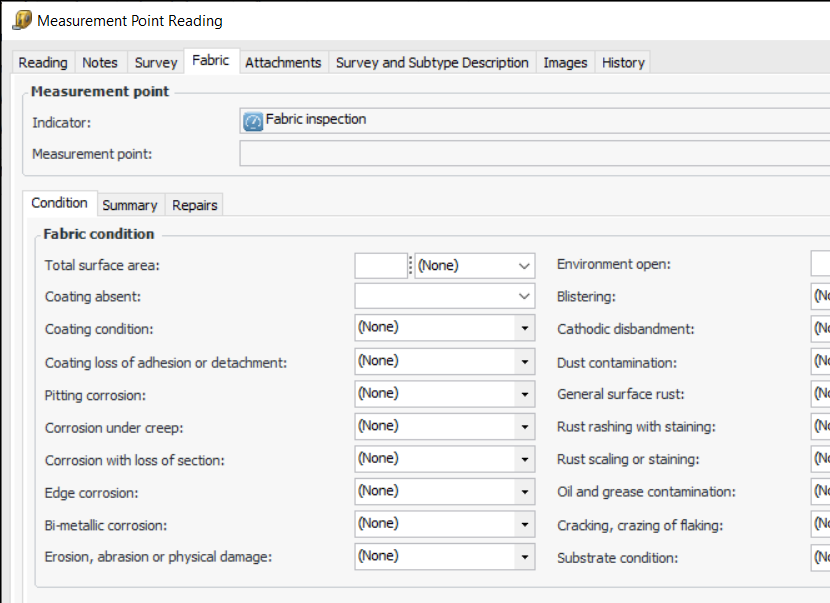
Fabric Inspection Subtype for Measurement Point Readings
This release introduces the Fabric indicator subtype for measurement point readings. When the subtype is assigned to an indicator type, measurement point readings for indicators of that type display the Fabric tab. For example:Note: The Fabric inspection subtype is available for technology preview. You must first enable feature 95 to use the functionality in APM. In the Enterprise window, select the Features view and the Enabled Features tab. Click Browse, select “Support for Fabric Inspection subtype on Measurement Point Reading” and click OK. If APM is running as a smart client, click Refresh Enabled Features on the server. Then restart the client to use the functionality.Information about fabric inspections is displayed in measurement point reading history for the site. In the site’s Inspection Management view, select the Readings and By Indicator tabs and then the Measurement Points tab.Fluid Sample Tab on Indicator Readings
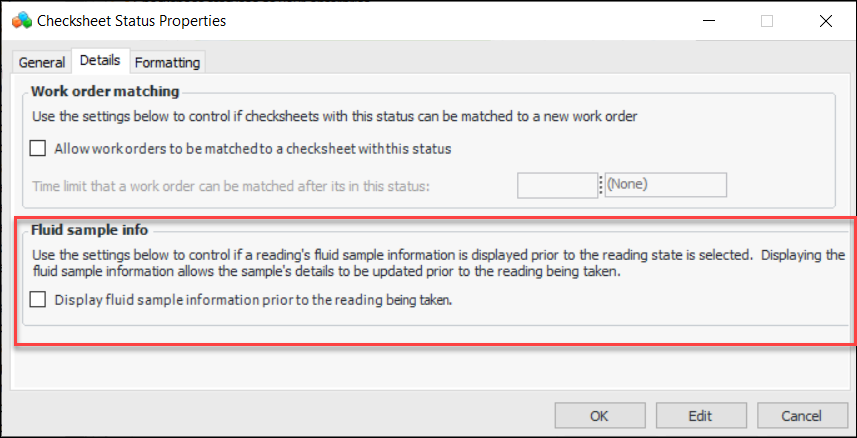
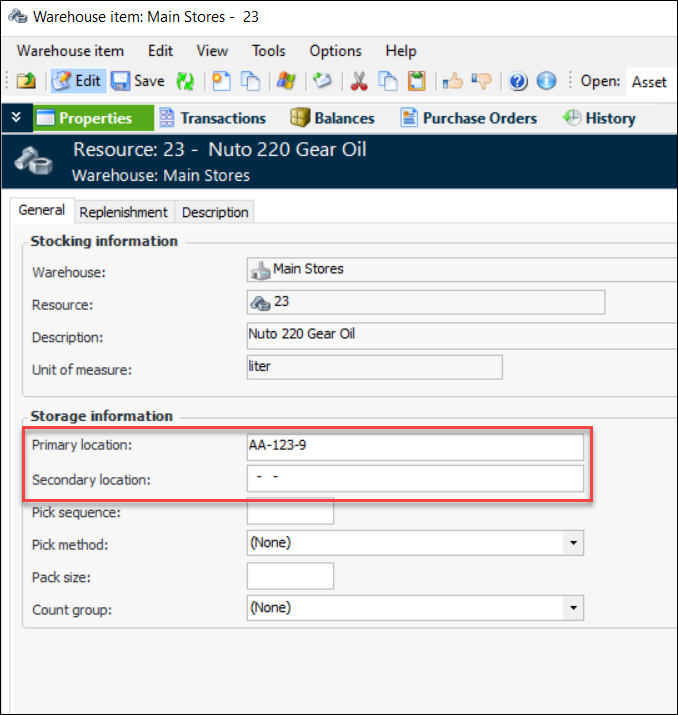
An option on the checksheet status controls whether the Fluid Sample tab is initially displayed on indicator readings. If the option is selected, the user can update the fluid sample information before selecting the indicator state.The Fluid Sample tab is displayed, whether the option is selected or not, once a state has been selected for the reading.To update Checksheet Status, select the Inspection Management view, Settings tab. Select the Checksheets and Checksheet Statuses tabs. Open the Checksheet Status window and click Edit. The option is on the Details tab:Inventory – Warehouse – Storage Location Formatting
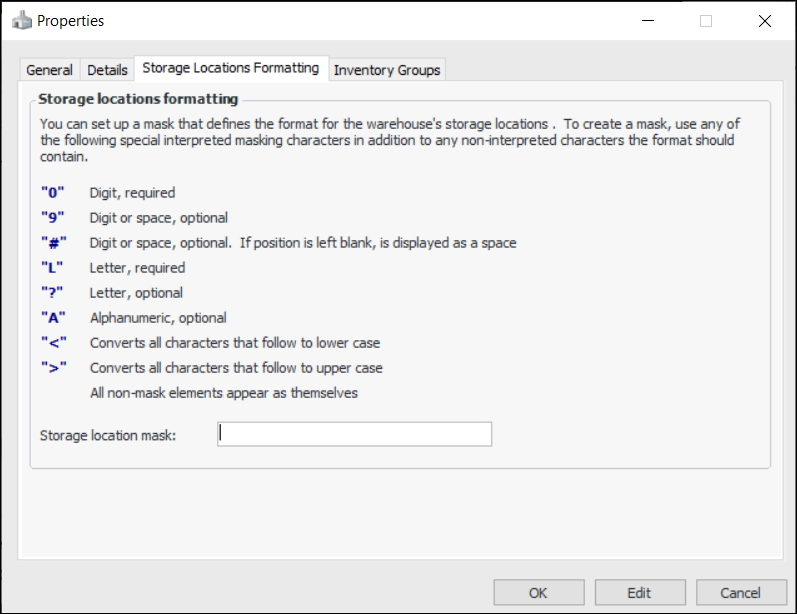
You can now define formatting rules for the names of warehouse storage locations. In the warehouse Properties dialog, select the Storage Locations Formatting tab to set up a mask:Performance and Stability Improvements
Server and Client Management
Thick Client Deployment
When downloading the APM Thick Client Install from the Server Manager Downloads page, you are now required to log in first. You can log in using CONNECT Client or Windows credentials, but your APM user must have the APM server manager option selected.Basic Windows Authentication
For more information, see APM Upgrade Guide.Digitally-Signed Client Packages
Strategy Development Analysis
MTA2 – Reliability Online Content Library
Risk-Based Inspection Analysis – Calculations
Tip: You can also download the APM Risk-based Inspection Analysis Guide (PDF) from the User’s Guides page in Bentley Communities.Supported Database Software
For more information, see APM Upgrade Guide.Work Management
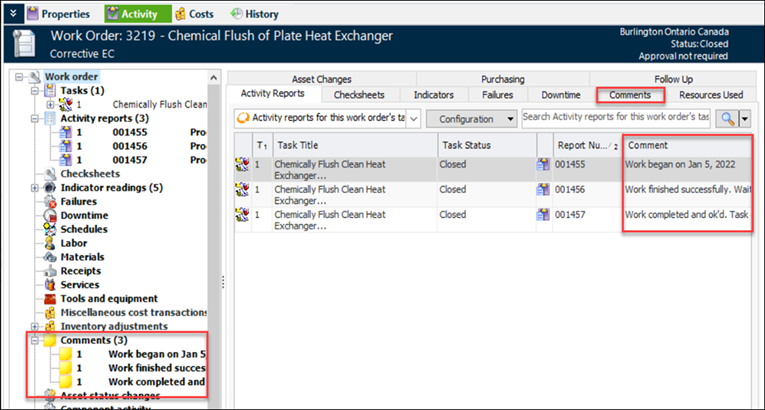
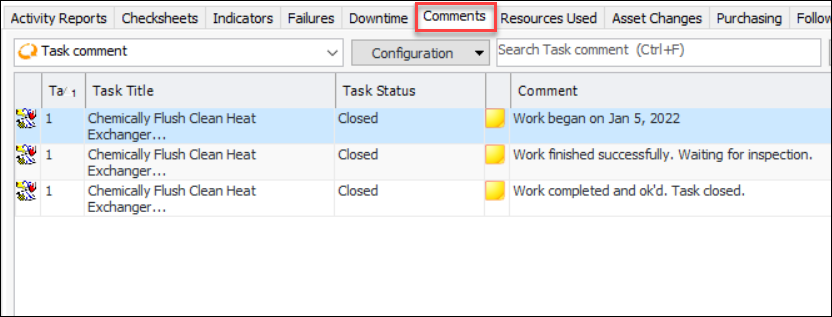
Activity report comments are now displayed in the work order’s Activity view. For example:In the Work Order window, Activity view, comments are displayed under the Comments node in the Work Order tree and in the Comment column in the Activity Reports tab.