|
|
What’s New in APM 7.13
Contents
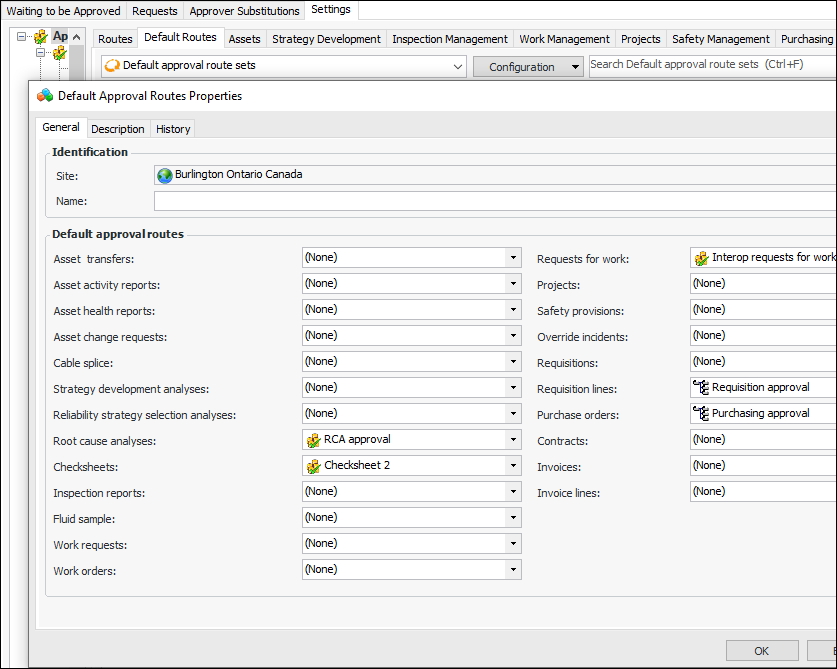
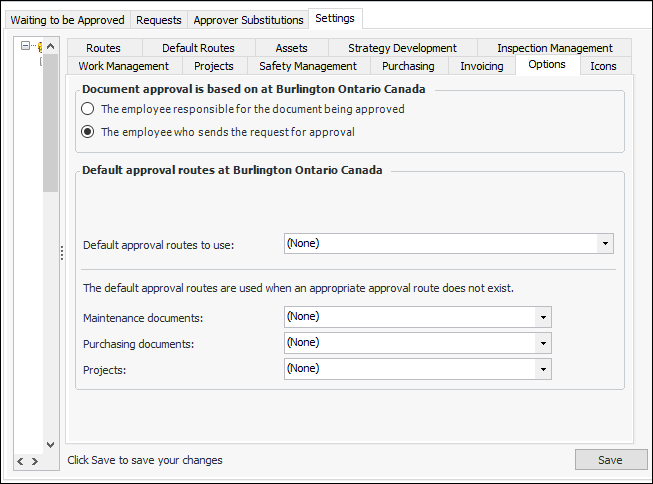
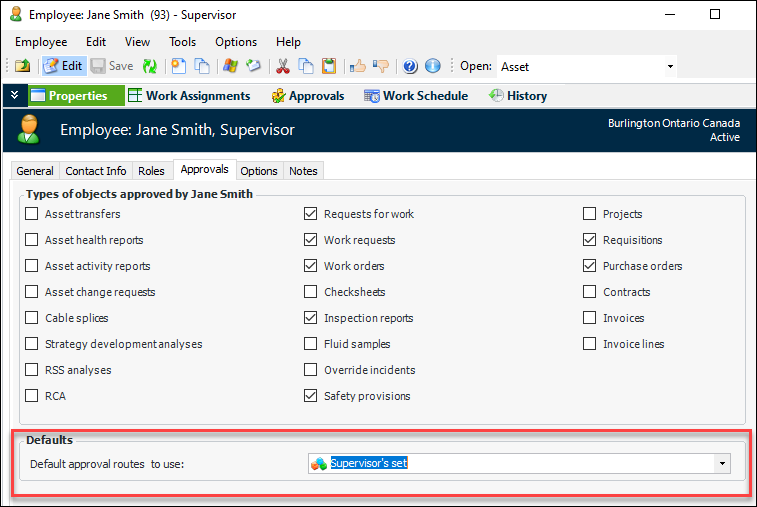
Approvals – Default Approval Routes
Note: This functionality is available as a Technology Preview. To use it in APM, you must first enable feature 57. In the Enterprise window, select the Features view and the Enabled Features tab. Click Browse, select “Default approval route support”, and click OK. If APM is running as a smart client, click Refresh Enabled Features on the server. Then restart the client to use the functionality.Set up one or more default route sets – A route set identifies default routes for one or more document types that require approval at the site. In the Site window, select the Approvals view, Settings tab, and Default Routes tab. Click New to open the Default Approval Routes Properties dialog. For example:Select site-level default routes – You can select a default route set for the site and a default route for each of maintenance, purchasing, and project documents. In the Approvals view, select the Settings tab and then the Options tab. For example:Assign approval route sets to employees – Besides identifying the types of objects that an employee approves, you can select a default route set. Open the Employee window, select the Properties tab and the Approvals tab. For example:Asset Management
Asset Regulatory Information
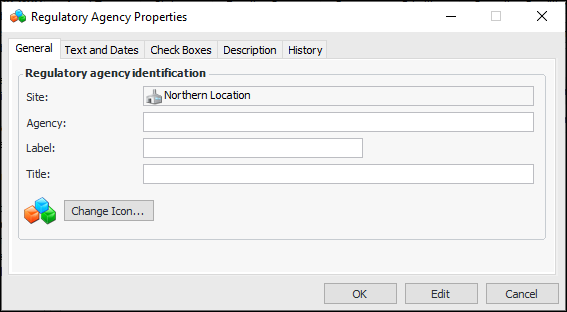
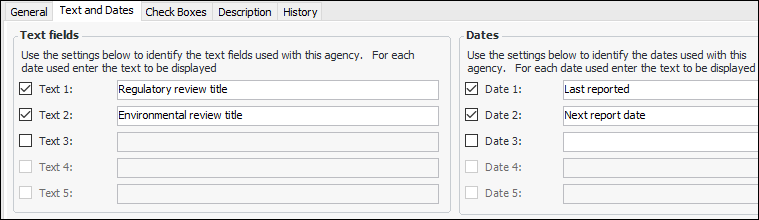
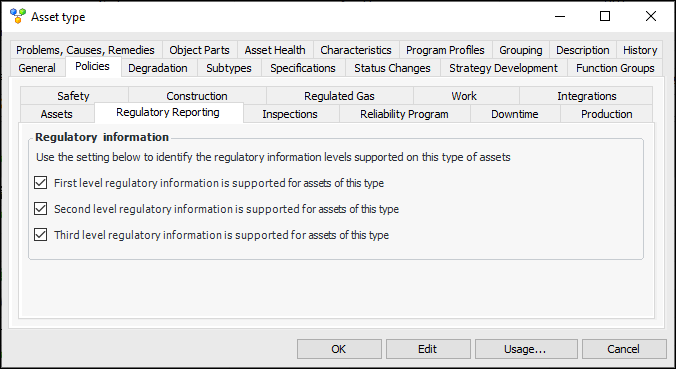
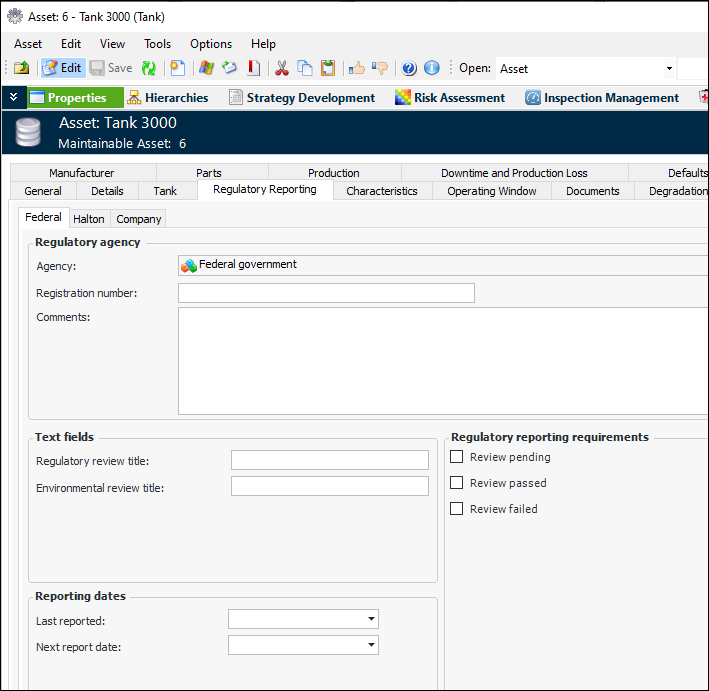
Note: This functionality is available as a Technology Preview. To use it in APM, you must first enable feature 61. In the Enterprise window, select the Features view and the Enabled Features tab. Click Browse, select “Regulatory reporting tracking support on assets”, and click OK. If APM is running as a smart client, click Refresh Enabled Features on the server. Then restart the client to use the functionality.Setting up regulatory information reporting on assets involves defining as many as three levels of regulatory agency. In the Site window, Assets view, select the Settings and Asset tabs and then the Regulatory Reporting tab. Click New to open the Regulatory Agency Properties dialog:Select the Text and Dates tab and the Check Boxes tabs to identity the information to be collected on assets. For example:For the current site, you can specify the levels of reporting and agencies appropriate for the site.When regulatory agencies have been defined, you can then assign them to asset types. In the Asset Type window, select the Policies tab and then the Regulatory Reporting tab.For assets of that type, the Asset window displays the Regulatory Reporting tab, which contains tabs for each of the agencies supported for the site and the asset. The text fields, check boxes, and dates that you set up on the regulatory agency are available. For example:On the Site window, Assets view, the Regulatory Reporting tab contains tabs for each of the levels defined for the site. Assets with regulatory information are listed in the tables.Asset Properties Displayed on Selected Objects
On asset types, you can specify which objects display asset properties and the panel to use. An Asset Properties view is added to the Checksheet window or an Asset Properties tab is added to the Indicator Reading and Request for Work windows for assets if their asset type supports displaying asset properties.Note: This functionality is available as a Technology Preview. To use it in APM, you must first enable feature 65. In the Enterprise window, select the Features view and the Enabled Features tab. Click Browse, select “Display asset properties on selected objects”, and click OK. If APM is running as a smart client, click Refresh Enabled Features on the server. Then restart the client to use the functionality.Assets Table Configurations
Table configurations in the Site window, Assets view have been reorganized to be easier to access:
AWEIS – Restrict Work Priorities on Requests for Work
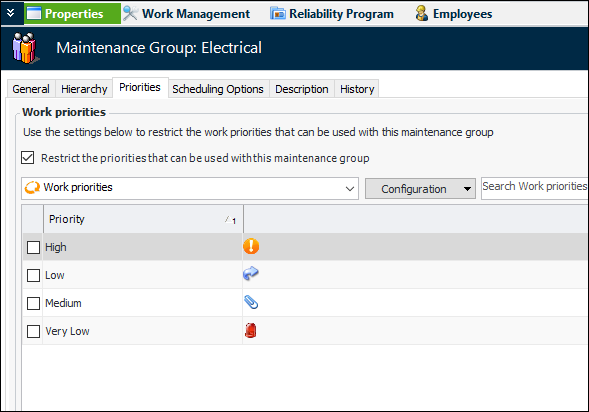
To set this up, select the new Priorities tab in the Maintenance Group window. Select the option to restrict priorities and choose the work priorities that will be available for the maintenance group. For example:Note: This functionality is available as a Technology Preview. To use it in APM, you must first enable feature 64. In the Enterprise window, select the Features view and the Enabled Features tab. Click Browse, select “Ability to restrict the priorities that can be used on a work request based on the maintenance group”, and click OK. If APM is running as a smart client, click Refresh Enabled Features on the server. Then restart the client to use the functionality.Construction Management
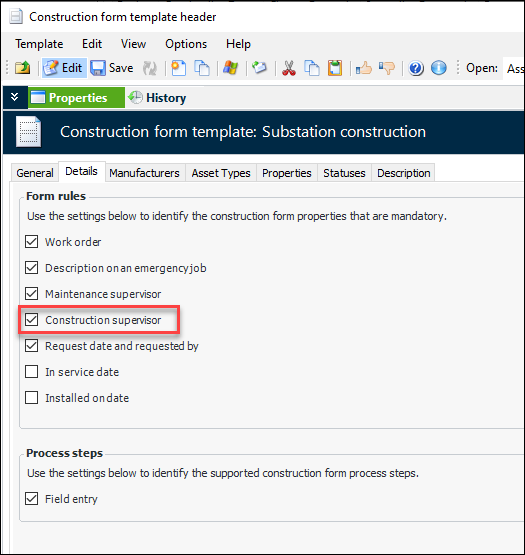
Construction Supervisor Mandatory on Construction Forms
You can now make it mandatory for users to identify the Construction supervisor on construction forms. In the Construction Form Template Header window, select the Details tab and then Construction supervisor. For example:Asset Specification Panels
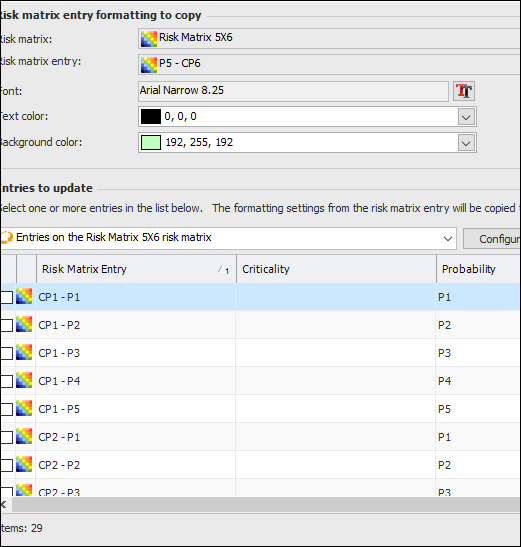
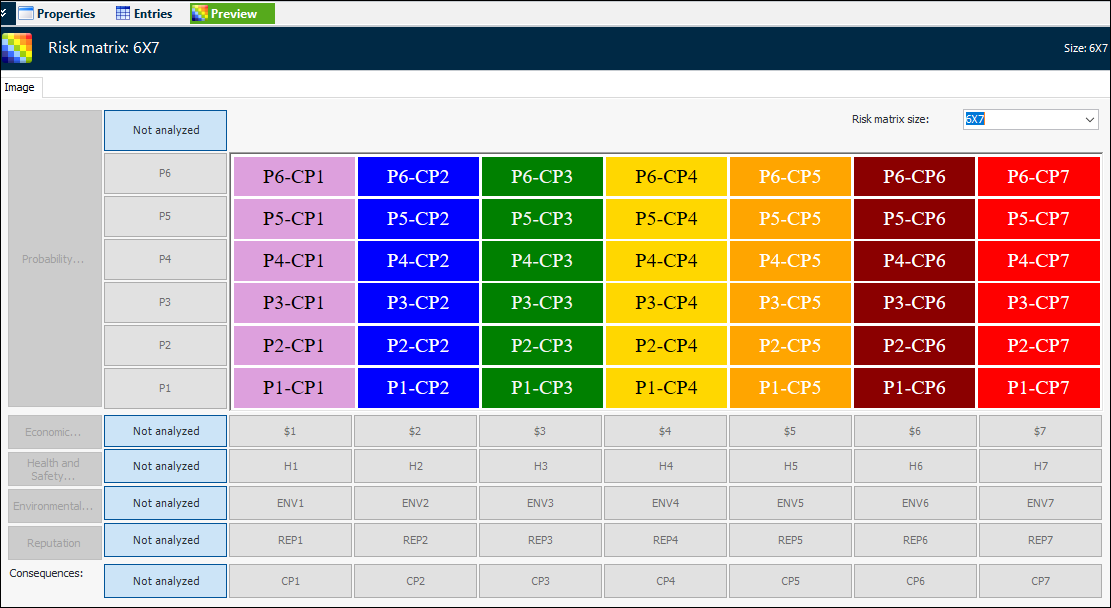
Strategy Development – Risk Matrix Sizes
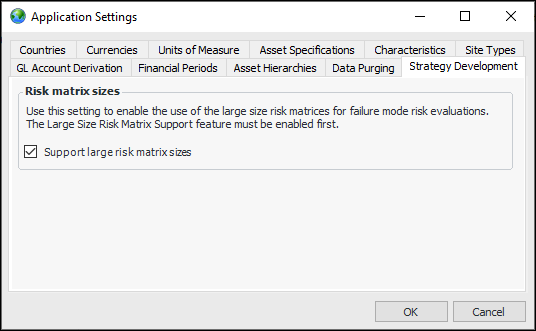
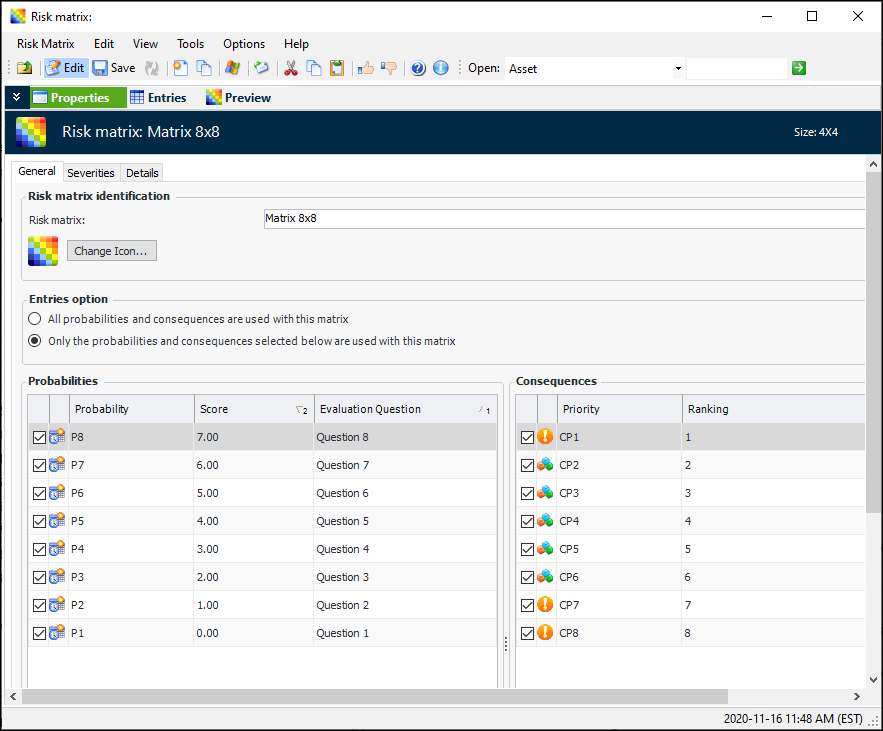
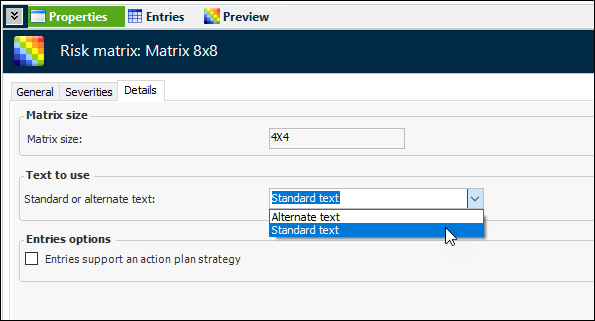
Note: To use this functionality in APM, you must first enable feature 47. In the Enterprise window, select the Features view and the Enabled Features tab. Click Browse, select “Support large risk matrices”, and click OK. If APM is running as a smart client, click Refresh Enabled Features on the server. Then restart the client to use the functionality.Set an option at the enterprise level that allows you to create larger matrices. In the Enterprise window, click the Administration menu and Application Settings to open the Application Settings dialog. Select the Strategy Development tab and click Support large risk matrix sizes. For example:When creating a risk matrix, you will notice that the Risk Matrix window has been redesigned. The window now offers three views: Properties, Entries, and Preview.In the Properties view, you can use the General and Severity tabs to view and select from all of the site’s probabilities, consequences, and severities. This example shows the General tab:Due to the expansion of matrix elements, it is no longer possible to support different text (standard or alternate) on probability and severity entries. Now the selected option applies to both probability and severity entries. The Text to use option is located on the Details tab:When you are ready, select the Entries view and click Generate Entries. The size of the risk matrix is determined by the number of probabilities and consequences selected. So, if six probabilities and seven consequences are selected, the matrix size will be 6x7. The matrix size is displayed in the window banner and on the Settings tab.If you wish to change any of the settings, select the Settings tab and click Edit settings. The risk matrix size becomes editable, as well as the tabs listing the probabilities, consequences, and the four types of severities. You can click an item to open its window and change its properties.The next step is to open each of the items on the Entries tab and select properties. To make the task easier, you can now copy the formatting (font, text color, and background color) from one entry to others. Right-click an entry and click Copy Formatting. The Copy Risk Matrix Entry Formatting dialog opens, where you can adjust the settings and select the target entries. For example:The list of entries is not limited to the entries on the current matrix, so you can change other matrices at the same time. When you click OK, the formatting is copied and the dialog closes. Select the Preview view to see the results.The new Preview view displays the resulting matrix. This example shows a 6x7 matrix: