What’s New in APM 7.12.1

Many of the enhancements made to AssetWise Performance Management (APM) in release 7.12.1 pertain to APM when AssetWise Enterprise Interoperability (AWEIS) has been implemented to exchange data with an external CMMS. This release also introduces online data collection from PI Asset Framework databases and a more flexible workflow for checksheets, including the ability to send checksheets for approval from APM Remote.

Contents

Asset Management – APM-only Assets with AWEIS
Failure Tracking with AWEIS
Inspection Management – Checksheet Workflow
Inspection Management – Checksheet Approval on APM Remote
Norwegian Language Support
Online Data Collection (ODC)
Performance Management – Overlapping Downtime Incidents
Personnel Management with AWEIS
Root Cause Analysis (RCA) with AWEIS
Strategy Development with AWEIS
Work Management

Asset Management – APM-only Assets with AWEIS

This release introduces support for APM-only assets when AssetWise Enterprise Interoperability (AWEIS) has been implemented. An APM-only asset is one that was created in APM and does not have a corresponding asset in the CMMS (for example, SAP® or Maximo®).
Note: Objects that originate in the CMMS are described as “interop” objects (for example, “interop asset”) in APM documentation.
All standard APM functions can be performed on APM-only assets, including:
You can assign APM-only assets to requests for work. However, the APM-only asset must be a child of an interop asset (an asset with a corresponding CMMS asset). When the request for work is submitted, APM first determines whether the asset originated in the CMMS or in APM. For an APM-only asset, the system traverses up the asset hierarchy until it finds an interop asset, which is then referenced by the request (this is the asset that is updated in the CMMS).
If APM cannot find an ancestor interop asset, it returns an error message explaining why the request for work cannot be submitted.
Tip: You can see which of the assets on a site originate in the CMMS and which are APM-only by adding the “AssetWise Interoperability Active” column to a table configuration that lists assets.

Failure Tracking with AWEIS

Failure Records Created from Alarm Acknowledgments

When you acknowledge an indicator alarm with a request for work, one or more failure records can be created, based on the events identified on the request for work. In this example, two events have been added:
The damage code’s settings determine whether a failure is created whenever the damage code is identified on an event or only when the damage code is assigned to the event with the highest work priority.
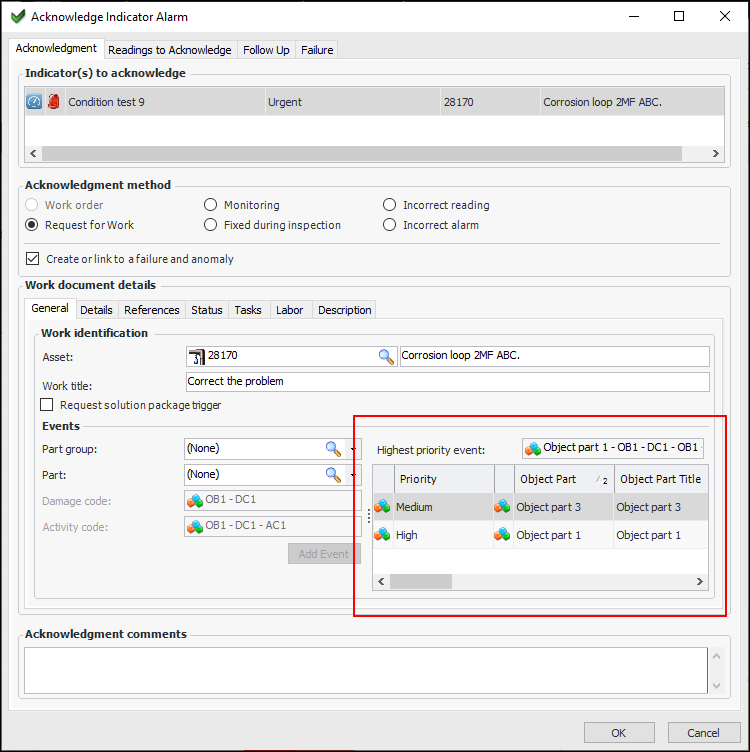
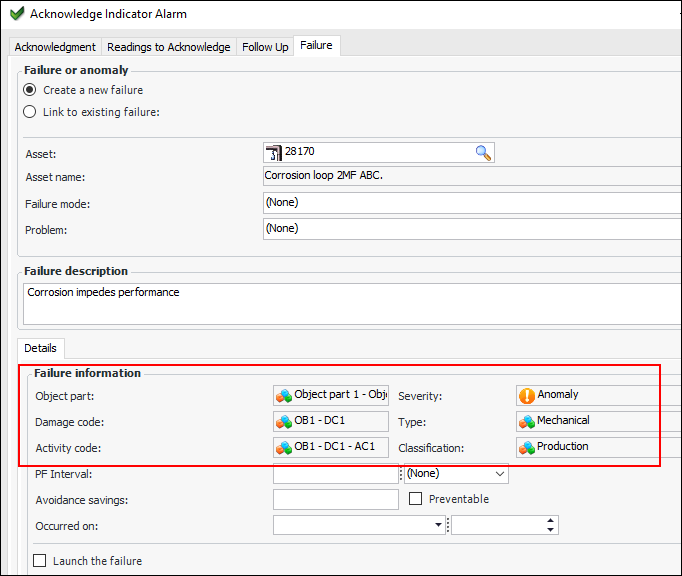
In the Acknowledge Indicator Alarm window, select the Failure tab to view information that is copied from work document details for the highest priority event. The object part, damage code, and activity code are copied from the event. The failure severity, type, and classification are copied from the damage code. For example:
When APM processes the acknowledgment, it creates the failure record and copies information to the failure from the acknowledgment. Similarly, the request for work records information about its source:
When two or more failures are created for an alarm acknowledgment, the event with the highest priority is designated as the primary failure. Failures for lower-level events are designated as secondary. If two events have the same priority, the first one that was added to the acknowledgment is primary.

CMMS Information on Failure Records

When AWEIS has been implemented, failures now record object part groups, object parts, damage codes, and activity codes. For example:
You can have APM create secondary failures based on the damage codes assigned to failures records. The default setting causes APM to create failures on all request events that reference the damage code. Alternatively, you can specify that a failure record be created only when the damage code is assigned to the highest priority event.
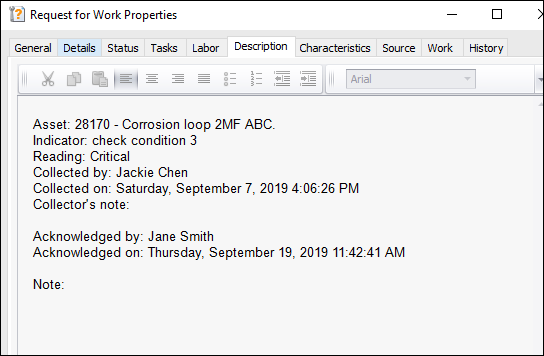
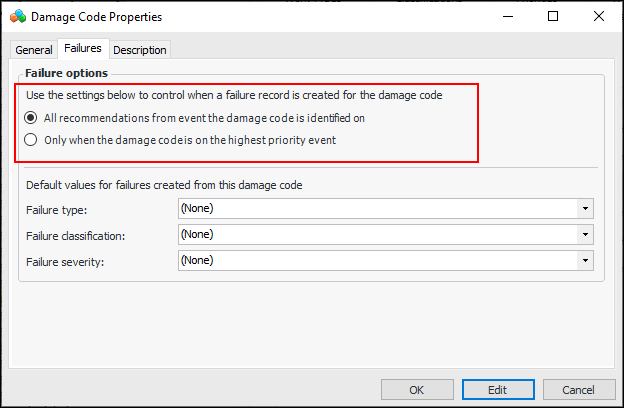
In work management settings, select the Interop tab, then the Object Parts tab and the Damage tab. Open the Damage Code Properties dialog and select the Failures tab to set options that specify when failures are created:
In damage code settings, you can also specify default values for failure type, failure classification, and severity for failures.
For example, when you acknowledge an indicator alarm with a request for work and create a failure record, you can select the part group, part, damage code, and activity code. The failure created from the acknowledgment displays the default values specified in the damage code settings.

Failure Modes Provide Failure Codes

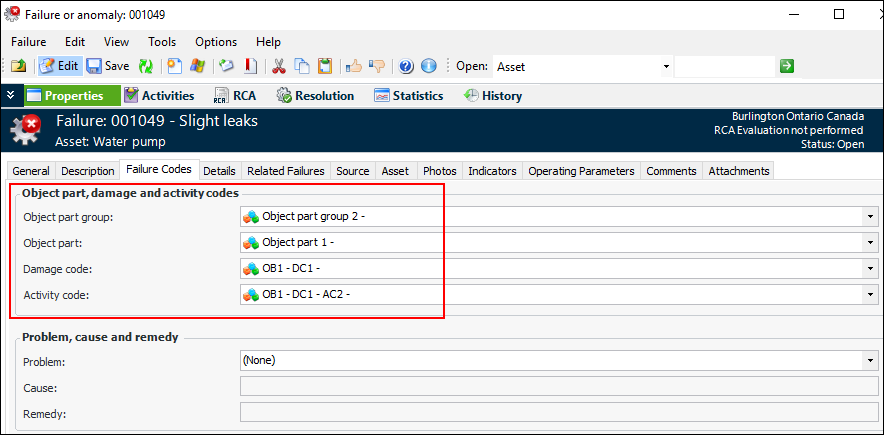
When a failure record references a failure mode, information from the failure mode is copied to the failure: object part group, object part, damage code, and activity code. In the Failure or Anomaly window, select the Properties view, Failure Codes tab to view the information.
However, if the failure record originates from an alarm acknowledgment and one or more events were identified on the acknowledgment request for work, failure codes are copied to the failure from the event’s damage code.

Inspection Management

Corrective Candidates on Indicators

In the Indicator window, Properties view, the Jobs and Tasks tab has been renamed Candidates. This tab lists corrective jobs (when AWEIS is not active) or solution packages and standard tasks associated with the indicator.

Requesting a Solution Package for an Indicator

When you acknowledge an indicator alarm with a work document or request follow-up work on a reading, the indicator’s candidate solution packages and standard tasks are available for defining the work document.
When you select a solution package, you can then select one of its cycles and set start and end dates for performing the corrective tasks.

Processing Checksheets for a Site

You can now process checksheets for the site either manually or automatically at scheduled intervals. The Process Ready Checksheets method is designed to process large numbers of checksheets, for example, those uploaded from APM Remote to be processed on enterprise.
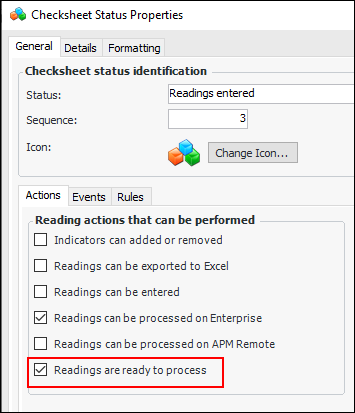
To support the function, the Readings are ready to process setting has been added to checksheet status properties:
When Process Ready Checksheets is triggered, it first identifies unprocessed checksheets with statuses that include “ready to process” and that have the approval status of “approved” or “approval not required”.
You can start the method from the Site window by clicking the Tools menu, Inspection Management, and then Process Checksheets. The progress dialog identifies the number of checksheets, which checksheet is currently being processed, and the number of checksheets that could not be processed due to errors. The dialog includes a Cancel button.
An error occurs if the minimum number of readings has not been entered or mandatory readings have not been taken for the checksheet. The method creates an error object for that checksheet and then continues on to the next checksheet. You can view checksheet errors in the Checksheet window, History view, Processing Errors tab.
You can define the Process Ready Checksheets scheduled action to automatically trigger the method at regular intervals. For more information, see Actions That Can Be Scheduled.

Inspection Management – Checksheet Workflow

The workflow for checksheets has been enhanced in the following ways.

Checksheet Type – Available Approval Routes

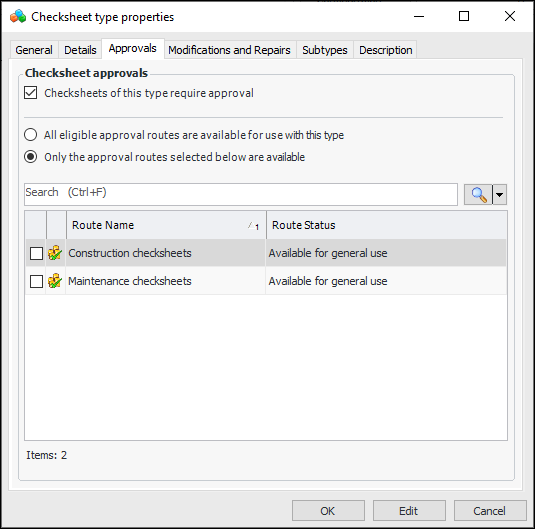
You can define the available approval routes by checksheet type. This allows separate routes to be defined for maintenance and construction inspections, for example. On the Checksheet Type properties dialog, select the new Approvals tab to choose the approval routes for this type:

Checksheet Type – Available Statuses

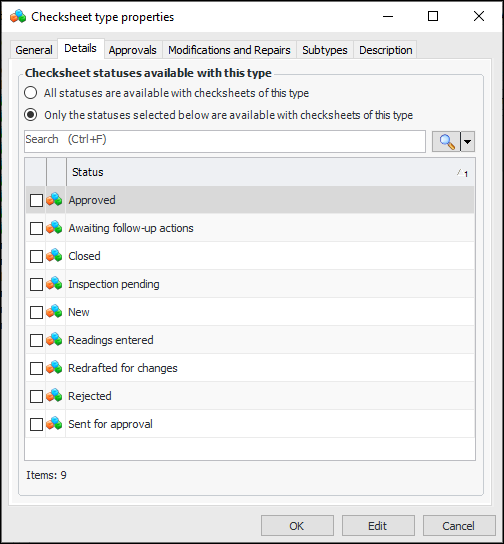
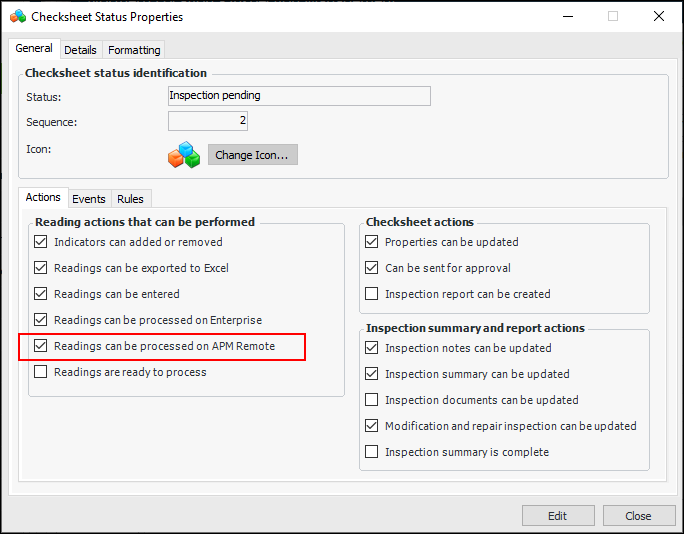
You can define the available checksheet statuses by checksheet type. This allows statuses that are specific to either maintenance or construction inspections, for example. On the Checksheet Type properties dialog, select the new Details tab to choose the statuses that can be used with this type:

Checksheet Status – Readings Processed on APM Remote

The Readings can be processed on APM Remote option has been added to the checksheet status so that you can specify whether or not checksheets with the status can be processed on the remote client. You will also notice that the streamlined Checksheet Status properties dialog is now easier to use.
Processing checksheets that were completed in APM Remote after they have been uploaded to Enterprise improves performance on client computers.

Checksheet Status – Next Available Statuses

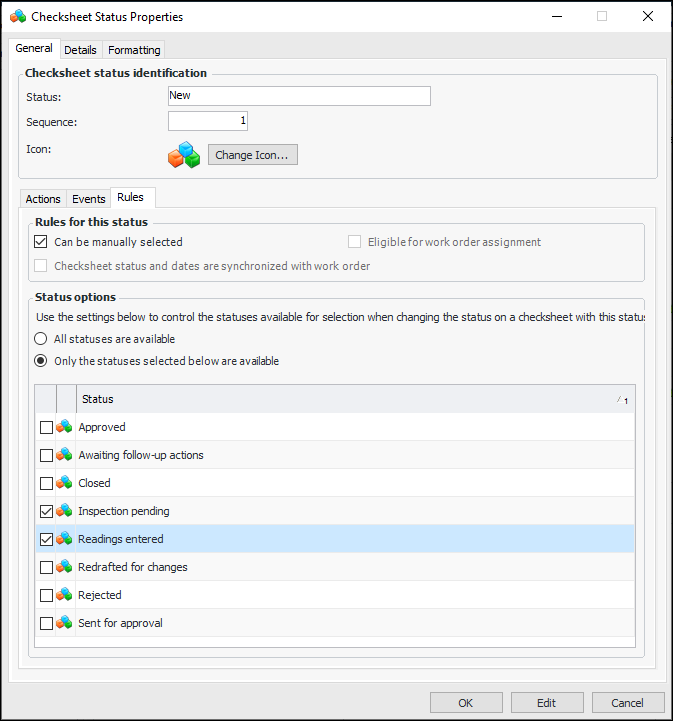
When setting up checksheet statuses, you can identify the available next statuses. This means that when a user changes the status on a checksheet, only the available next statuses can be selected. In the Checksheet Status properties dialog, select the General tab and then the new Rules tab to choose the statuses:

Employee Permission Groups – Checksheet Status

You can control the checksheet statuses an employee can select, as well as determine when an employee can change the status. For example, inspectors might not be allowed to change the status on an approved checksheet or to select the “Approved” status. Employee permission group functionality has been expanded to support checksheet controls. For example:

Inspection Management – Checksheet Approval on APM Remote

The checksheet approval process is designed for supervisors tasked with ensuring that construction or maintenance work has been completed. After the work is done, a number of inspections are performed and recorded as readings. These readings are reviewed by the appropriate supervisor(s). A supervisor can either approve the work (at which point the readings are processed) or return the checksheet to the crew for more information or rework.
Data structures and download packages have been updated to include approval routes for checksheets and to support checksheet approvals on APM Remote. Approvers and approval requests are now supported by APM Remote. This means that APM Remote users can flag a checksheet to be sent for approval and select the approval route. When the checksheet is uploaded to enterprise, the checksheet is available to approvers.
If the checksheet is approved, it is then processed. If the checksheet is rejected, it is included in the next download to APM Remote, where the user can correct and resubmit it. Users can also redraft checksheets from APM Remote.
Employee email addresses are now downloaded to APM Remote so that emails can be sent to approvers.

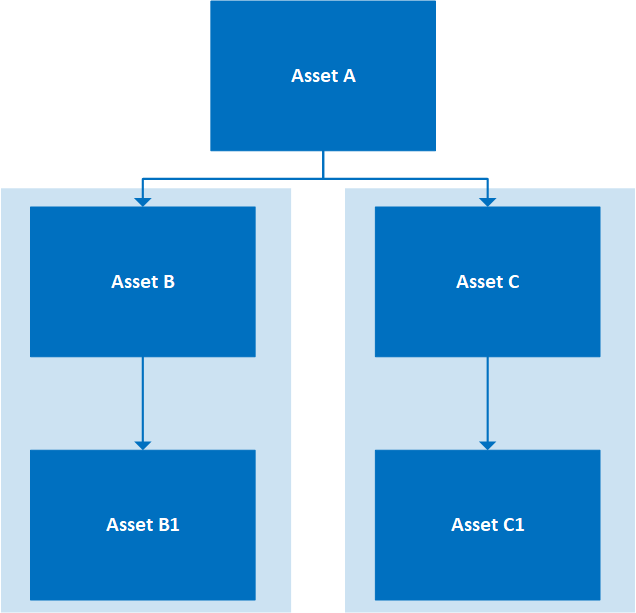
Approval Routes – Include Assets that Span the Hierarchy

When you define approval routes for use in APM and APM Remote, be sure to add assets that reflect the hierarchy. Consider the following example.
For this approval route to work on enterprise and both remote devices, the route must include Asset A, Asset B, and Asset C.

Norwegian Language Support

With this release, the user interfaces for APM, APM Remote, and APM Mobile Inspections support the Norwegian language. APM Mobile Count Sheets will include Norwegian in its next release.

Online Data Collection (ODC)

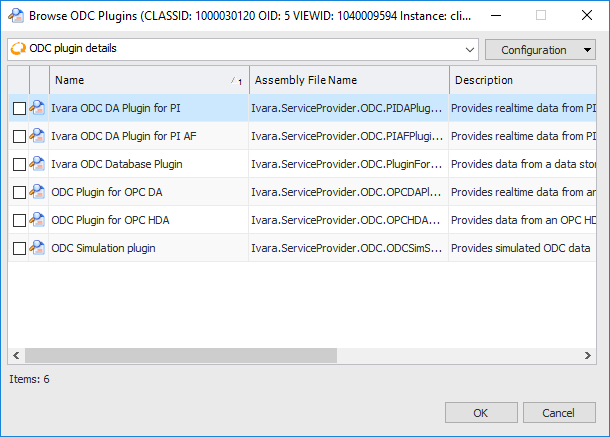
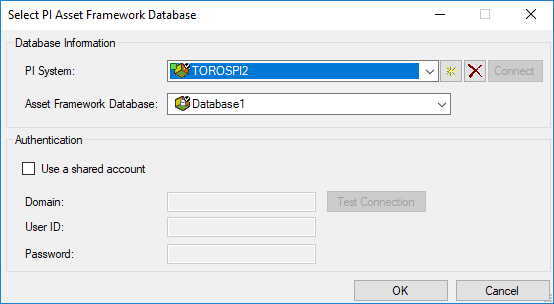
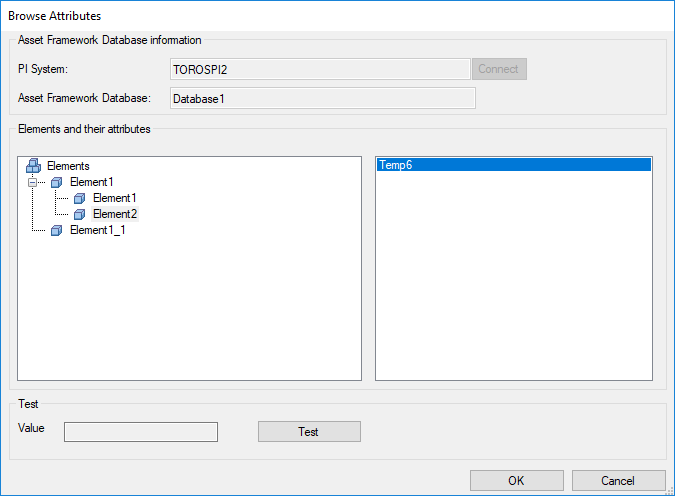
The new ODC DA plugin for OSIsoft® PI Asset Framework allows you to collect data from a PI AF database. This is in addition to the ODC DA plugin for PI, which provides access to PI as a data source.
Using the plugin, select the ODC data source for the PI AF database. For example:
When configuring indicators to collect online data, you can connect to the PI system and asset framework database. Then map the indicator to the appropriate element attribute. For example:
Once you have configured the polling schedule and created a reading request, be sure to restart the server to check that the reading is pulled from the database.

Performance Management – Overlapping Downtime Incidents

Downtime settings now provide an option to support overlapping incidents. When the option is enabled, one asset can have two or more downtime incidents at the same time. This is handy, for example, when an asset produces more than one product and one production line closes down before another.
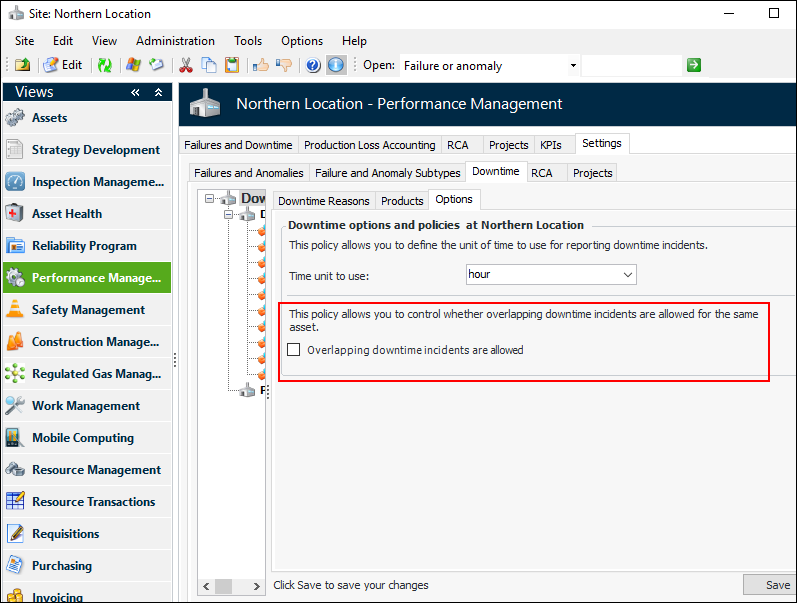
To enable the option, select the site’s Performance Management view, Settings tab, Downtime tab, and Options tab. Click Edit to change the site settings.
Select Overlapping downtime incidents are allowed and click Save.

Personnel Management with AWEIS

When AWEIS has been implemented to exchange data with an external CMMS, the CMMS is the master system where employees and maintenance groups are created and maintained. For example, when an employee is created in the CMMS, AWEIS adds the record to APM with the following information:
For maintenance groups, the following information is provided:
Maintenance groups are always added to the top site.
Note: AWEIS must be active at the top site in APM to accommodate interop maintenance groups.
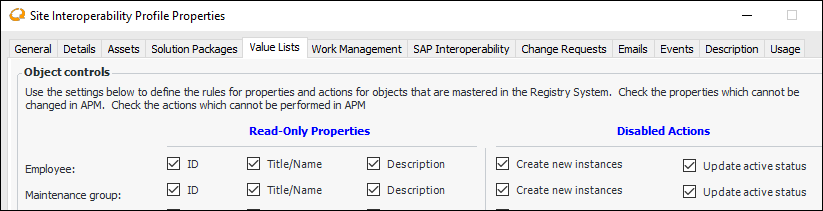
The site interoperability profile determines whether you can also create and update employees and maintenance groups in APM. In the Site Interoperability Profile dialog, select the new Value Lists tab to set these options.
Note: Only the Employee and Maintenance group settings are operational as of APM 7.12.1. The others settings on this tab will be enabled in a future release.

Root Cause Analysis (RCA) with AWEIS

When the site’s interoperability profile specifies that interop work management history is used, root cause analyses display the history of interop work orders and work requests. In the RCA window, select the Asset History view. The Work Orders and Work Requests tab list the interop documents.

Strategy Development with AWEIS

The following enhancements provide support for interop objects and information on strategy development analyses.

Failure Information on Failure Modes

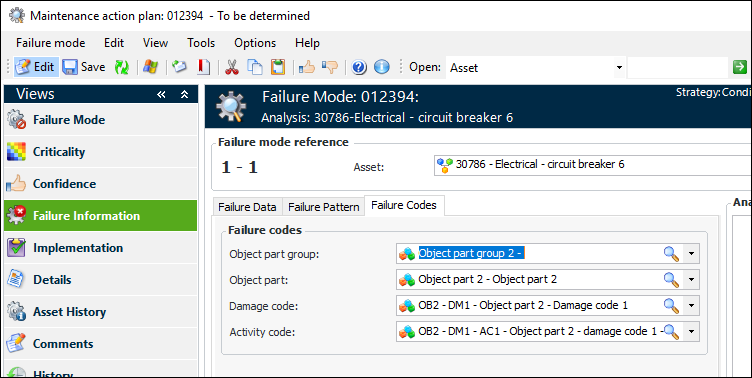
When AWEIS is active for the site, you can add object part group, object part, damage code, and activity code to failure modes. In the Maintenance Action Plan window, select the Failure Information view and the Failure Codes tab. For example:
When a failure record references the failure mode, information from the failure mode is copied to the failure. However, if the failure record originates from an alarm acknowledgment and one or more events were identified on the acknowledgment request for work, failure codes are copied to the failure from the event’s damage code.

Corrective and Proposed Tasks on Failure Modes

When the site’s interoperability profile specifies that interop work documents are used, you can add a corrective task in the form of a standard task or solution package and (optional) cycle to an action plan. Note that the analysis asset must already be associated with the solution package and cycle.
When performing feasibility analysis on a failure mode, you can assign an inspection task or solution package and cycle to a proposed task.

Work History on Failure Modes

When the site’s interoperability profile specifies that interop work management history is used, you can view interop work requests and interop work orders for the analysis assets. In the Maintenance Action Plan window, select the Asset History view and the Work Orders or Work Requests tab.
When performing failure mode risk evaluation, you can view interop work documents in the History tabs of evaluation forms.

Reliability Strategy Analyses

In the Asset History view in an analysis window, select the Work Requests and Work Orders tabs to view lists of interop work documents for the analysis asset.
You can view solution packages assigned to the analysis asset in the Reliability Program view, Solution Packages tab.

System and Implementation Information for Analyses

When the site’s interoperability profile specifies that interop work management history is used, you can view interop work requests and interop work orders for the primary analysis asset. Open a Strategy Development Analysis window, for example, an MTA2. Select the System Information view. The Work History tab displays Work Orders, Work Requests, and Summary tabs.
When the site’s interoperability profile specifies that interop reliability program is used, the System Information view displays solution packages and cycles for the primary analysis asset. Select the Reliability Program tab.
In the Strategy Development Analysis window, select the Implementation view and the Tasks tab to see any corrective standard tasks or solution packages assigned to the action plans.

Work Management

Follow-up Work with AWEIS

When AWEIS has been implemented, you can create requests for work or trigger solution packages when defining follow-up work for:
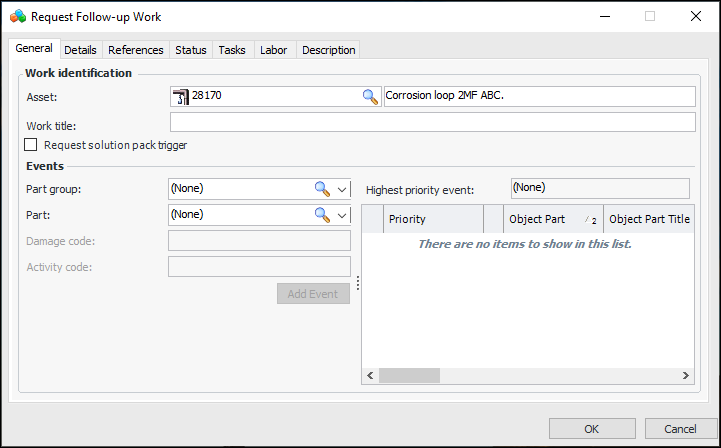
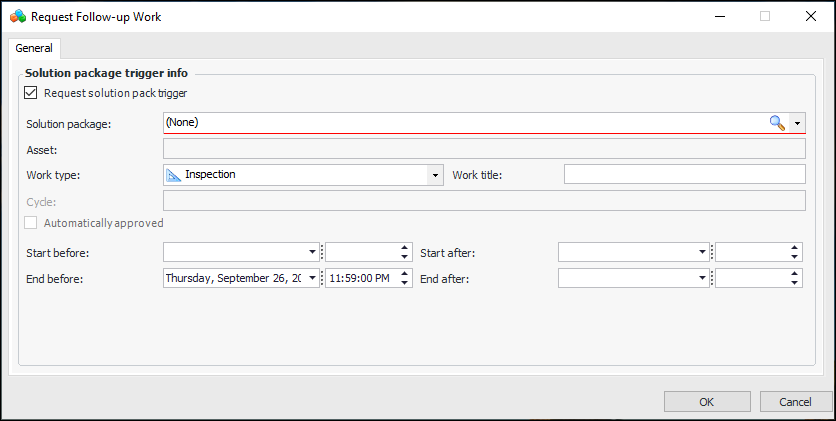
To create a request for work from an indicator reading, for example, right-click the reading in a list and click Request Follow-up Work. The Request Follow-up Work dialog appears:
Use this dialog to define a work title and add events. The tabs allow you to enter detail information, select secondary statuses, and add tasks, labor requirements, and a description.
Alternatively, you can select Request solution package trigger to identify a solution package, cycle, and triggering dates:
Solution packages associated with the asset are listed in the Solution package list.

Work Classification and Work Priority

The Work Priority and Work Classification relationships have been added to the Follow-up Work dialogs. For example, when the Request Follow-up Work dialog is opened from an indicator reading, the information appears for work request, work order, and request for work (when AWEIS is active). The same is true for the Report Activity on a Work Order dialog, Follow-up Work tab and the Review Activity and Close Task dialog, Follow-up Work tab.
Work Classification has also been added to the Acknowledge Indicator Alarm dialog. When the alarm is acknowledged with a work request, work order, or request for work, the Work document details area now contains the Work classification list.
In all cases, the values for these fields are defaulted with the asset’s work priority and classification, if available.

Default Work Types for Interop Work Documents

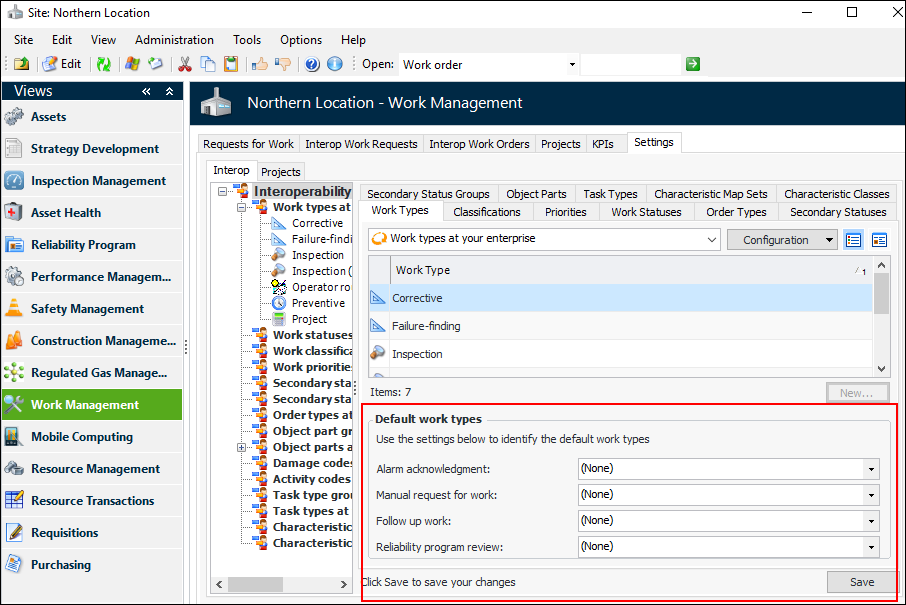
Requests for work can be created in several ways. For example, you can create them from scratch in the site’s Work Management view, from an indicator alarm acknowledgment, when defining follow-up work from a failure record, maintenance action plan, or safety override incident, or when reviewing a reliability program. Previously, there were two locations for setting default work types, but this release introduces one location for setting the site’s default work types for a variety of uses.
In the site’s Work Management view, select the Settings tab, Interop tab, and then the Work Types tab. Click Edit to modify the site settings.
Note that requests for work created from an indicator reading use the default selected in the Alarm acknowledgment list. Click Save when you are finished.