|
|
What’s New in APM 25.0.0
Contents
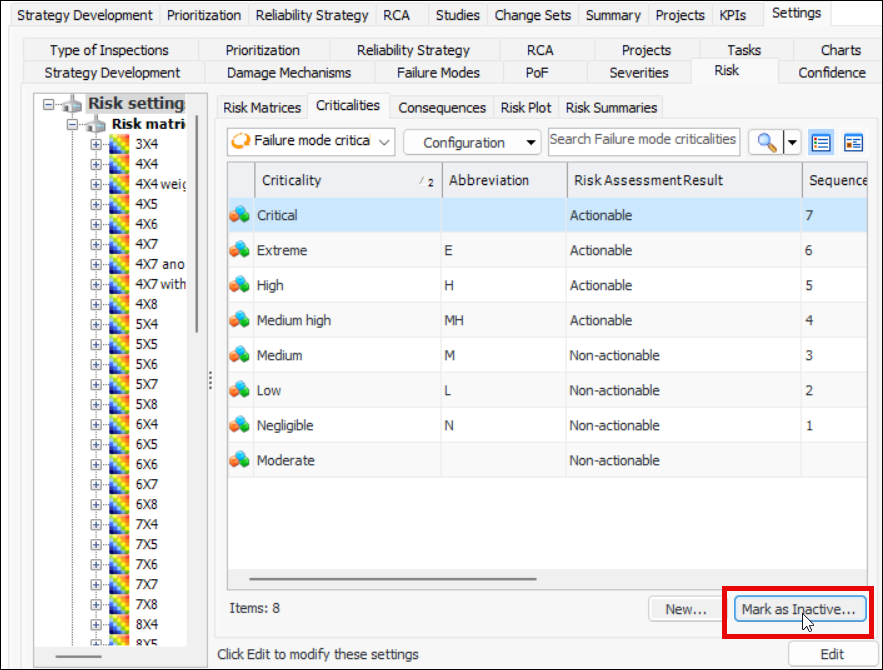
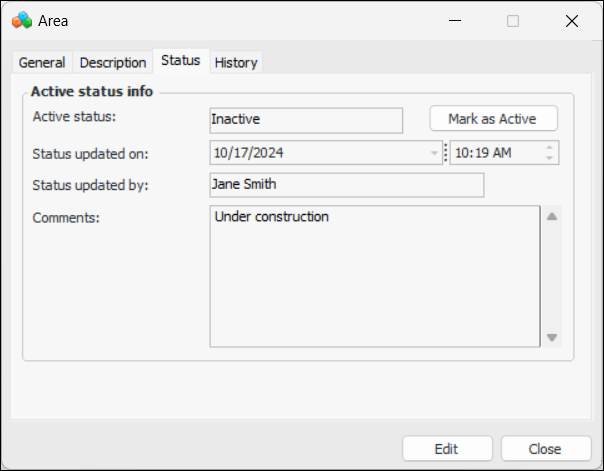
Active Status
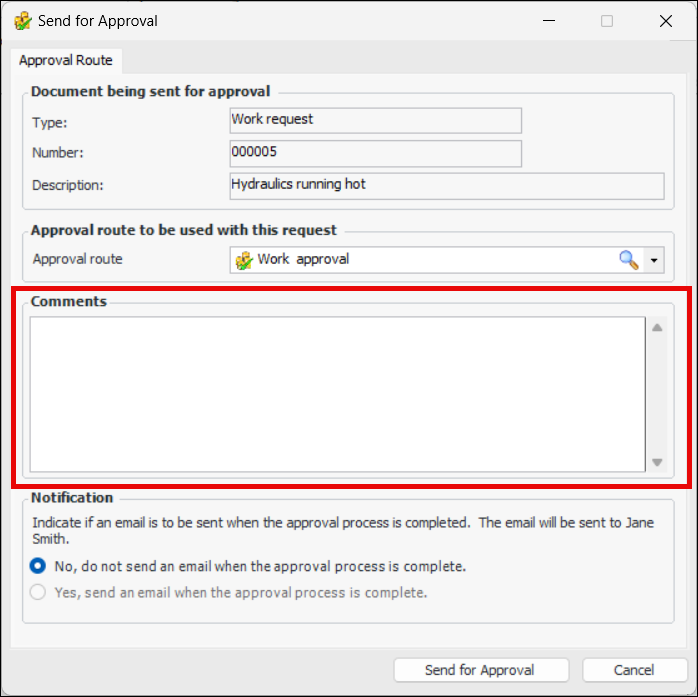
Approvals – Requester Comments
The requester comment is displayed in the Approval Request window, Request Info tab. Tables that list approval requests now contain columns showing requester comments.Assets
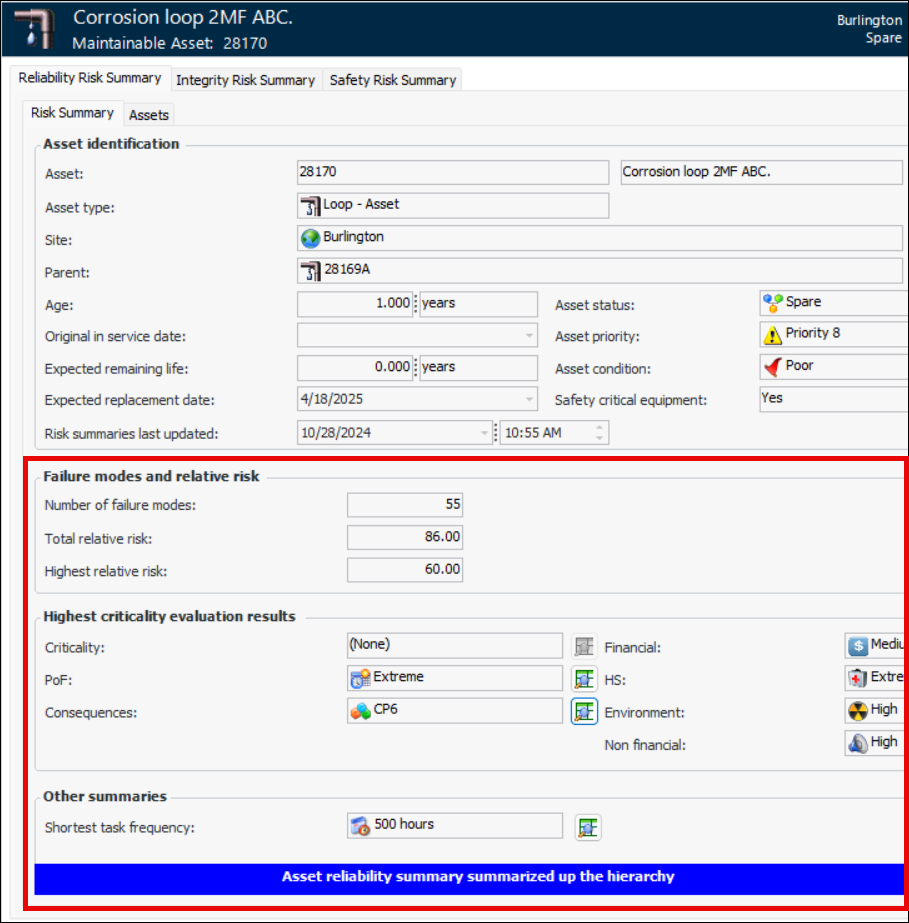
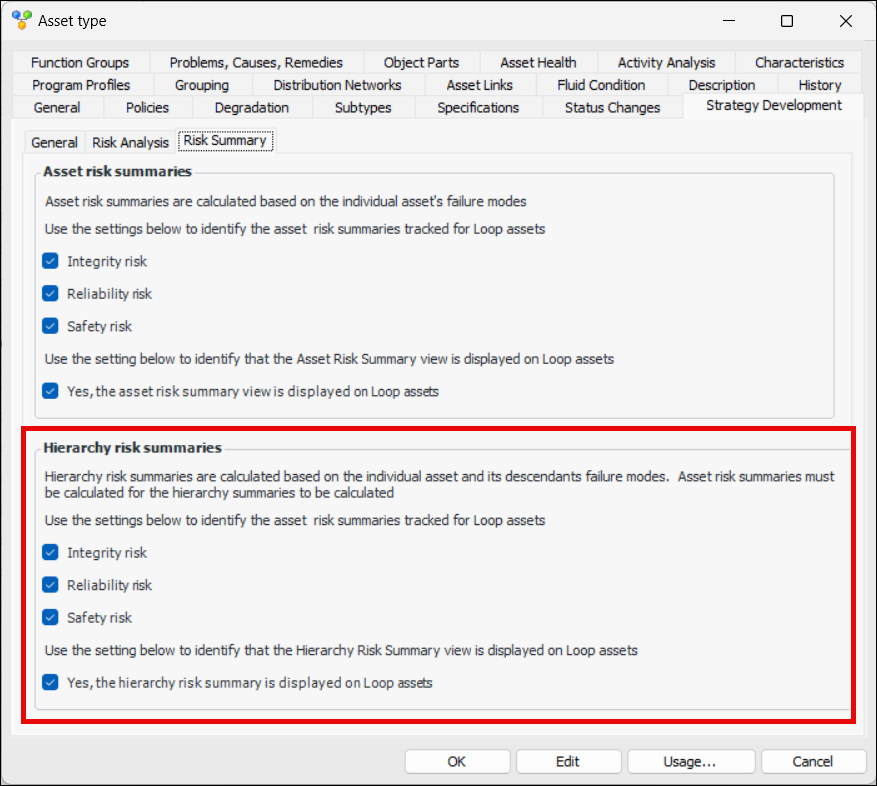
Asset Risk Summaries – Hierarchical Information
Expanding on the asset risk summaries introduced in APM 24.0.2, this release provides risk information summarized up the asset hierarchy. For example, in the Asset window, the Hierarchy Risk view, Reliability Risk Summary tab displays data from MTA2 and RCM2 analyses summarized for the current asset and its descendants:The Failure modes and relative risk area displays:
) to open a window listing the failure modes that have that value.
The Other summaries area displays the shortest task frequency on the summarized assets.The Hierarchy Risk view contains tabs for each of the supported risk assessments:
Risk Assessment and Asset Risk Views
In the Asset window, you will notice that risk information has been separated into two views: Risk Assessment and Asset Risk. The Risk Assessment view collects the Risk Assessment, Risk Matrix, Risk Plot, Criticality, and Summary Charts tabs for the asset. In previous releases, these tabs were on the Asset Risk view, which now contains only the Reliability Risk Summary, Integrity Risk Summary, and Safety Risk Summary tabs.Asset-Focused Overviews
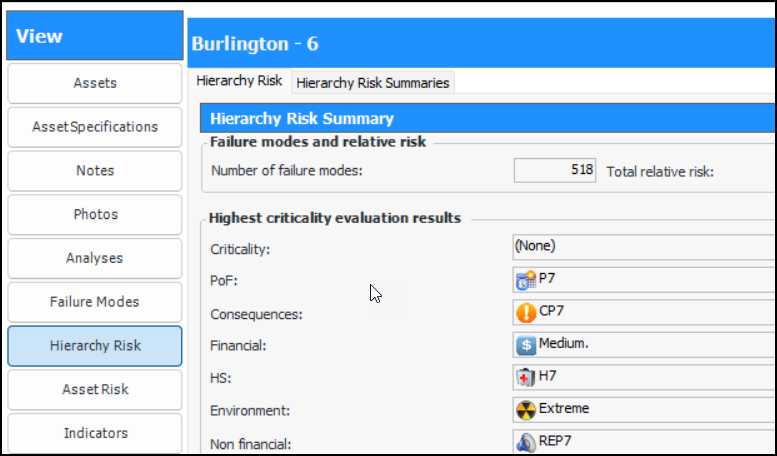
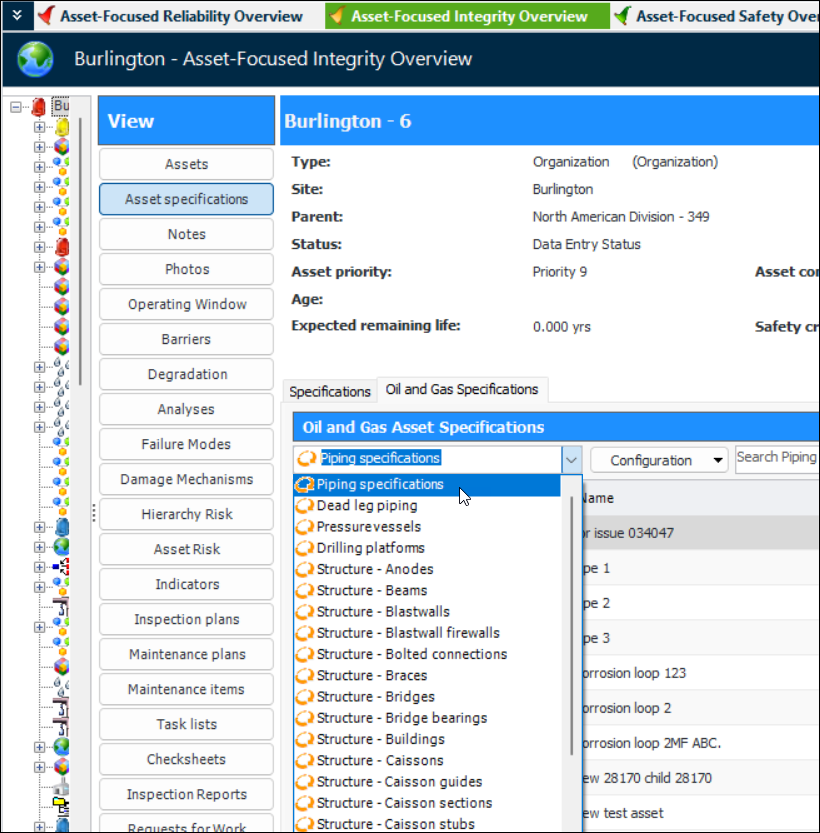
The reliability, integrity, and safety overviews in the Site window now incorporate summaries of risk information for the selected asset and its descendants. Select the Hierarchy Risk button in the View panel, for example:Asset-Focused Overviews – Additions
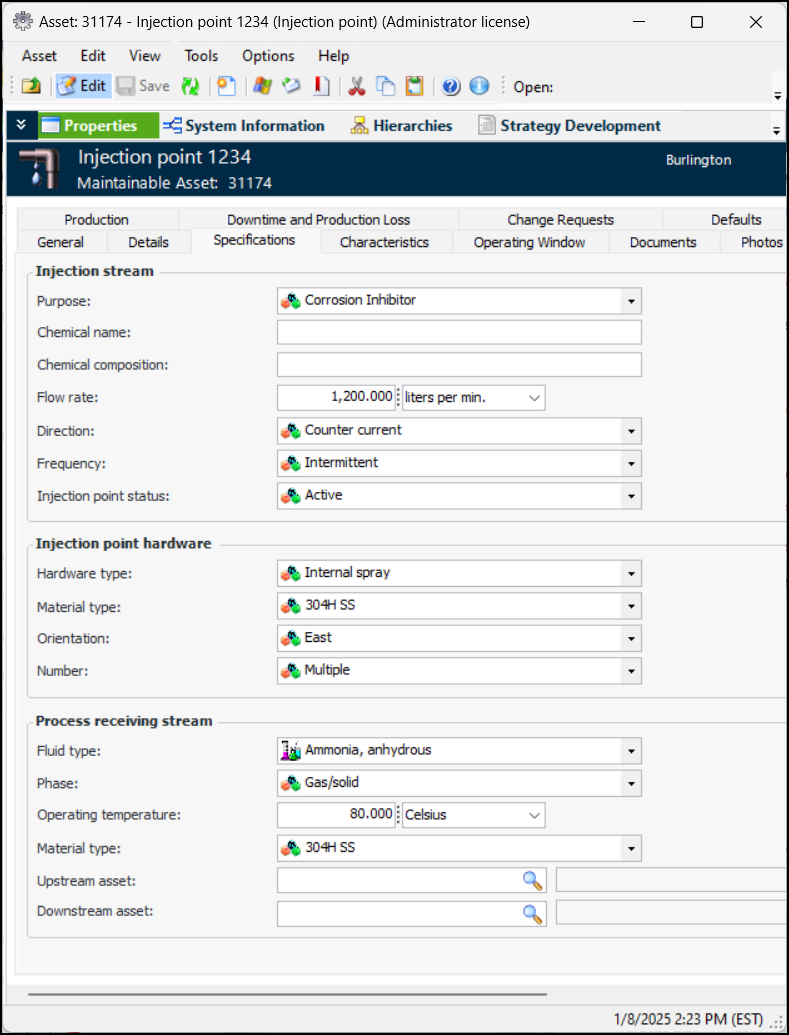
Injection Point Asset Specifications
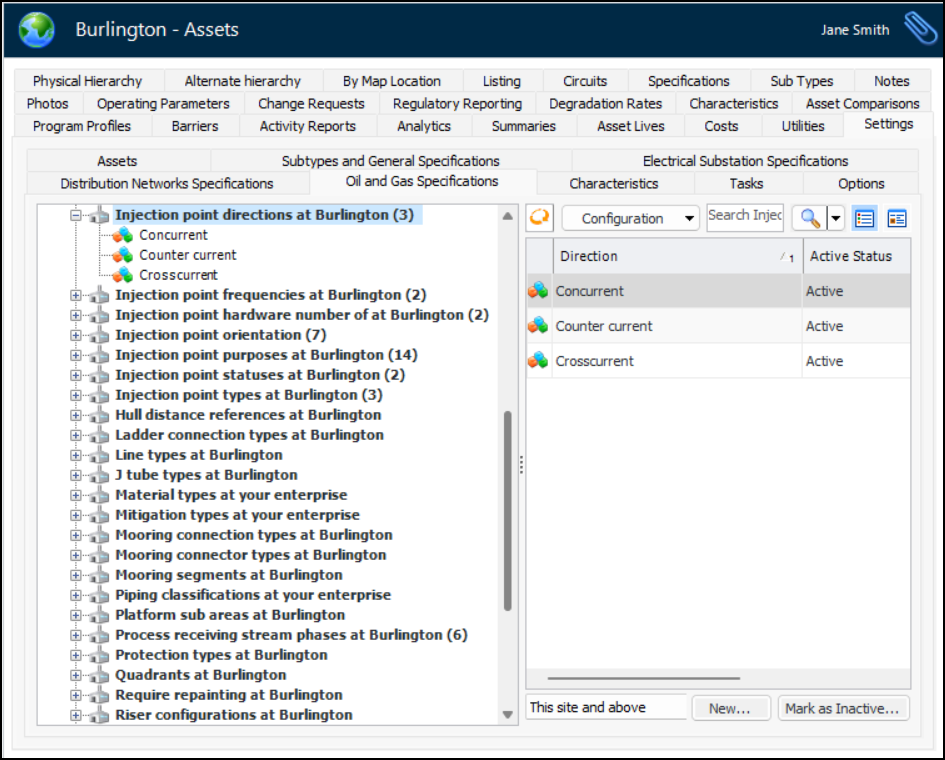
Asset specifications have been added to support injection point asset types. You can assign the new “Asset specifications - Oil and gas drilling platform - Injection point” panel to asset types. Each asset of the type displays the Specifications tab in its Properties view. For example:You can populate the value lists in specifications. In the Site window, select the Assets view, Settings tab, and Oil and Gas Specifications tab. Select an object in the tree to view the values in the right-hand pane. For example:Click New to add a value.Asset Specification and P&ID Documents
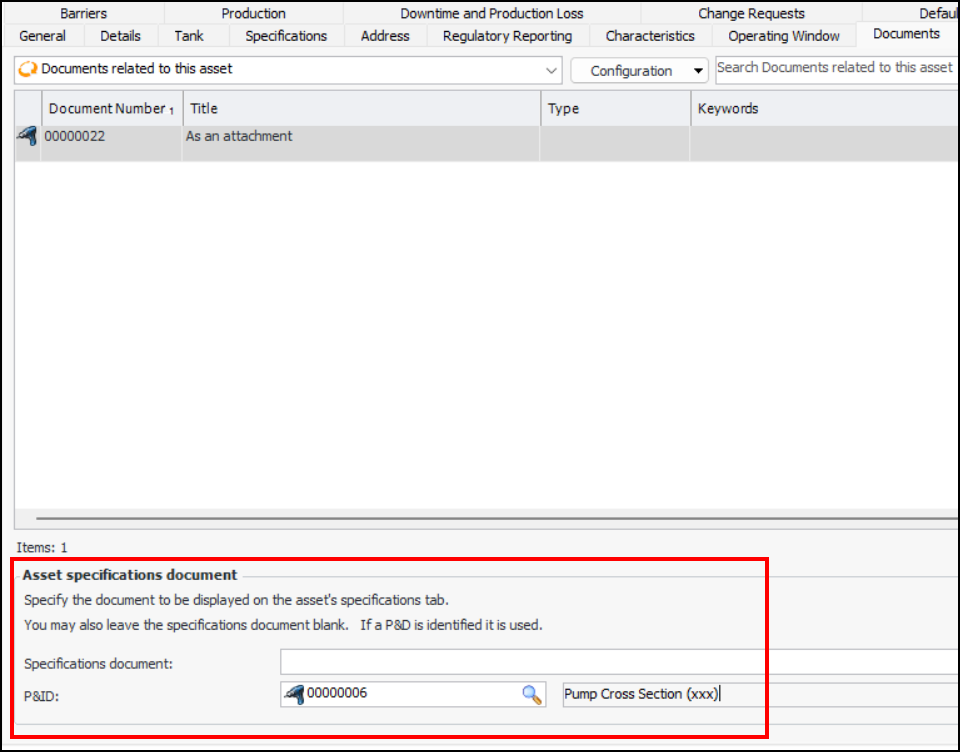
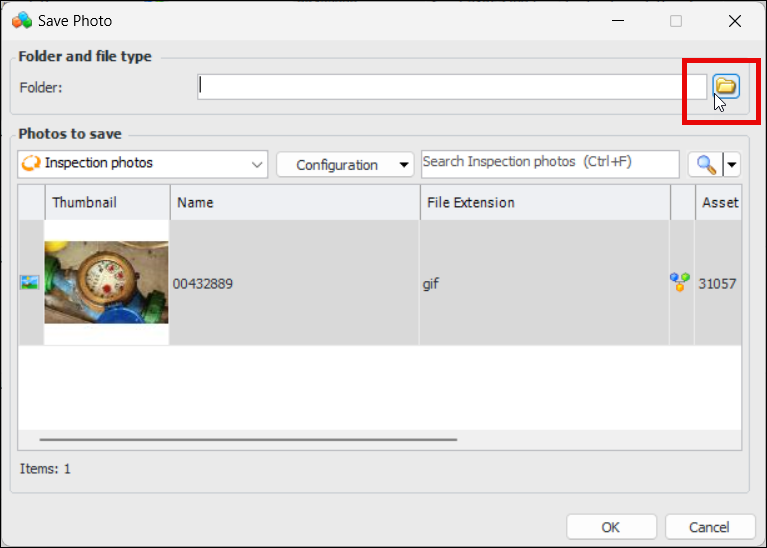
When adding documents to an asset, you can now specify that, if a specification document is not referenced but a P&ID is, the P&ID document is to be displayed in the Specifications tab.Folders for Asset Photos and Documents
In APM, open the Asset window and select the Properties view, Photos tab. In the Asset photos area, browse to the folder and click OK.Click Open Folder to open the location where the photos are stored.AWEIS – Marking Standard Tasks as Inactive
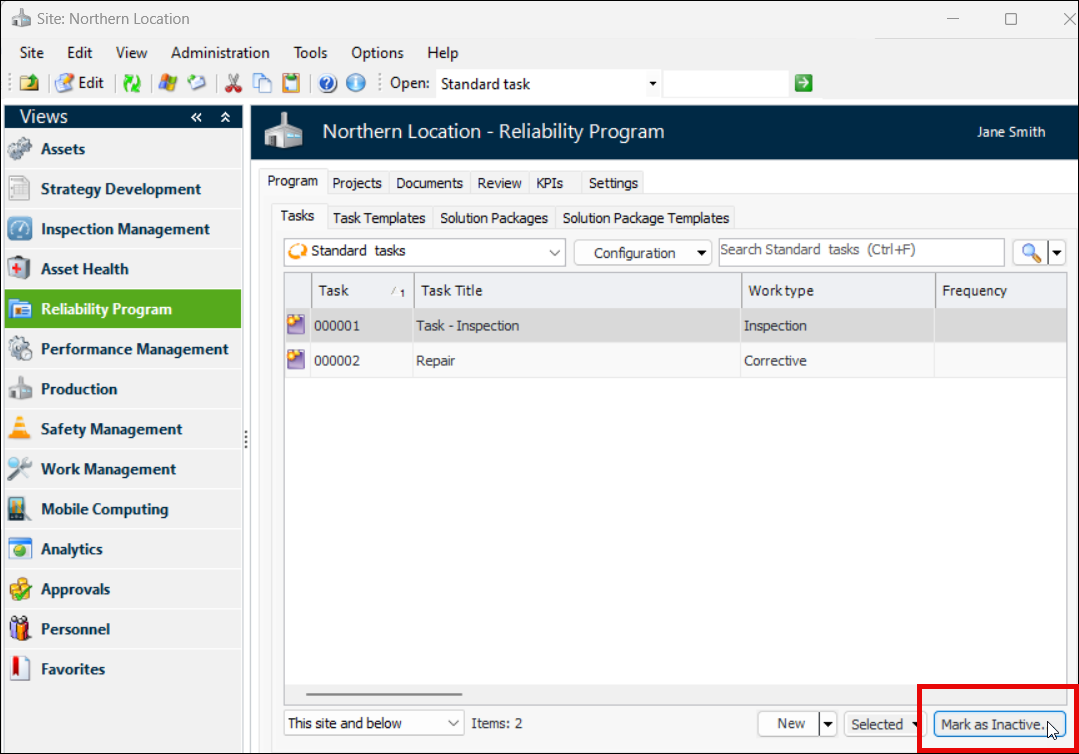
To mark a standard task as inactive, open the site where AWEIS is active, select the Reliability Program view, the Program tab and the Tasks tab. Select the task in the table and click Mark as Inactive:In the Mark as Inactive/Active dialog, enter a reason and click OK. Click OK on the confirmation message that appears. The task is shown as struck-through in the table, and the Active Status column displays “Inactive”.To activate the task, select it in the table and click Mark as Active.Configuring the APM Environment
Transport Layer Security (TLS) v 1.3
Setting up Databases
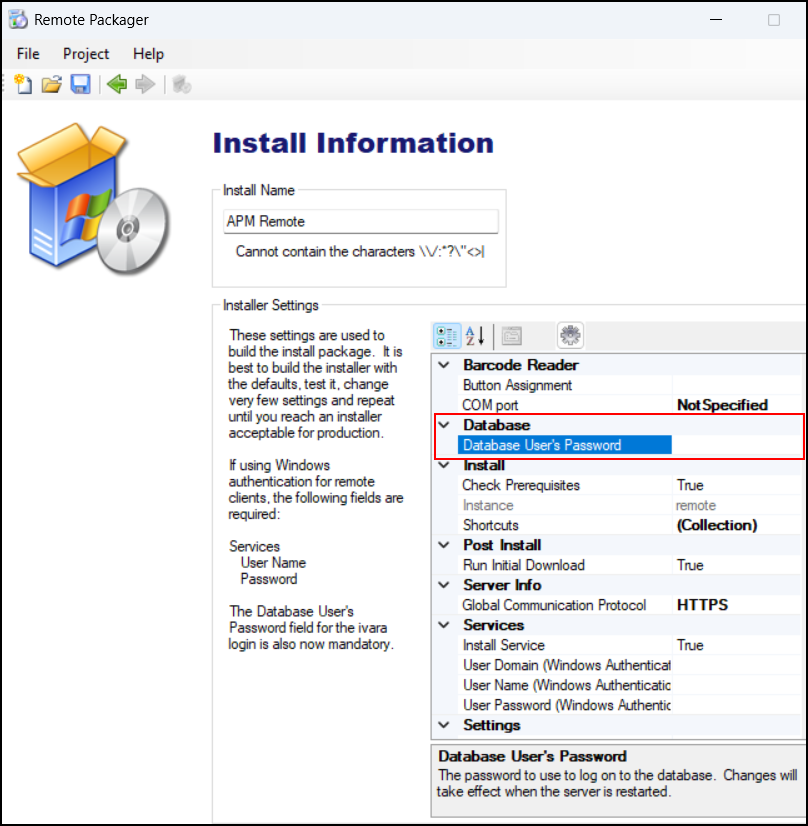
APM Remote Packager
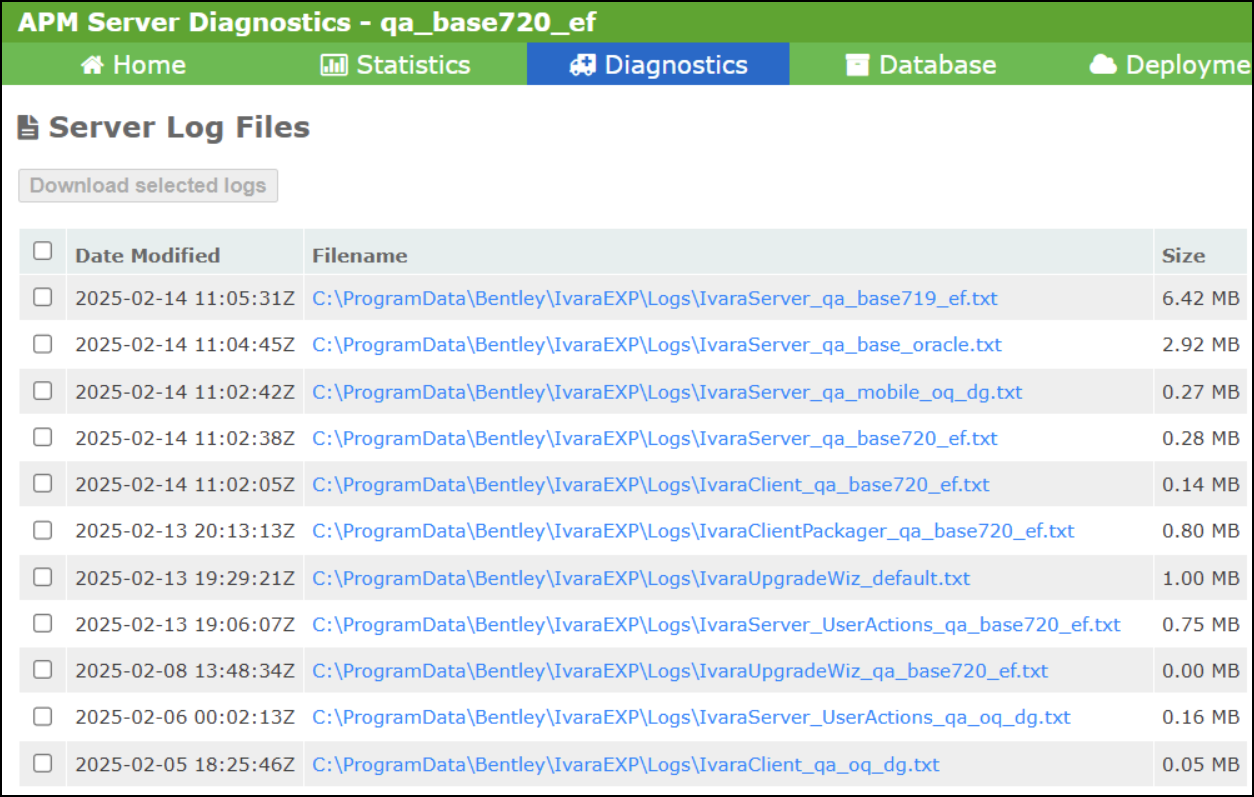
For more information about the Remote Packager, see the APM Remote Setup Guide.APM Web Monitor – Download Server Log Files
You can now download individual log files from the Web Monitor, Diagnostics page. Select the file you want and click Download selected logs. For example:Construction Management – Child Asset Reuse
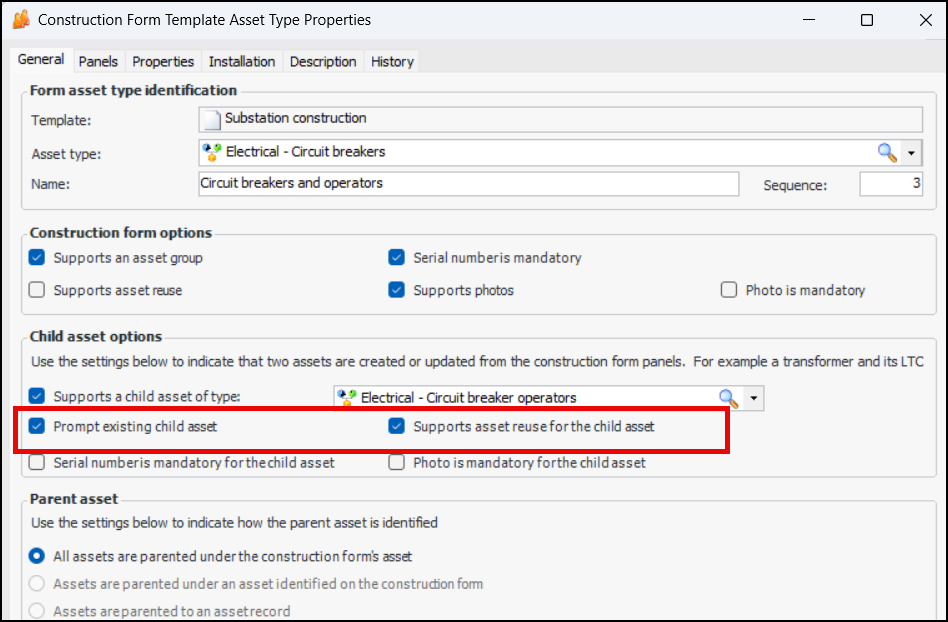
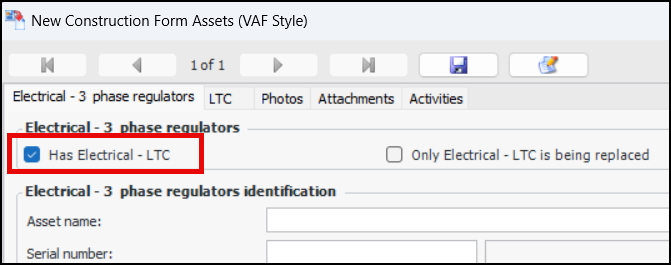
To set up this functionality, open a Construction Form Template Asset Type window, select the General tab and the new options Prompt existing child asset and Supports asset reuse of the child asset. For example:Note: When creating construction forms for 3-phase transformers and regulators, the Has Electrical LTC option must be selected before the parent asset is entered. For example:Data Loaders – Audit Records
Note: This feature is generally available. You must first enable feature 138 to use the functionality in APM. In the Enterprise window, select the Features view and the Enabled Features tab. Click Browse, select “Provide visibility to the user who initiated the processing of a data loader” and click OK. If APM is running as a smart client, click Refresh Enabled Features on the server. Then restart the client to use the functionality.In the Asset window, History view, the new Data Loaders tab displays tabs for each of the these data loaders:In the Indicator window, History view, the new Data Loaders tab displays tabs for each of these data loaders:In the Standard Task window, History view, the new Data Loaders tab displays tabs for each of these data loaders:Description Audit Records
To view audit history in the Checksheet window, for example, select the History view and tab, By Data Element tab.Inspection Management
AWEIS – Split Checksheets Updates
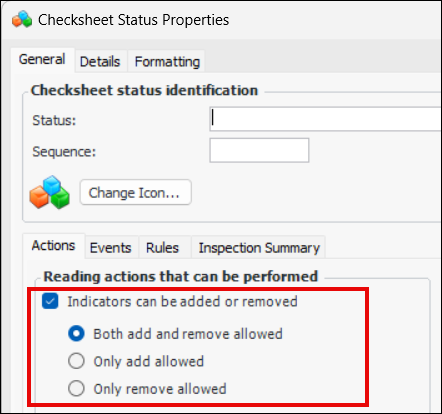
Checksheet Statuses
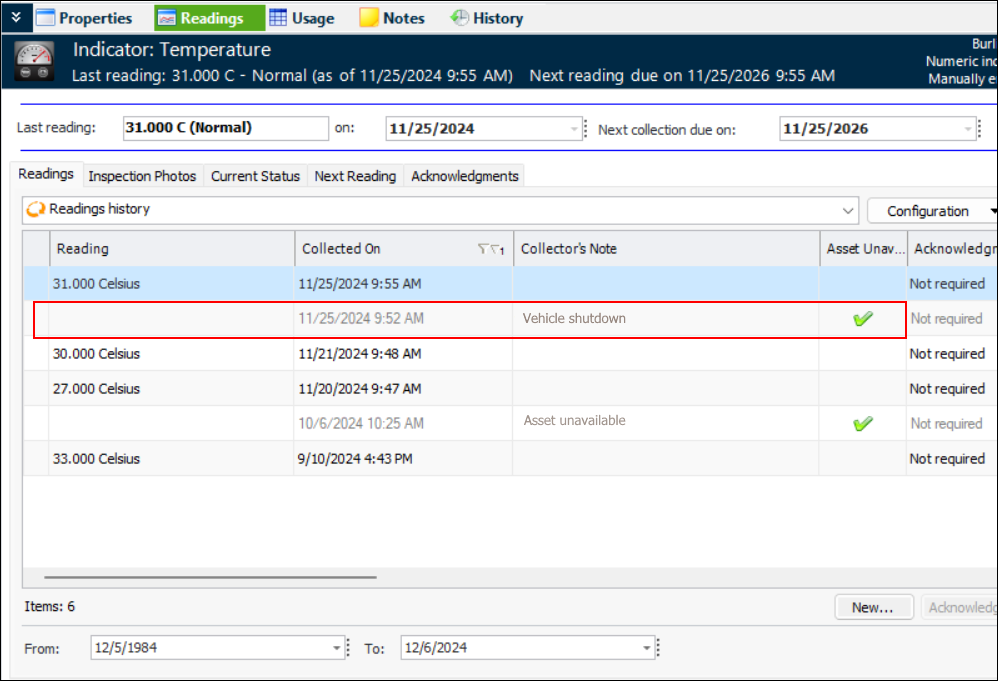
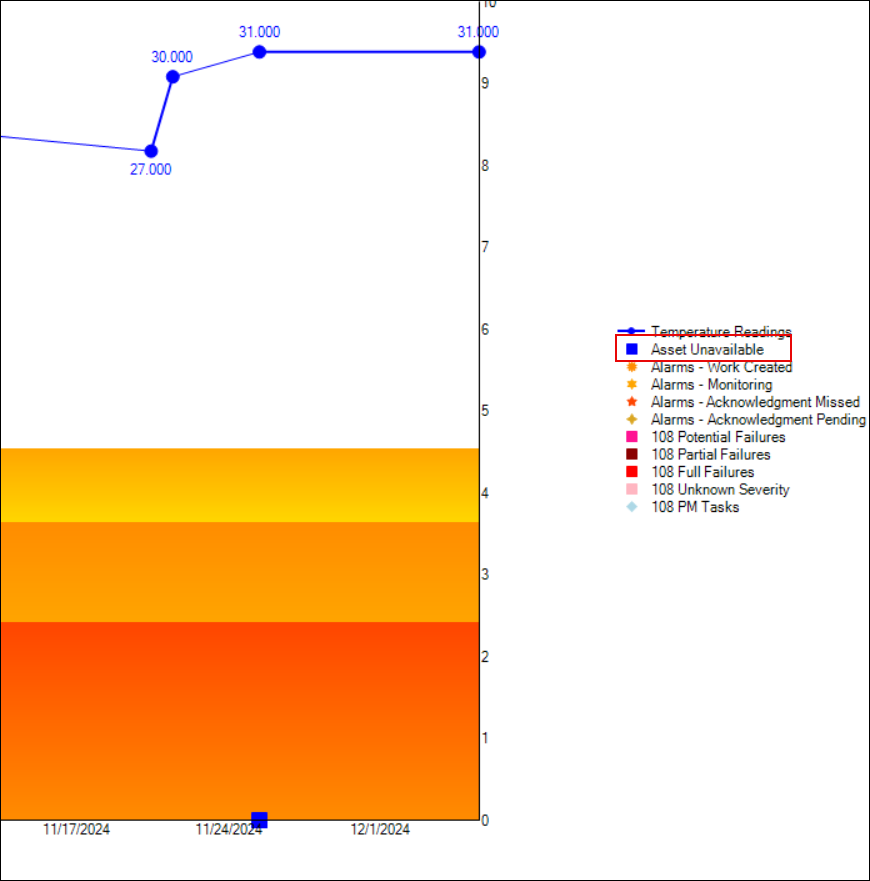
Indicator Readings – Asset Unavailable
Tables and charts have been updated to identify readings marked “asset unavailable”. For example, in the Indicator window, Readings view, the “Readings history” table displays “asset unavailable” readings as gray text:Inspection Photos – Save as Files
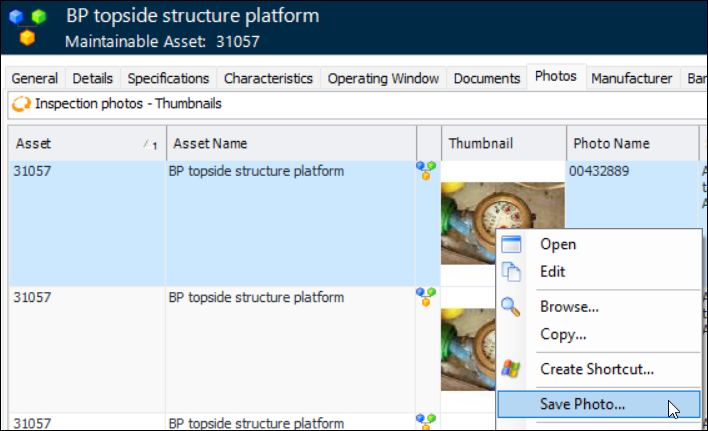
Click OK. The file is saved with its original file name, format, and file extension.Mobile Computing
Performance and Stability Enhancements
Removal of Unprintable Characters
Download to APM Remote
Respect for Cultural Settings on Client
Reliability Program
Expected Frequencies
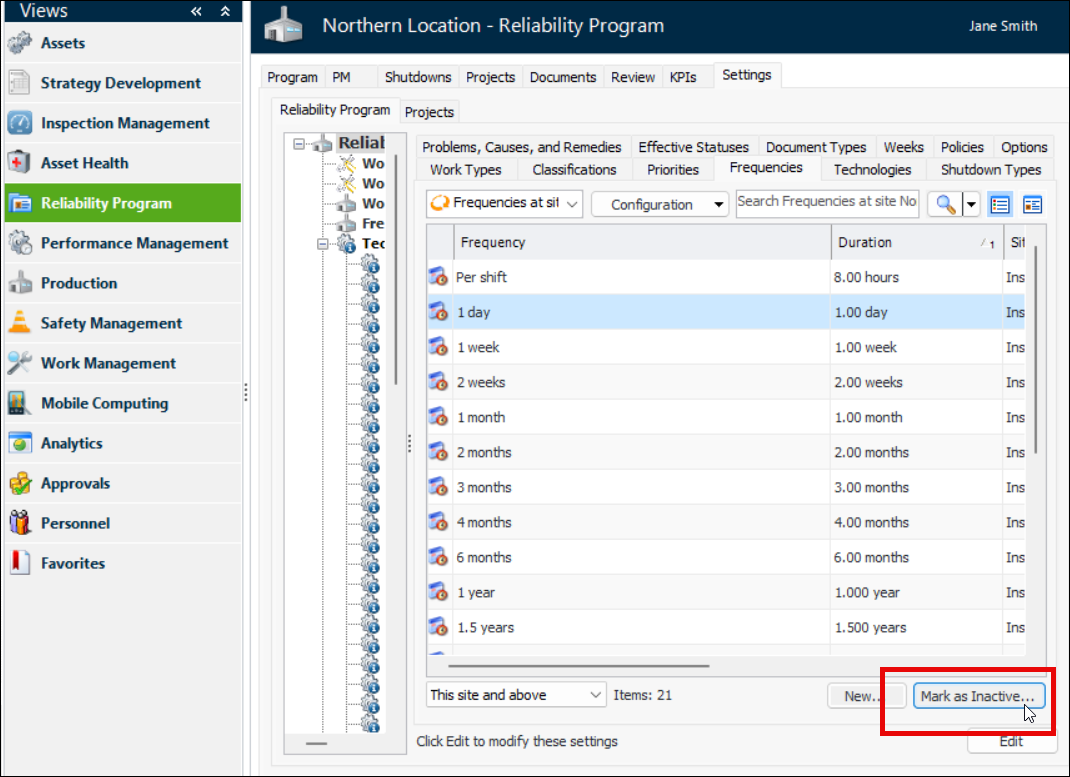
Inactive/active support is now available for expected frequencies. To mark a frequency as inactive, open the site, select the Reliability Program view, the Settings tab, the Reliability Program tab and the Frequencies tab. Select the frequency in the table and click Mark as Inactive:In the Mark as Inactive/Active dialog, enter a reason and click OK. Click OK on the confirmation message that appears. The frequency is shown as struck-through in the table, and the Active Status column displays “Inactive”.To activate the frequency, select it in the table and click Mark as Active.Shutdown Types
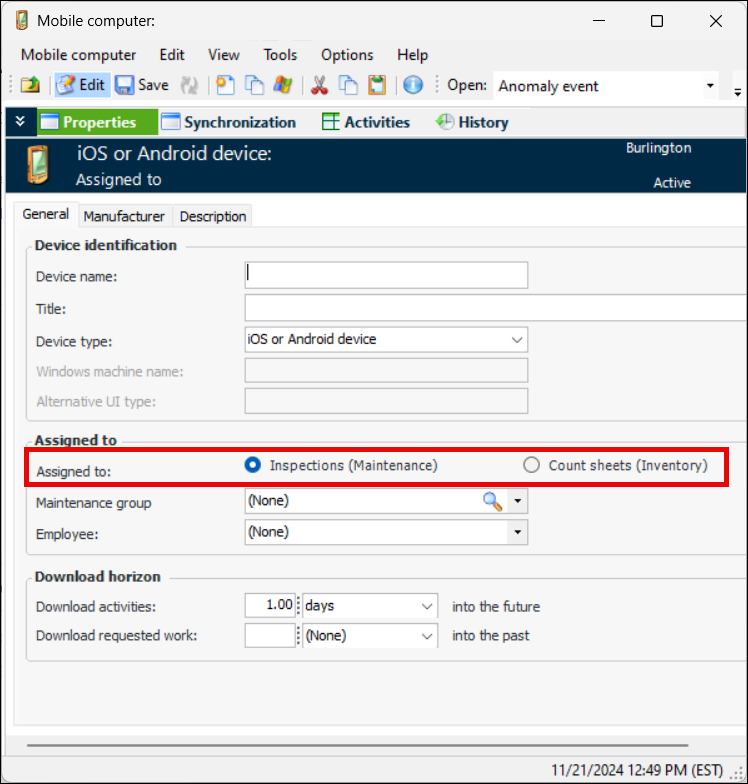
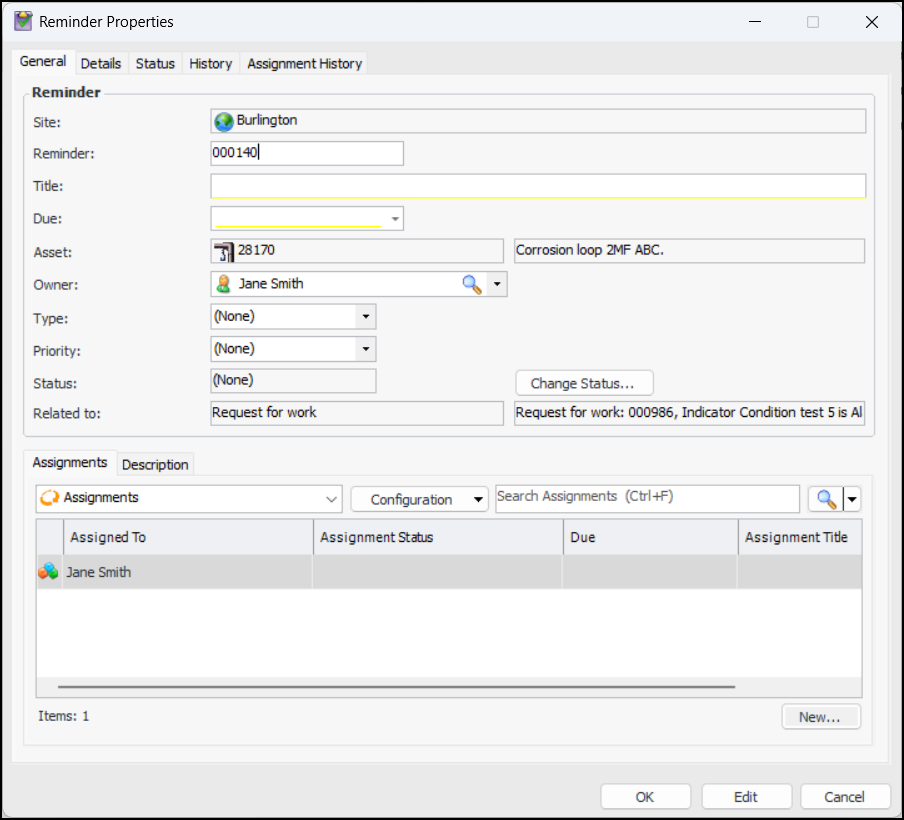
Reminders
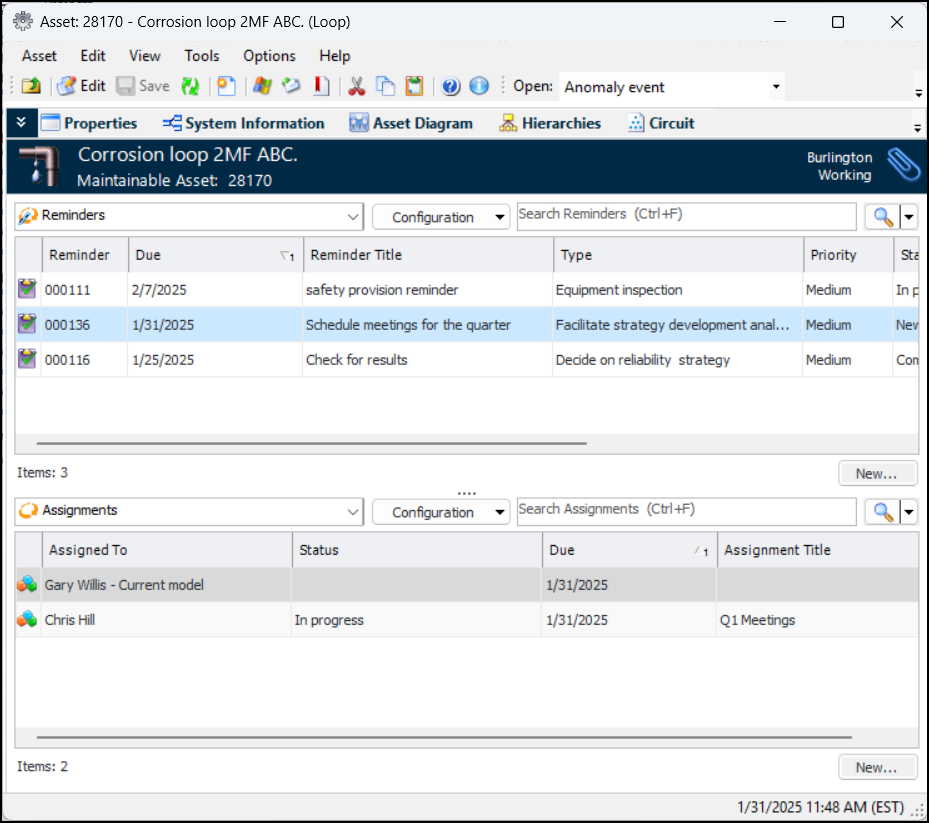
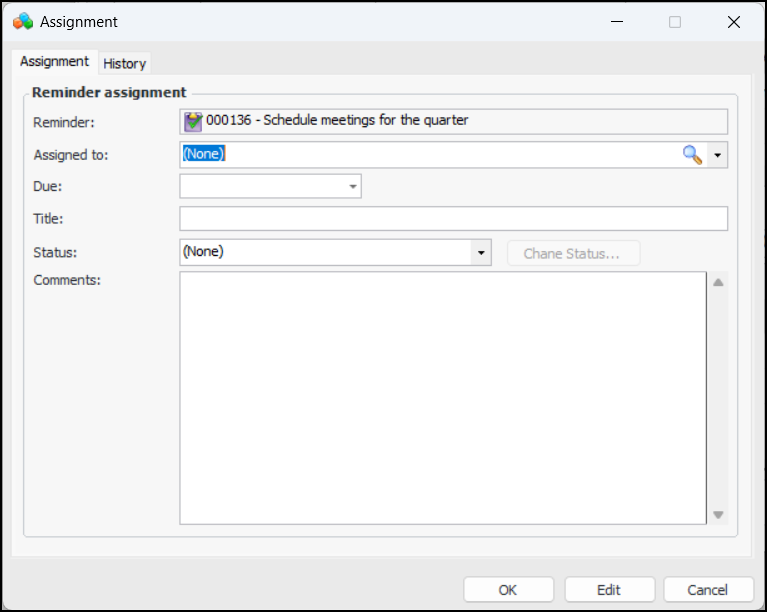
This release introduces reminders: tasks and employee assignments that can be added to most objects in APM. A reminder can include as many assignments as needed, each with its own employee, due date, and status. Here is an example of the Reminders view in the Asset window:Note: Reminders are a generally available product feature. You must first enable feature 139 to use the functionality in APM. In the Enterprise window, select the Features view and the Enabled Features tab. Click Browse, select “Reminders and assignments” and click OK. If APM is running as a smart client, click Refresh Enabled Features on the server. Then restart the client to use the functionality.To attach a reminder to an object, locate the object in a table, right-click, and click New Reminder. The Reminder Properties window appears:The first assignment is created automatically and assigned to the employee who created the reminder. Click New to create an assignment:You can assign an employee and add a due date and title, as well as comments. For a new assignment, you can select a status. In an established assignment, click Change Status to select a different one.For the site, reminders are listed in the Work Management view, Reminders tab. In object windows, reminders are listed in the Reminders view or tab. Your My Desk view in the Site window can also display the Reminders tab with configurations showing your assignments and reminders. For more information, see Setting up My Desk Views.Employee permission groups have been updated to include reminders. See Setting up Employee Permission Groups.The Implementation Assistant for Reminders helps you perform the setup steps from one location. See Using the Implementation Assistants.Strategy Development Analysis
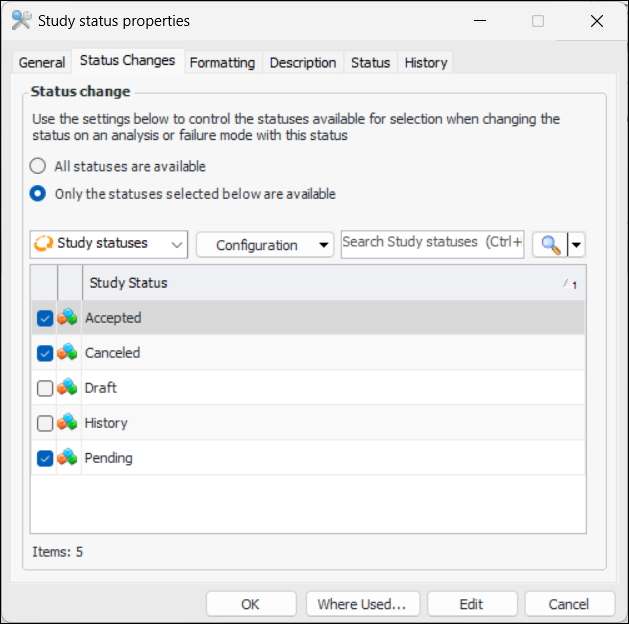
Study Statuses
Employee permission groups have been updated to support which study statuses employees can change on analyses and failure modes. For more information, see Setting up Employee Permission Groups.Study Types
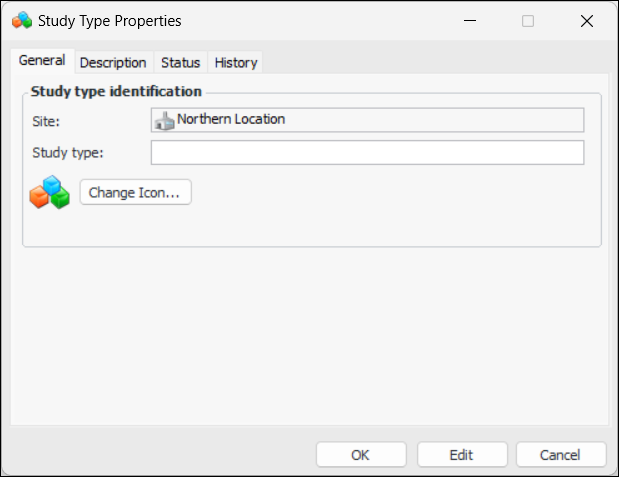
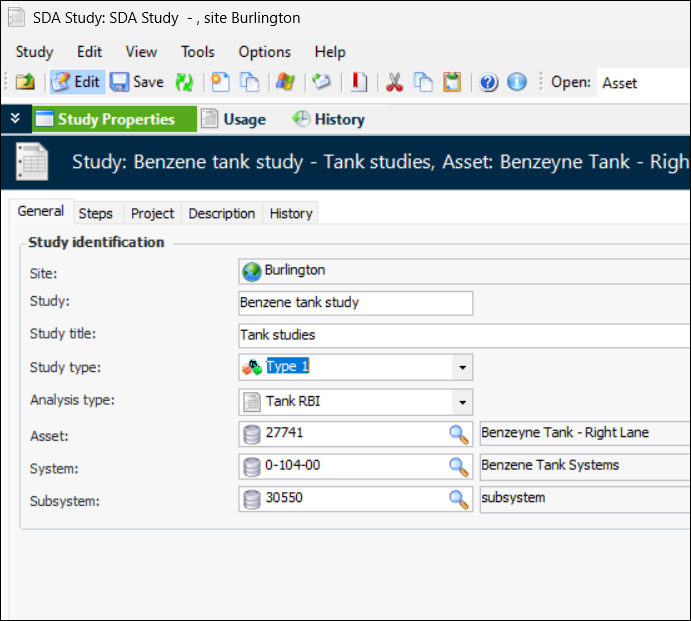
You can now create study types and reference them on studies. On the Site window, select the Strategy Development view, Settings tab, Studies tab, and the Types tab. Click New to open the Study Type Properties dialog:Name the type and click OK. The study type is now available for selection in studies:Criticality Evaluations Import and Processing
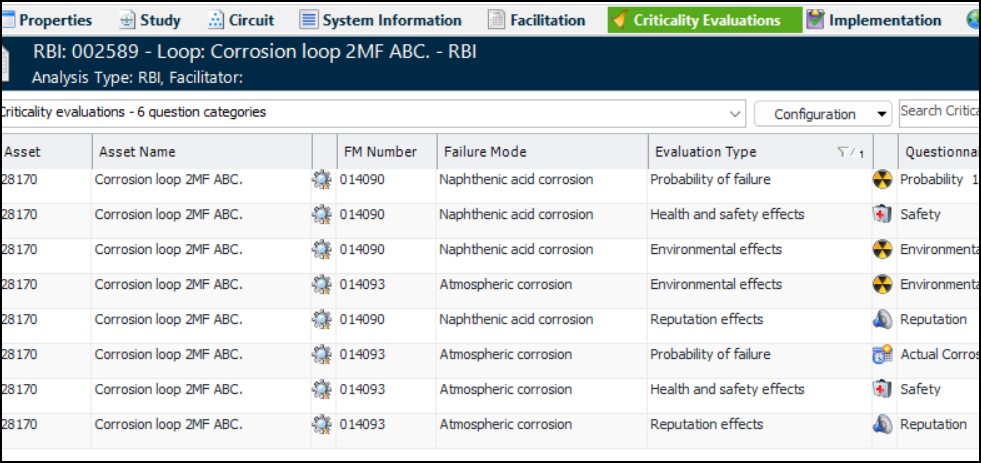
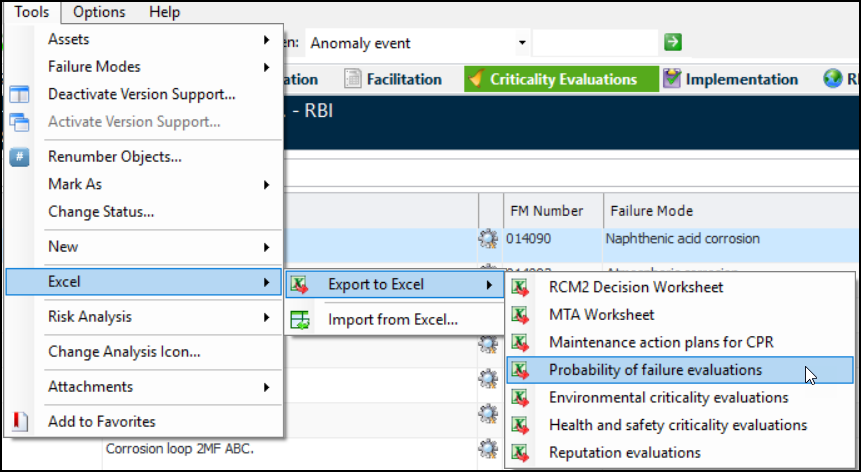
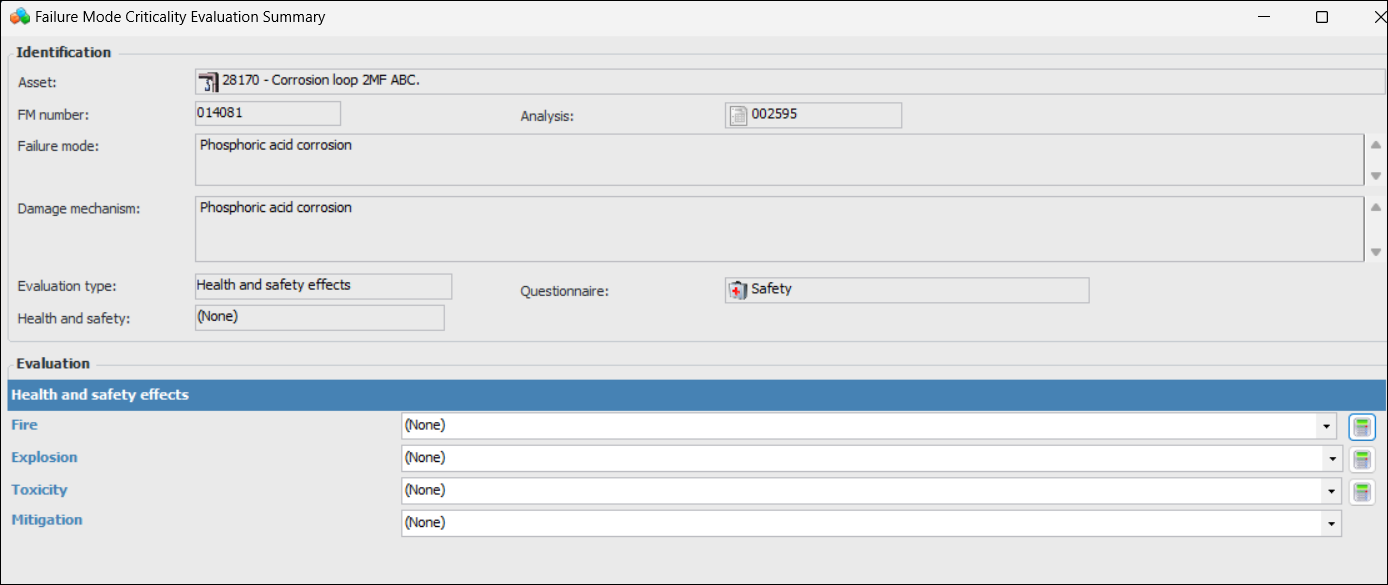
You can now use the new Criticality Evaluations view in the Strategy Development Analysis window to quickly generate evaluations for the analysis’ failure modes. You can then export the generated evaluations to an Excel spreadsheet. The following evaluation types are supported:Note: The criticality evaluation export/import feature is generally available. You must first enable feature 134 to use the functionality in APM. In the Enterprise window, select the Features view and the Enabled Features tab. Click Browse, select “Ability to import Risk Evaluation values from a spreadsheet for analysis failure modes” and click OK. If APM is running as a smart client, click Refresh Enabled Features on the server. Then restart the client to use the functionality.To see the export and import features in action, first create your analysis as normal. After adding failure modes, select the Criticality Evaluations view and click Generate in the lower right-hand corner. A confirmation message appears informing you that, depending on the number of failure modes and evaluations being performed, this might take a few minutes. Click Yes.To export evaluations to a spreadsheet, click the Tools menu, Excel, Export to Excel, and then the type of questionnaires you wish to export. For example:To import the evaluations, return to the analysis in APM and select the Tools menu, Excel, and Import from Excel. The Import Data window opens, where you can identify the source Excel file and import its contents.You can also use this feature to work with “flattened” versions of criticality evaluations. After generating failure modes in the Criticality Evaluations view, select one or more of the rows and click Open. The appropriate summary window opens. Here is an example of a Health and Safety evaluation:Extended Failure Effect Statements
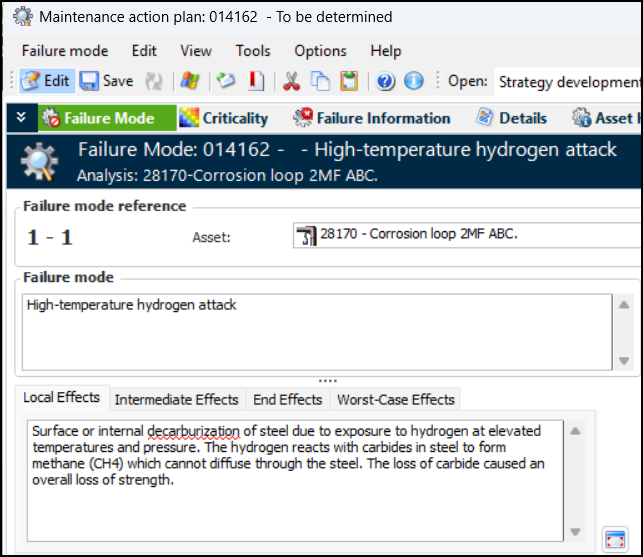
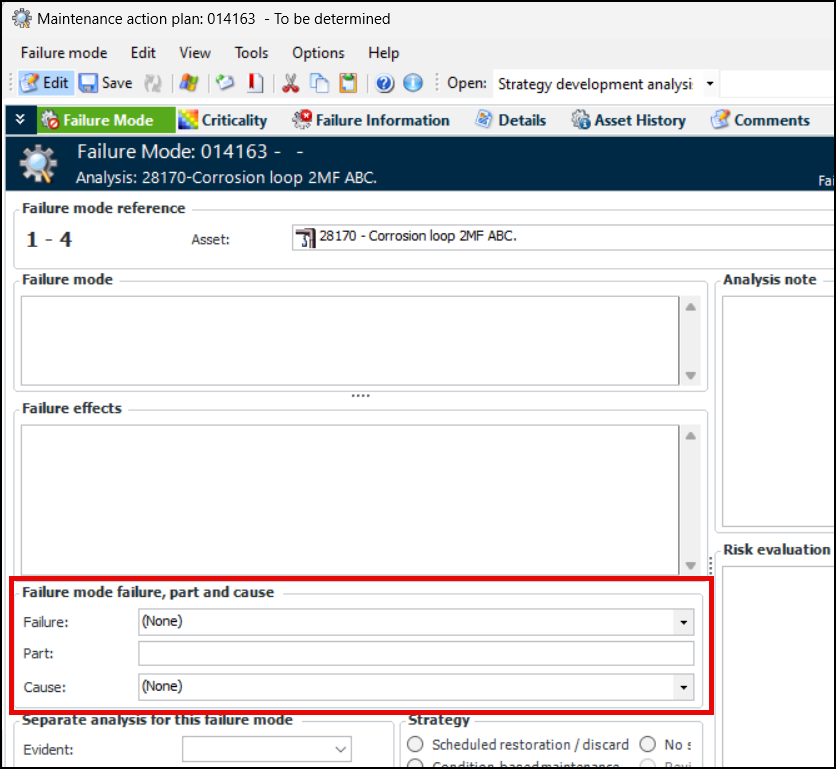
You can enable extended effects in failure mode options for analysis types and analyses. For more information, see Setting Failure Mode Options for Analysis Types.Failure, Part, and Cause Supported on MTA2 and RCM2 Failure Modes
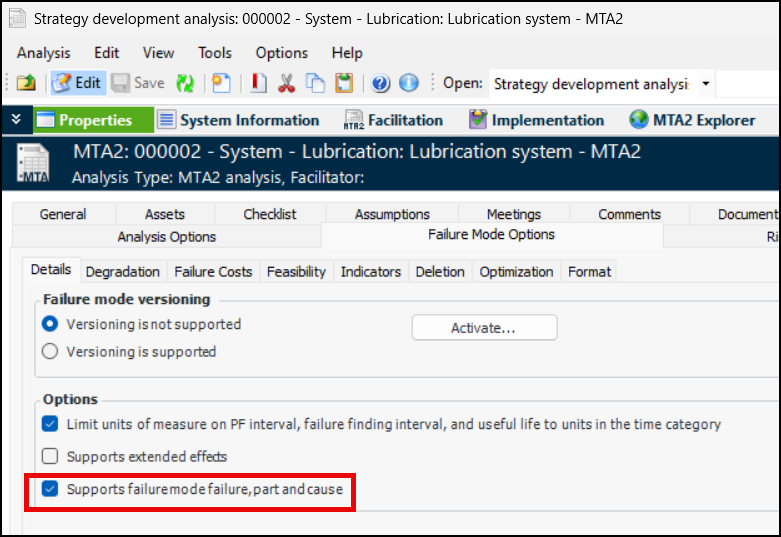
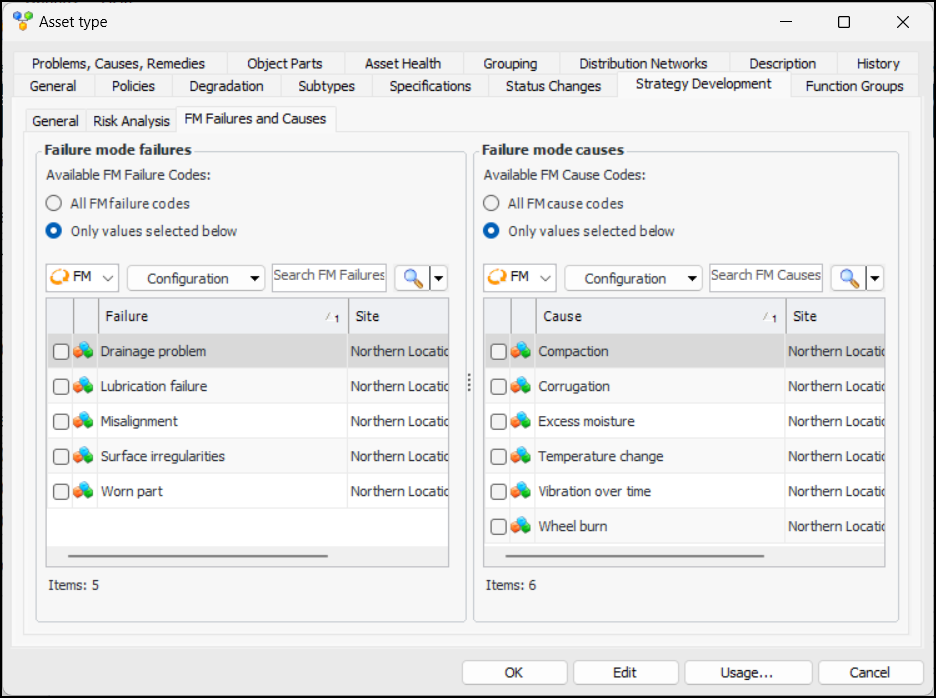
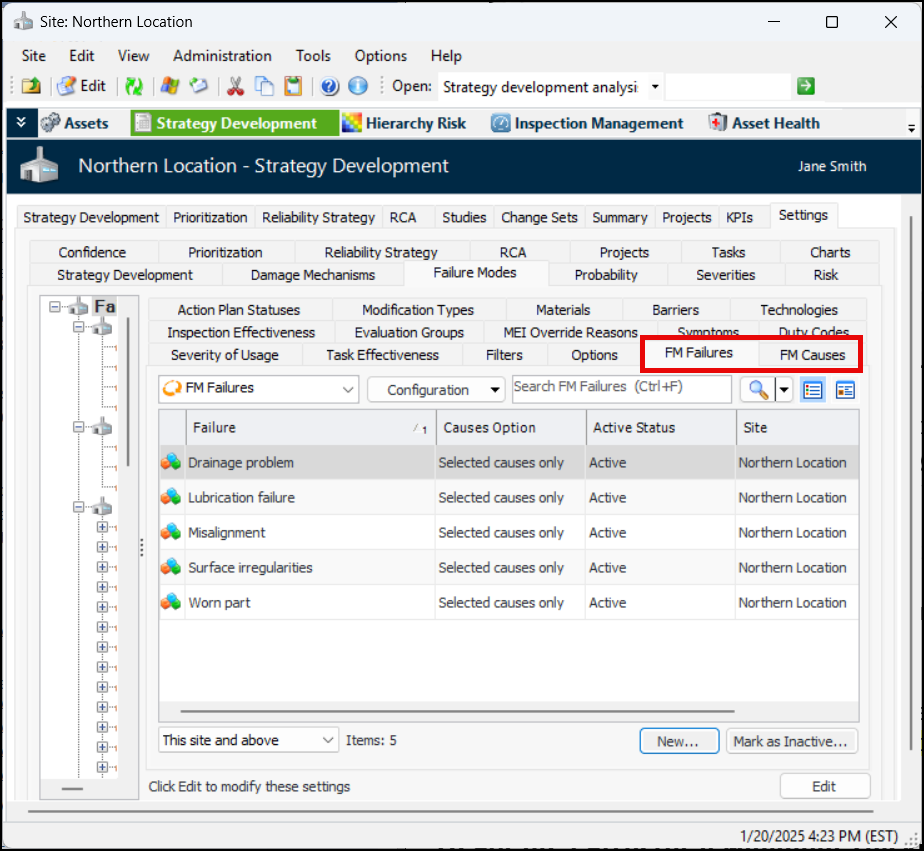
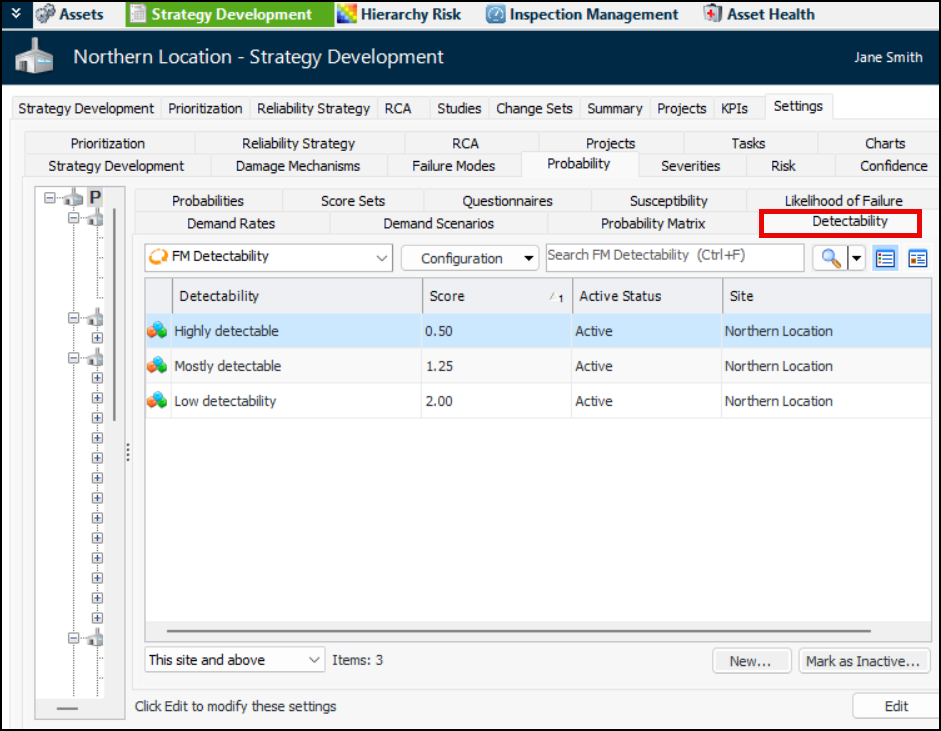
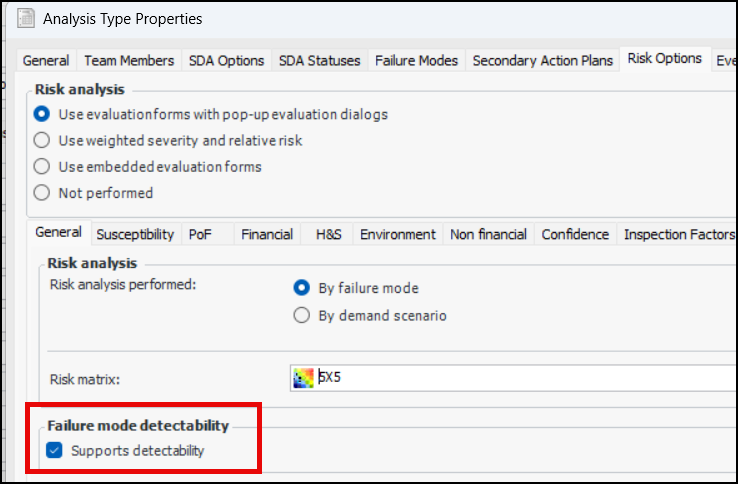
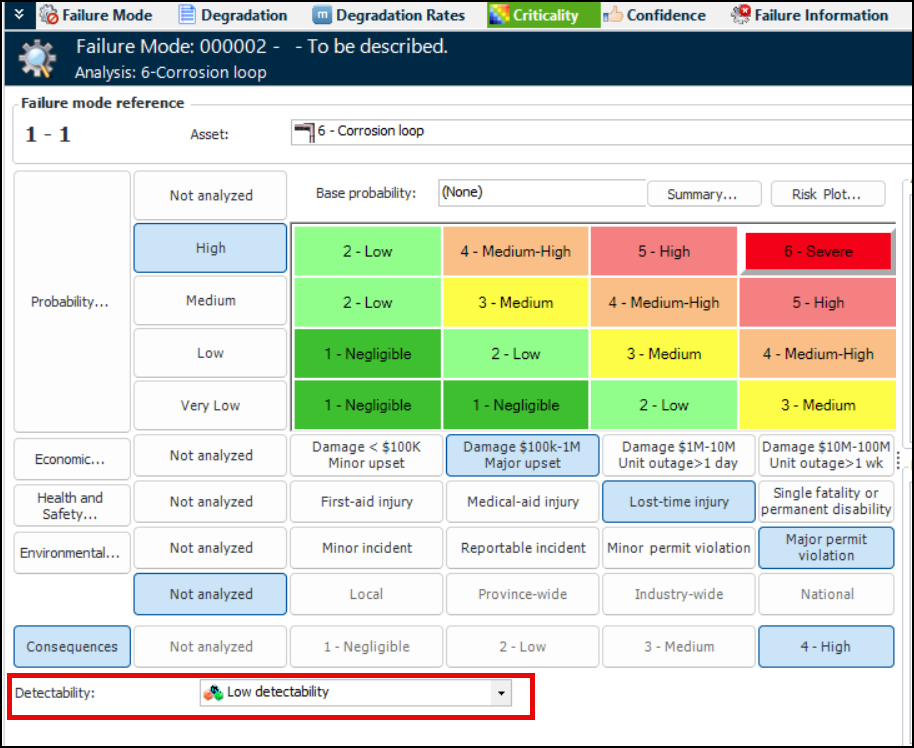
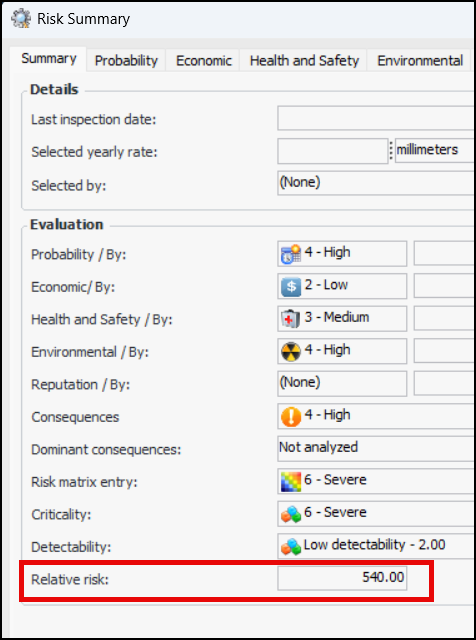
To enable this functionality in an MTA2 or RCM2 analysis, select the Properties view and the Failure Mode Options tab. On the Details tab, select Supports failure mode failure, part and cause:On asset types, you can identify the FM failures and FM causes that can be identified on failure modes for specific assets. In the Asset Type window, select the Strategy Development tab and the FM Failures and Causes tab. By default, all codes are available, but you can click Only values selected below for FM Failures, FM Causes, or both. For example:To use FM failures and causes, first populate the value lists in Strategy Development settings. Select the Failure Modes tab and then the FM Failures and FM Causes tabs:Detectability Supported in Risk Calculation
Next, select Supports detectability in analysis types or analyses. For example:When you perform criticality evaluation for a failure mode, the Detectability list appears under the risk matrix. For example:Click Summary to view the evaluation properties, including “Relative Risk”. For example:Failure Mode Comparison