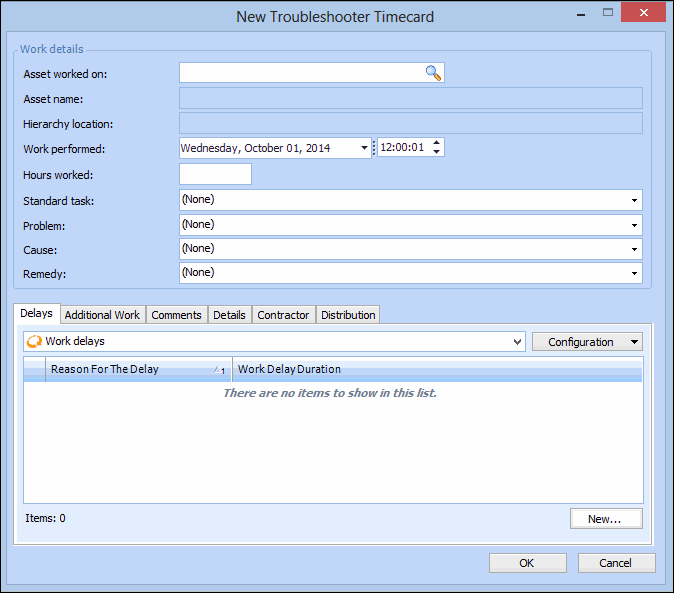
Creating a Troubleshooter Timesheet

To enter time spent on troubleshooting that was not part of a planned work order, you can create and fill out troubleshooter timecards. If you have several jobs to enter, you can enter them all at once using a troubleshooter timesheet.
This topic explains how to create and enter a troubleshooter timesheet. To create a single troubleshooter timecard, see Creating a Troubleshooter Timecard for an Asset.

To Create a Troubleshooter Timesheet

1.
From the site, click the Tools menu, New, then Personnel, and then select Troubleshooter Timesheet. APM creates and opens a new timesheet.
2.
3.
Make sure that the date in the Date work performed box is correct.
4.
To enter a new timecard, click New. The New Troubleshooter Timecard dialog appears.
Tip: You can also enter timecards by clicking on a line in the Employee timecard table, and then pressing the F2 key. The Asset worked on box becomes open for editing. Enter the number of the asset that was worked on. To find the asset, click the ellipsis () button, select the asset that was worked on, and then click OK. Use the Tab key to move across the table and fill in all of the required information.
5.
Complete the Work details:
Make sure that the asset that was worked on is correct. To select an asset, click Browse. Select the asset in the selector dialog, and then click OK
6.
If there were any delays in completing the work, click New. The New Troubleshooter Timecard dialog appears. For example:
7.
Select why the work was delayed from the Reason for the delay list, enter how long the delay was in the Delay length box, and then click OK.
8.
To create a work request to complete the remaining work, select the Additional Work tab, and then select Yes, additional work is required option and then type a note about the work that is required in the Description box. If appropriate, enter a Completion date for the additional work and select the Maintenance group that should perform the work.
Note: The text entered in the Description box will be the title of the new work request.
9.
Select the Comments tab to enter any comments.
10.
11.
Select the Contractor tab to enter the Purchase order and Line information.
12.
Select the Distribution tab to enter the Rate type, Cost type and Account information
13.
14.
15.
When you are finished entering information, click Post Transactions. APM saves and posts the labor charges, and if selected, creates work requests for the jobs.
16.
Note: To view follow-up work requests, see Viewing Follow-up Work Requests Created from Troubleshooter Timecards.