Setting up an APM Fax Server

If you are using APM procurement features, you can send RFQ and purchase order documents to suppliers by fax. To do this, you will need to designate at least one computer on the network to be your fax server. You can create more than one fax server, if necessary.
Prerequisites for the fax server computer are:
When an APM user sends a fax through APM, the faxed document is stored in the APM database. When one of the Fax scheduled actions (Fax All Documents, Fax Purchase Orders, or Fax RFQs) is run, the method checks for pending faxes in the database, converts the files to TIFF format, creates a file for each fax, and submits the faxes to the local Fax device. Sent faxes can be viewed in the Windows Fax and Scan window of the device.
Because the Fax method must be scheduled, the system only sends faxes at the frequency that the Fax method is run. For example, if you schedule the Fax method to run once a day, pending APM faxes will only be retrieved and sent once a day.
Setting up the fax server involves these steps:
Tip: When you have completed these steps, send a test fax to ensure that the fax server is set up correctly.

Add Fax Services

Note: You must be a member of the Windows Administrators group to install fax components.
The following steps are for Windows Server 2008 R2. The steps might vary slightly if your APM application server computer runs another supported version of the operating system.
1.
On the computer that will be the fax server, click Start, Administrative Tools and then Server Manager. In the left-hand pane, click Roles and in the right-hand pane click Add Roles. A wizard appears.
2.
In the Add Roles Wizard, on the Select Server Roles page, select Fax Server. A message appears indicating that Print and Document Services also need to be setup with the Fax Server Role.
3.
Click Add Required Role Services and then click Next. A Select Fax Users page opens.
4.
If you wish to restrict use of the fax server to specific users, on the Select Fax Users page, click Add and then type in the domain and user names for the groups and user that will have access to the fax server. Click OK and then click Next.
5.
6.
7.
Click Start, Run and then type “control printers”. Confirm that a printer named “Fax” exists. If it does not, restart the computer.
8.
If you cannot restart the computer, stop and start the Print Spooler instead. To do this, open the Control Panel to Administrative Tools, Services. In the right pane, right-click Print Spooler and click Stop. Click the Print Spooler again and click Start.
9.
In the Control Panel, double-click Phone and Modem Options. In the Location Information dialog, enter information for your country or region and the information required to dial an outside line (including whether tone or pulse dialing is used).

Install the Windows Desktop Experience

The Windows feature required to print from the default image viewer is disabled by default on Windows Server 2008. To enable the viewer, install the Desktop Experience feature of Windows Server 2008.
1.
Open the Windows Server Manager, click Start, click Administrative Tools, and then double-click Server Manager.
Tip: You can also open Server Manager by typing the following at a command prompt “servermanager.msc”.
2.
3.
In the Add Features Wizard dialog box, ensure that the Desktop Experience option is selected.
4.
Click Next and then click Install.
5.
After the installation process is complete, click Close and then close Server Manager.
Note: After you install Desktop Experience, you have to restart the computer.

Add a Local Fax Device

1.
In the Control Panel, open the Devices and Printers dialog.
2.
Click Add a Device and follow the steps to add a local fax device.
3.
4.
Click the Tools menu and then Fax Accounts. Click Add to create a fax account to send or receive faxes.

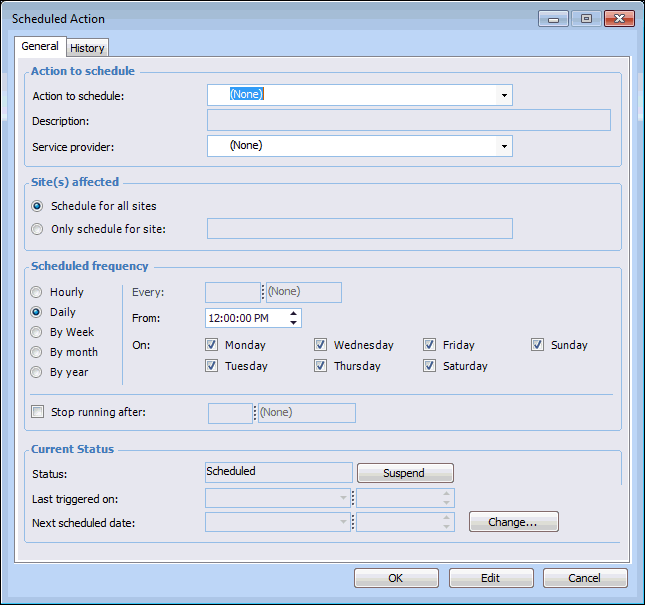
Create a Scheduled Action for the Fax Method

1.
2.
Select the Services view and the Scheduled Actions tab. Click New. The Scheduled Action dialog appears.
3.
From the Action to schedule list, select the appropriate Fax method:
Fax All Documents – Finds all documents waiting to be faxed and submits them to the fax server
Fax Purchase Orders – Finds all purchase orders waiting to be faxed and submits them to the fax server
Fax RFQs – Finds all RFQs waiting to be faxed and submits them to the fax server
4.
5.
If you want to restrict this action to run for a single site, select Only Schedule for Site and select the site on which this action will run. For example, you might want to create a different schedule for processing activity reports on each site.
Note: You cannot schedule the same action to run on two servers for the same site. Similarly, you cannot assign an action to all sites and then assign it again to a single site.
6.
Define the Scheduling frequency for the action.
7.
Select Stop running after and specify a time period if you expect that the volume of faxes will be large enough to affect system performance.
Note: If you decide to suspend the scheduled action from running, click Suspend on the Scheduled Action’s General tab. When you are ready to start the action again, click Re-activate.
1.