Creating an Override Incident

A provision version’s safety override identifies the procedures that an operator or technician should follow when a safety device malfunctions in order to keep the facility operating safely while the device is being fixed or replaced.
When a safety device fails, an APM user (for example, an engineer, manager, or operator) creates an override incident in the system that records the details and recommendations.
The purpose of an override incident is to:
Besides entering the incident report, you can record planning information, log actions performed during the incident, create follow-up work documents, and request extensions if the incident requires more time than the override recommends. The incident record displays a time line showing the start date and time, time allowed and extension details, as well as elapsed and remaining time.
Tip: To track the incident and review its history and context, select the Incidents view. This view provides information about similar incidents and the override’s history of incidents. Select the History view to see information about actions performed on the incident, its extensions, and approval requests.
Tip: To view provisions’ or provision versions’ most recent override incidents, select the site’s Safety Management view, the Provision Versions or Provisions tabs, and the default table configuration. Scroll to the right to view the most recent override incidents, as well as their statuses, start and end dates, and titles.
Depending on your organization’s requirements, incidents can be sent for approval, typically to vet incident extensions. For information about the approval process, see Sending a Safety Object for Approval.
If your organization prefers the alternative to the formal approval process, extensions can be accepted or rejected on the dialogs where they are created and listed.
This topic provides some background information and detailed instructions:

Safety Type and Statuses

When you create an override incident, the override’s safety type determines the incident’s status. The type can also change the incident’s status when key events occur; that is, when usage is exceeded, the Update Open Override Incidents command is executed, or an extension is approved.
The incident’s status, in turn, controls the actions you can perform on the incident: whether its properties can be updated or the incident can be sent for approval. The incident’s status can also trigger any of the following system events:
For information about how statuses are set up, see Setting up Safety Statuses.

How Start Dates are Set on Override Incidents

Override incidents with planned dates in the past can be started automatically, as long as their safety types allow it. The action sets the incident’s start date and time so that APM can determine when the maximum usage is exceeded. The following components and actions are involved:
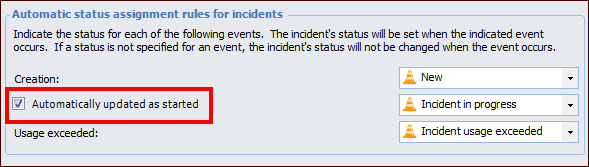
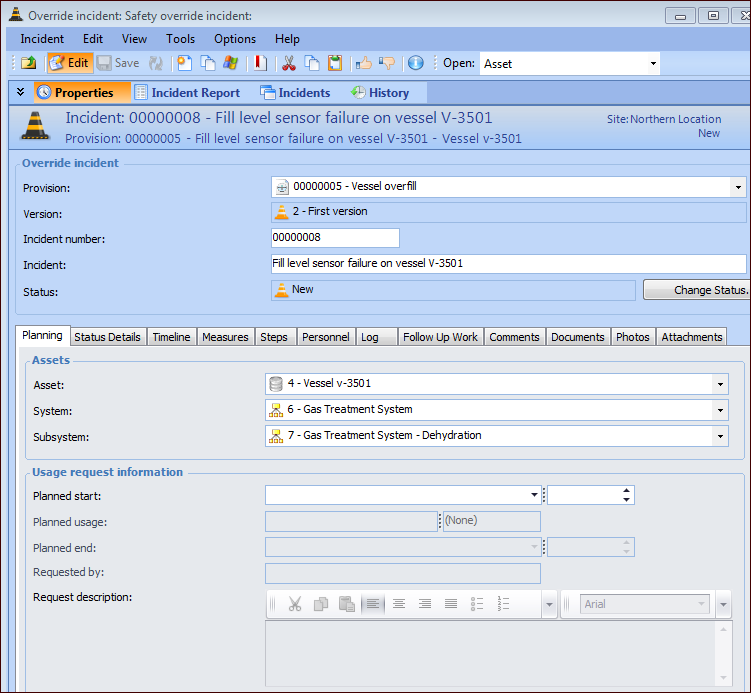
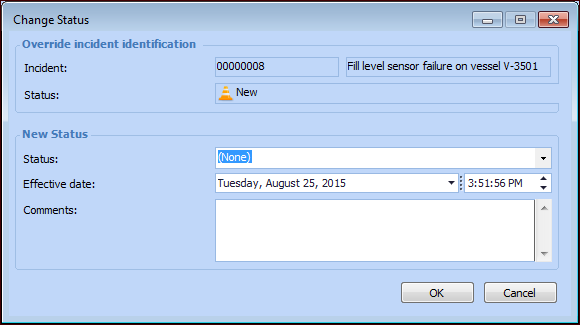
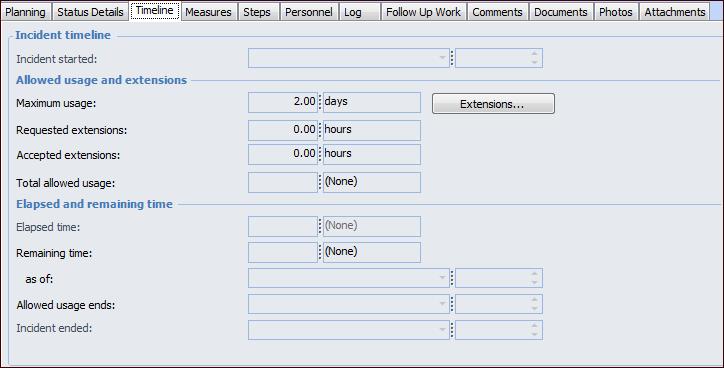
When Automatically updated as started is selected on the safety type, the specified safety status is applied to the incident.
Tip: If the status can be applied manually, you can set an incident’s start date and time by changing its status to “Incident in progress” when appropriate. As a result, the incident’s values are set to the current date and time.
An incident’s start date and time are shown on the Override Incident window, Properties view, Timeline tab. For example:
Tip: You can manually perform the scheduled action’s tasks using a command on the site. On the Site window, click the Tools menu, Safety Management, and then Update Open Override Incidents. APM updates the remaining time on all open override incidents. It also reviews open incidents that have not yet started to determine if their planned start dates are in the past and their safety types allow start dates to be set automatically. It sets each qualified incident’s start date and time to its planned values.
For information about setting up the scheduled action, see Scheduling Actions.

To Create an Override Incident

1.
In the Site window, select the Safety Management view and the Incidents tab. This tab lists any incidents that have already been created.
2.
Click New. The New Safety Override Incident window appears.
Tip: You can also right-click a current provision version and click New Incident. Or open a provision, right-click its current version, and click New Incident. In both cases, the Override Incident window appears, and the provision information is filled in.
3.
4.
5.
Note: The incident’s status is provided by the provision’s safety type.
6.
In the Responsibility area, select the employee who has operational responsibility for the asset involved in the safety incident, as well as the related organization.
7.
In the Reported area, identify the employee who reported the incident, the related organizational asset, and the date and time when the incident was reported.
8.
Click OK. The dialog closes and the Safety Override Incident window appears. For example:
9.
Select a new status from the list, enter the reason for the change in the Comments box, and click OK. The date and time when the status went into effect are shown on the Status Details tab, along with your comments.
10.
The Planning tab displays information about the assets. In the Usage request information area, select the date and time when the override measures are planned to start.
11.
In the Planned usage boxes, select the estimated amount of time that the override measures will be active. If this value exceeds the maximum usage recommended on the override, you will need to request an extension on the Timeline tab.
12.
13.
14.
In the Request description box, provide information to explain why the request is necessary.
15.
Select the Status Details tab to view and change the incident’s status. This tab shows the effective date and time and status comments.
16.
Select the Timeline tab. For example:
17.
The Incident started boxes display the date and time when the incident is updated as started. In this example, the incident’s life cycle has not started.
18.
The rest of the Timeline tab displays the following information:
When the incident’s life cycle has completed, the data and time are displayed in the Incident ended boxes.
19.
Select the Measures tab to view the measures to be taken, as defined in the safety override.
20.
Select the Steps tab to view the steps defined in the safety override.
21.
Select the Personnel tab to view information about the employee with operational responsible for the asset and the employee who reported the incident.
22.
Select the Log tab to add and review log entries.
23.
Select the Follow Up Work tab. Each incident can have one work request or work order automatically created for follow-up work based on the safety override’s settings and a safety status applied to the incident. When the work document is created automatically, it is listed in this tab.
You can also click New on this tab to create a work document. For more information, see Requesting Follow-up Work for an Override Incident.
24.
25.
Select the Documents tab to view and open standard documents from the safety override.
26.
You can select the Photos tab to browse for inspection photos.
27.
Select the Attachments tab to add files, folders, notes, URLs, or shortcuts to the incident. For more information, see Adding Attachments to Objects.
28.
Select the Incident Report view to enter a report and make recommendations.

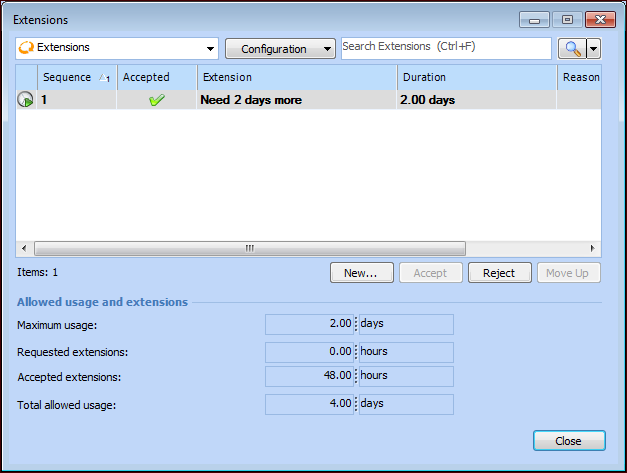
To Request and Process Extensions

1.
Select the Timeline tab and click Extensions. The Extensions dialog lists existing extension requests. For example:
If approvals are required, the Accept and Reject buttons are not available. Instead, send the incident for approval. Otherwise, you can accept and reject extensions using these buttons.
Tip: You can change the order of extensions using the Move Up button.
2.
Click New. The Incident Extension dialog appears.
The sequence number is automatically assigned. If you are using the approval process, the Accept button is not available.
3.
In the Extension box, enter a descriptive title for the extension.
4.
5.
6.
In the Description box explain the reason for the request.
7.
If allowed, you can accept the extension request at this point. Click Accept. A confirmation message appears. Click Yes. The Extension accepted option is selected.
8.
Click OK. The Incident Extension dialog closes and the extension request is added to the Extensions table.
9.
Click Close to close the Extensions dialog. If the extension was accepted, the information on the Timeline tab is updated immediately. If the incident must be sent for approval, this information is updated when the incident has been approved.