Reports Overview

You can design, view, and print reports using the APM user interface. There are two things you should consider when you design a custom report: the class associated with the report and the report hierarchy. However, before you start designing reports, you should understand the basic elements of the APM object model.

Contents

Object Model Overview
Reporting Overview
Class Associated With the Report
Report Hierarchy
Applying Filters, Sorts, and Calculations to Fields
Adding a Data bound Accessory Field for Custom Data
Technical Background
External Reports
Changing the Logo on Printed Reports
Deploying Custom Reports

Object Model Overview

The object model behind APM provides all of the information that you need to display data in reports or in the UI. When you design a report or view, you start by choosing the class of object where that report or view can be accessed. You can then navigate the relationships between classes to add information from other object classes to your report or view.
Navigating the relationships creates a join path, or the path that you follow to get from an attribute in one class to an attribute in another class. You can add attributes from any object class, including object extensions and subtypes you created, by selecting an appropriate join path.
If you upgrade your version of APM, you should review your custom reports to make sure that the attributes and join paths are still correct.
For information about adding reports to security profiles, see Securing Reports.
TOP

Reporting Overview

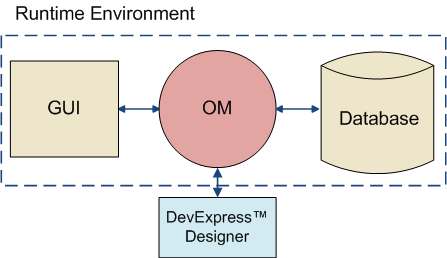
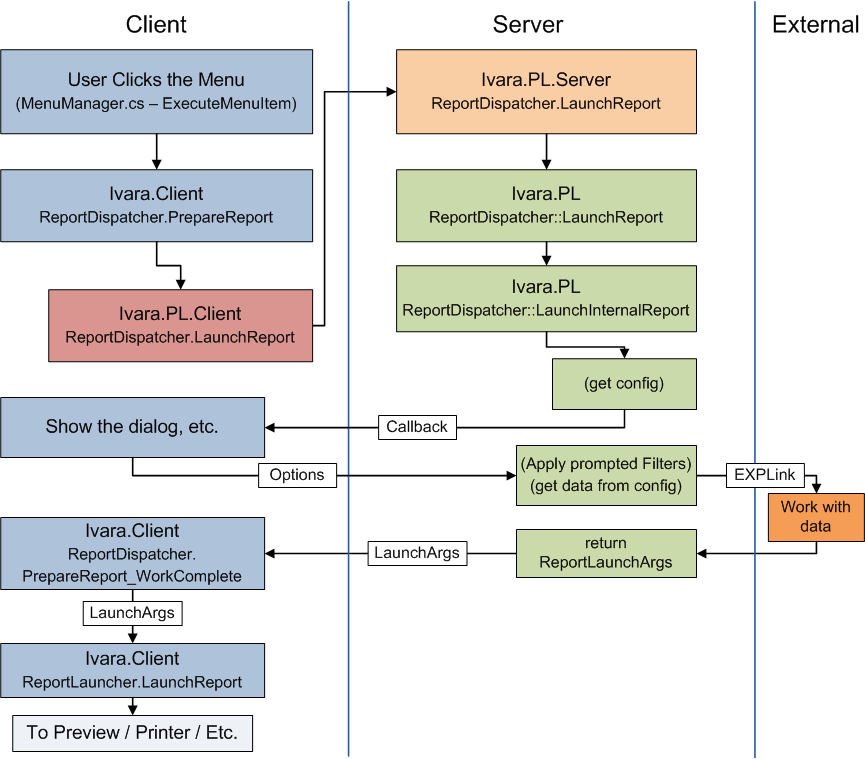
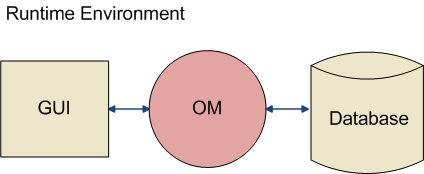
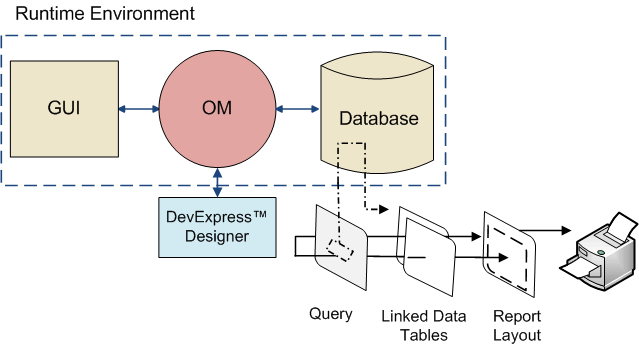
Report generation in APM has been implemented by tying the reporting features of the DevExpress Reporting reporting tool into the object model. The object model can be viewed as the “hub” that links the user, the reporting tool, and the database together. This link provides the necessary mechanisms that allow each element to contribute to the generation of a report. Using the object model as the conduit, users can initiate the design of a report.
When a report definition is persisted, code running on the client builds a data structure consisting of the attributes and relationships used on the report (with corresponding join paths) and sends it to the server.
The server uses the data to construct a configuration object that is associated with the report and persisted. When the report is generated for printing or display, a base context object is sent to the server and the data is retrieved as a slice object from the database.
The slice data is transferred into an ADO.NET derived data table object and serialized back to the client. The table is then provided to the report object, which binds its fields to the values in the table during report generation, producing a completed report.
The user interface (UI) for a report prints in the user’s localized language, provided that the language is supported by APM. For example, a user who has French specified as the language in the Settings Editor, will see French text on the report.
The report’s settings and details are stored in the database. Any APM user can print, create or modify reports unless they are restricted through security.
You can create an Internal report that is used in APM only or several types of external reports that are used with third-party software applications such as SAP. External reports are linked to the third-party company by a command or method invoked in APM or to a URL.
The process of generating a report in APM involves three basic steps:

Selecting Data for the Report

Data selection for a report involves defining which data elements or object classes that you want to include in the report. Object class selection is defined from within APM and is related to the types of information from the APM database that the user wants to include in the report.
For example, if the report must contain information about assets, you may include the Asset class and some of its attributes and relationships, in the report definition.

Designing a Report

APM provides standard reports, which can be modified if necessary. You can also create custom reports. Reports are edited or created using the report designer tool.
Typically, a report is created with a primary relationship such as Asset or Work Order. The join paths for the selected class are available to include in the report. The report’s attributes are limited to attributes and relationships defined in the primary relationship class.
If a primary relationship is not specified, the report is a site report and will only contain site-specific information. Any details other than site details, must be included using subreports in the report details section.
Once the report relationship is determined, the report structure is “built”. The report designer utility that is used is similar to the APM Forms Editor. It consists of five panels: Join path, Toolbox, Outline, Properties, and a layout panel. The layout panel includes several report bands that contain the report attributes, controls, and accessories.
Classes are selected from the Join path panel; the related attributes appear in the Toolbox panel. The report is created when the attributes are dragged from the Toolbox onto the layout panel report bands. Accessories such as panels, images, lines, and page numbers can be added to the report bands as well. You can add filters and sorts so that the report is generated in the most suitable format. Finally, properties are defined for each of the report fields and controls.
Once you have created a report definition in APM, the report must be saved. It then becomes available to all users, depending on their level of access. When the report is saved and generated, APM creates an SQL statement that is used as the basis of a new view on the database. The system then links the database view to the database file and creates a report layout in APM.
When a custom report is generated, pre-existing views for that report are dropped and then re-created. For ad-hoc reports, the view is only created if it does not already exist. When a report is run, the view is created if it does not exist and the view is re-linked to the database.

Printing a Report

Report printing involves using the generated files to populate the report and send it to the printer or a file. APM re-queries the database tables that have been linked to the views in the APM database. The data is passed to the report layout and formatted for printing. To complete the process, the report is sent to the output destination.
An option in the report definition determines whether the user can change the attachments to print option. For example, with this option selected, the user can change the attachments to print option from “Do not print” to “All” attachments and all objects attached to the report are printed in addition to the report.
If a prompted filter was added to the report when it was designed, the user is required to specify an appropriate value when the report is printed. For example, if a prompted filter is applied to the Created On date, when the report is generated, the user will need to specify the date range to apply.
TOP

Class Associated With the Report

Each report that you create is associated with a class in the object model. This class determines where users can access the report in the user interface. For example, if you create a report by selecting Create Custom Report from the Task menu on an open work order task, the report will be associated with the Work Order Task class and will appear under the Task menu, Print menu item for all primary windows on the Work Order Task class. When you decide to design a custom report, you need to be sure that you access the Create Custom Report option from the appropriate place. You can create multiple reports on each class in APM.
TOP

Report Hierarchy

Reports in APM can have a master-detail format. A master-detail report consists of a (master) report that has one or more subreports linked to it. Each report is created individually, and each contains a data field that is passed from the master report to the detail (sub) report.
For example, you could create an asset report that includes the asset name, properties, and so on. You could create a subreport that lists all indicators for the asset, with the current indicator reading. The link between the master report and the detail report might be the asset number. All of the reports are embedded within the top level report when it is generated and printed. The titles of lower-level reports become subreports contained within the master report.
Each element of the report is associated with fields from the object model. These fields provide the actual data for the report. If you want a piece of information from the object model to appear in the title of the report but not in the body of the report, you can make that field hidden and include it in the formula for the title.
If a primary relationship is not selected for a report, the report is considered a site report. Only values for the site such as address, default values, rules, or approvals can be included on a site report. Any details, other than site details, must be provided by subreports in the report details section.
When a primary relationship is selected for a report, the join paths for the selected class are available to include in the report. The report’s attributes are limited to the attributes and relationships defined in the primary relationship class.
TOP

Applying Filters, Sorts, and Calculations to Fields

You can apply filters, sorts and calculations to most of the fields on a report. Some filters and sorts can be added to the report field directly. For example, you might select a date field and select a “on or before” filter to it, or you might select a text field such as employee name and apply a descending sort to it.
A report designer can also determine whether a report’s prompted filter is read-only. Setting the prompted (runtime) filter to read-only will prevent users from changing the condition when executing the report. Details of the prompt can still be included on the report regardless of whether or not the propted filter is read-only.
You can also create a configuration for the report and apply filters and sorts in the same way as for table configurations. Examples of settings to filter, sort, or perform a calculation on data in a field on your report are listed below:
Between: Use this condition to select a range of items to include on the report.
Does not contain: If the attribute is a text string, use this condition to filter out strings that contain a specific string.
Equal: Use this condition to include only the items that equal the parameter or value you enter. For example, you can select all work orders that have the status “Planned”.
Greater Than: Use this condition to include only the items that are greater than the selected parameter or value.
Greater Than or Equal: Use this condition to include only the items that are greater than or equal to the selected parameter or value.
Less Than: Use this condition to include only the items that are less than the selected parameter or value.
Less Than or Equal: Use this condition to include only the items that are less than or equal to the selected parameter or value.
Like: If the attribute is a text string, use this condition to include items that contain a specific string. For example, if you enter a string with asterisks such as “*correct*”, you will get values that start or end with “correct”.
Not Equal: Use this condition to include only the items that are not equal to the selected parameter or value.
Ascending: Items with the lowest value or parameter will be listed first, at the top of the report.
Descending: Items with the highest value or parameter will be listed first, at the top of the report.
None: Select this option if you do not want any calculations performed on the information in this field.
Sum: Select this option to get a total value for all items in this field. Sum only works when the field contains a Number, Date/Time, or Currency.
Maximum: Select this option to list the highest value in this field. Maximum only works when the field contains a Number, Date/Time, or Currency.
Minimum: Select this option to list the lowest value in this field. Minimum only works when the field contains a Number, Date/Time, or Currency.
Average: Select this option to list the average value in this field. The average is calculated by totaling all fields and dividing by the number of items in the list. Average only works when the field contains a Number, Date/Time, or Currency.
Count: Select this option to view the number of items in this field. Count works for any field on your report.
TOP

Adding a Data bound Accessory Field for Custom Data

Previous to version 6.2.1, the only method available to add a custom data onto a report was to use an existing data member field and then change its value in the data table. This required that for each custom column included on the report, a unique existing data member field be used.
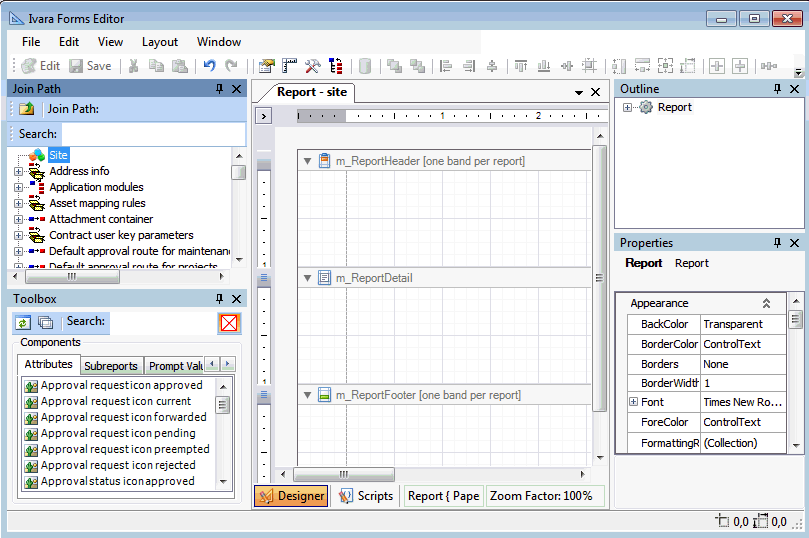
A new report control feature called “Custom Data Label” has been added to APM Forms Editor Toolbox panel, Accessories tab.
This new feature gives the user the ability to draw a data bound field on the report to show the custom data. The control can be dragged from the Accessories tab onto the layout panel and placed on any report band (header, detail or footer). Summary and calculated fields can be added to this control.
The DataFieldName and DataType properties can be modified if necessary. In the preLaunch event, the EXPLink developer will write code to add the column to the report data table and to set the values.
Note: The EXPLink developer must make certain that the custom data column name is equal to the datafieldname.

Technical Background

Customize Reports: Using this function, you can create, edit, preview, and print customized reports, as well as view and print reports that come with APM. These reports are saved in the database so that you can access them through APM whenever necessary.
When you create a custom report, you can specify whether the report is accessible from the site’s Reports menu or on an object’s menu, such as Strategy Development reports.
Note: Only one user at a time can work on creating custom reports. This is because all custom reports are stored in the database. If one person uploads custom reports to APM, and then a second person also uploads custom reports, the first person’s reports is overwritten. The second person’s file replaces the first uploaded file.

Editing in Report Designer

You can make some changes to custom reports directly through the APM Report Designer. To change the layout, you need to open the report in Create Custom Report and then select the existing report to edit. Note that you cannot preview the report from the Report Designer. You must save the changes made to the report and then preview it from the Reports option on the menu bar.

External Reports

Customers can implement their own reports using their own reporting tool and then integrate those reports into APM. The external reports appear on the Reports menu along with other report. Basically, APM acts as a placeholder for the external reports.
There are three methods by which external reports can be invoked:
Calling out to an external process: A user can utilize a reporting tool to print an APM report. For example, John Doe uses a reporting tool called “reportgen.exe” to print a report called AssetReport.rpt for an asset with OID =1234. The report is defined on the Asset class. To execute the report, John Doe runs Reportgen.exe AssetReport.rpt objectID=1234="John Doe.
APM does attempt to validate the existence of the external reporting tool, nor does it verify user permissions to execute the command or access to the data required to generate the report.
Requesting a URL: This is similar to the external process method, except that a URL is built up instead of a command line. It is requested via the operating system’s Shell Execute method. For example: https://reportserver/AssetReport.rpt?objectid=1234&username="John%20 Doe".
URL reports can be invoked for the client only. Because user interaction via a browser or other UI is required, the server does not invoke the URL, nor does the APM server act as a proxy for the client. As well, APM does not attempt to validate the URL and does not verify user permissions to request the URL or to access the data for the report.
Calling a custom method: Requesting a report in APM can trigger an external modeled method on the class that owns the report. The method can be an external custom method created using the APM normal custom method feature, EXPLink. Once invoked, the responsibility for generating and executing the report lies with the external method. The method can indicate success or failure via argument object passed to the method.
External reports can be associated with a configuration object. Configuration data can be fetched and provided to the external method exported to file as a serialized version on an ADO (ActiveX Data Object) data set, or converted to a database view so that the external reporting tool can fetch the data from the database.
TOP

Changing the Logo on Printed Reports

By default all reports included in the APM install database are printed with the APM logo. You can replace this logo with your organization’s logo. The logo is in a file called logo.bmp. Access the logo in the Enterprise properties and replace the logo files. The next time that you print standard reports, the new logo is used. Only one logo is available for the enterprise.
When you create a custom report, a logo is not automatically included. You must select the enterprise logo from the report’s Toolbox Accessories for it to be displayed on the custom report.
TOP

Deploying Custom Reports

Once custom reports are completed and saved, they are available to all users, depending on the security that is in place. In some cases, a user that is restricted from viewing or working with data in APM is able to print a report that contains the restricted data. For this reason, the Administrator must review security settings to be sure that they are appropriate.