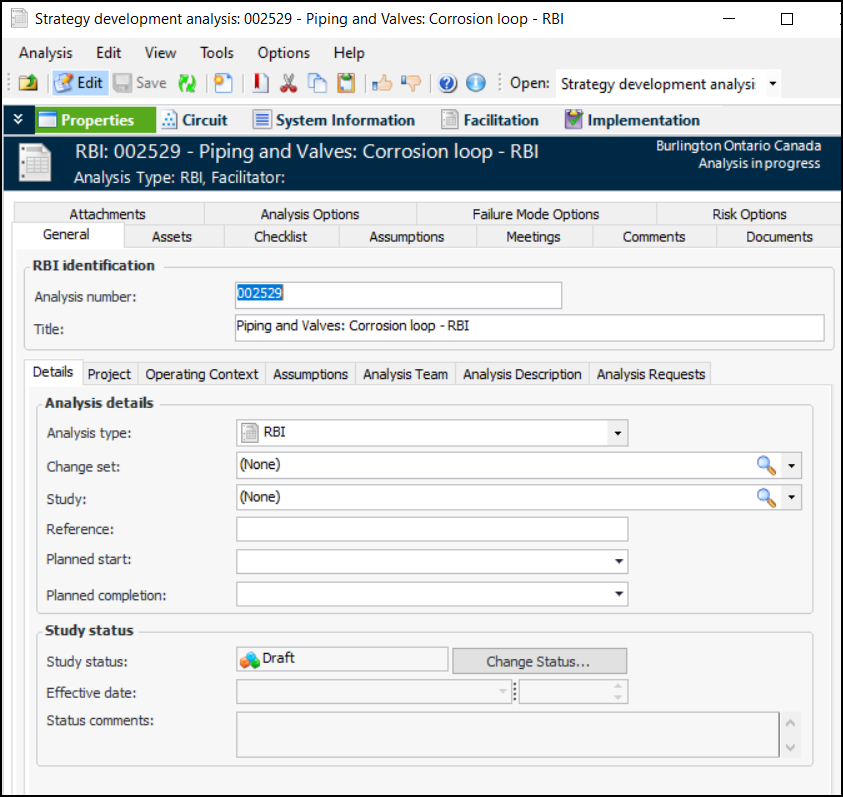
Creating an RBI Analysis

The first step in recording the RBI analysis in APM is to create the analysis record. In the process, you will select the assets to be analyzed.
This section explains how to create an analysis and includes links to more detailed explanations of some steps.

To Create an RBI Analysis
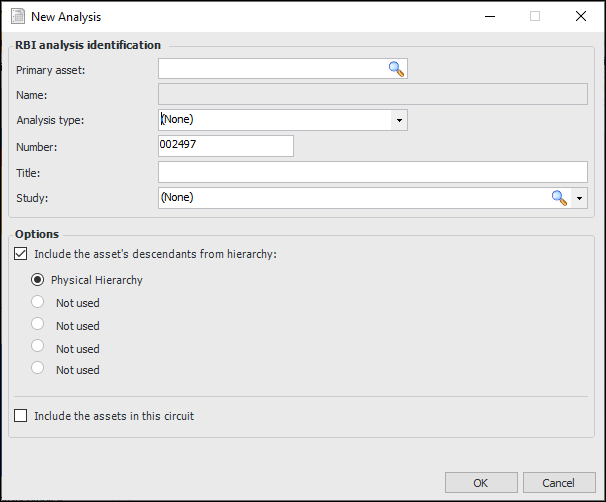
1.
Select the site’s Strategy Development view, Strategy Development tab, and the RBI tab.
2.
Click New. The New Analysis dialog appears.
3.
Tip: You can also create an RBI analysis by opening an asset and selecting the Strategy Development view and tab. Then select the Analyses tab. From the New list, select RBI. The New Analysis dialog appears, and the primary asset information is filled in.
4.
The Analysis type box shows the default type for RBI analyses, if a default has been assigned. An analysis type is a collection of preferred options that can range from the default analysis title to how risk analysis is performed (if at all). You can change or select the analysis type to quickly set default options for the analysis.
5.
6.
If analysis titles are created automatically when the asset is selected, the Title box displays the default name. The name follows this pattern:
Asset type: Primary asset - RBI
You can provide the title, if you wish.
7.
8.
To include the primary asset’s descendants in the analysis, select Include the asset’s descendants and select the asset hierarchy.
Note: Component locations can be included in the analysis. However, component assets and their descendants cannot be included.
9.
10.
Click OK. If you are including the asset’s descendants in the analysis, a progress dialog might appear as the analysis is created. The Strategy development analysis window appears. The Facilitation view, Info Worksheet tab is shown.
11.
To set the general properties of the analysis, select the Properties view. The General tab displays information about the analysis. For example:
12.
The Details tab displays the analysis type, if one has been assigned to the analysis. You can select an analysis type from the list to set default options.
13.
14.
15.
16.
Tip: If the analysis was created when an analysis request was processed, the planned start and completion dates are copied from the request.
17.
On the Project tab, you can add the analysis to a reliability project and associate the analysis with a project task. Reliability projects are typically used to organize and track analyses and objects. They usually use project tasks rather than work orders.
18.
On the Operating Context tab, you can select a context and record the circumstances in which the asset operates.
19.
Select the Analysis Description tab to record additional information about the analysis.
20.
On the Analysis Team tab, you can add team members, identify the facilitator, and assign roles. For more information, see Adding Team Members to an RBI Analysis.
21.
On the Assets tab, you can change the primary asset by clicking Change and selecting another asset.
22.
On the second Assets tab, you can view the assets in a list or select the Hierarchy tab to see the relationship between assets. You can add new or existing assets. You can also double-click an asset to open, and if required, edit it.
You can add assets to the analysis as needed. For more information, see Adding Assets to an RBI Analysis.
23.
The Comments tab helps the analysis team keep track of their work in analyzing assets. For more information, see Entering and Reviewing Comments on an RBI Analysis.
24.
Use the Meetings tab to record team meetings. For more information, see Recording Team Meetings on an RBI Analysis.
25.
The Checklist tab displays standard tasks for your organization’s analysis projects. For more information, see Working with the RBI Analysis Checklist.
26.
Select the Documents tab to browse for standard documents that are relevant to the analysis.
27.
Now and while the analysis progresses, you can attach documents to it using the Attachments tab. For information about attaching a file, folder, note, or URL to an analysis, see Adding Attachments to Objects.
28.
Select the Analysis Options tab. For example:
29.
30.
The New asset options area shows the settings you selected on the New Analysis dialog when creating the analysis. If you intend to add assets, you can select a different hierarchy.
31.
On the Assets tab, you can provide a description of the scope covered by the analysis. The same asset can be added to the analysis as many times as required. For more information, see Working with Asset Scope on an RBI Analysis.
32.
Select the Failure Mode Options and Risk Options tabs to change the default settings for the analysis. For more information, see:
33.
On the History view, Status tab, you can change the Started on date for the analysis.
Tip: As the analysis progresses, you can select the Analysis Audit Info tab or the Asset Audit Info tab to monitor the status of the analysis and its assets.
34.
Select the Copy Requests tab when you wish to view failure mode copies for which the analysis was the source or target. For more information, see Copying Failure Modes for RBI Analyses.
35.
Select the Activity Reports tab to view asset activity reports for this analysis and asset activity reports in which this analysis is included.
When you have completed these steps, you are ready to develop the analysis by creating failure modes and more. Refer to the following topics for more information: