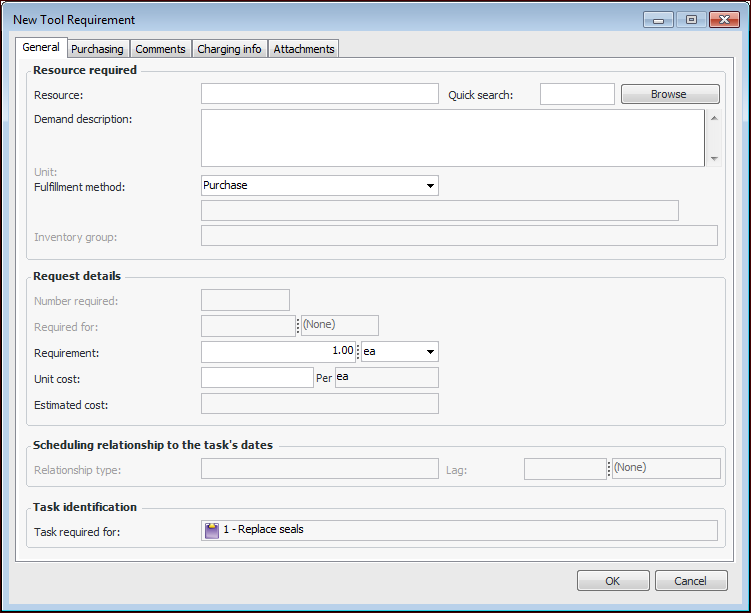
Adding Tools to be Issued from a Warehouse to a Work Order Task

This section describes how to add requirements for tools that will be issued from a warehouse to an existing work order task. You can also add requirements for purchased or rented tools. See:
Note: If the work order has already been approved or marked as planned, you will not be able to add requirements to it. To add requirements to a planned work order, you must first redraft it.
You can specify that two or more tools are required for a work order task, but each tool is issued from the warehouse separately and returned separately. This ensures that on-hand inventory balances are accurate for stocked tools.

Overriding GL Accounts

APM automatically derives a GL account for charges to an asset or work order task based on the site’s accounting settings. You can override the derived maintenance GL account for labor, direct purchases, and inventory usage charged to an asset or work order. When the account number is overridden, the replacement account number is used on subsequent documents and transactions (work order requirements, timecards, issue transactions, purchase order lines, and receipts). The option to override a GL account is available only if the work type has been set up to allow the override.

To Add Tool Requirements

1.
2.
3.
Select the Planning tab and then the Tools tab.
Note: The Planning tab is only available if the task’s work type includes planning information.
4.
Click New. The New Tool Requirement dialog appears.
Tip: To add several different requirements at once, click Browse. The Browse Catalog dialog appears. Select each resource that you want to add. You can select resources on more than one tab. When you are finished, click OK. The resources are added to the list. You may need to open each requirement and edit the settings.
5.
On the General tab, select the tool that is needed:
6.
Select Tool Issue.
7.
The amount of time that each employee, contractor, tool, or service person is required. For example if you are entering a trade requirement, enter how long each employee will need to work on this task. The total time entered for the requirement will be calculated as:
Number Of x Required For
8.
Start to start (SS): The requirement starts when the task is planned to start, offset by any entered lag time.
Finish to finish (FF): The requirement ends when the task is planned to end. The system automatically calculates the required lag time.
9.
Select the Comments tab to enter your notes.
10.
To override the GL account or cost type, select the Charging Info tab and make the appropriate changes (only available if overrides are allowed for the task’s work type).
11.
Select the Attachments tab to view or add attachments to the tool requirement.
12.
Click OK to save the requirement and close the dialog.
13.