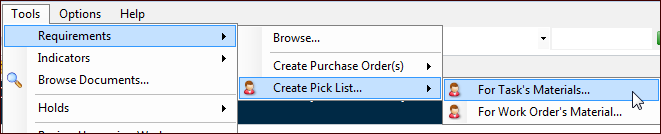
Creating Pick Lists from a Work Order

If the materials or tools required for a work order are in inventory, you can generate a pick list from the work order or task. However, if the site’s Unplanned Work Order Policy has been set to “do not allow activity on unplanned work orders,” you might not be able to create a pick list. If this is the case, you will only be able to create a pick list after the work order has been approved or marked as planned.
Note: If the work order has a requirement for a serialized resource, and the unit has not yet been selected, this requirement will not be added to the pick list. To issue a unit, see Issuing Serialized Units.
Tip: To view pick lists for the site, select the Resource Transactions view, Pick Lists tab.
This topic explains how to create a pick list and issue parts. This tells APM that the material has been taken from the warehouse. APM then records the transactions and assigns the costs to the work order or requisition. The status of each line on the pick list changes to “Posted”.

To Create a Pick List and Issue Parts

1.
2.
To create a pick list for the entire work order: Open the Work Order window, click the Tools menu then Create Pick List. APM creates the pick list and presents a confirmation message. Click OK.
To create a pick list for the open work order task: Open the Work Order Task window, click the Tools menu, Requirements, Create Pick List, and then For Task’s Materials.
APM creates the pick list and presents a confirmation message. Click OK.
Note: If these options are unavailable, you might need to either approve the work order or mark it as planned before creating a pick list.
3.
Open the Work Order Task window, select the Planning tab and the appropriate requirement tab. Scroll to the Pick List column in the table. The column displays the icon and number for the pick list. For example:
4.
5.
6.
In the Pick list identification area, select the correct warehouse, the employee picking the material, and the employee the material will be issued to. For example:
7.
Tip: You can also change fields and add lines by selecting a row and pressing F2 to make the available fields editable. Press Tab to move between the editable fields and select or enter options. Press Enter when you have finished editing a line.
8.
When the pick list is correct, you can issue the parts to the work order. Click Issue Parts Now. The status of each line on the pick list changes from “Waiting to be posted” to “Posted”.
9.