|
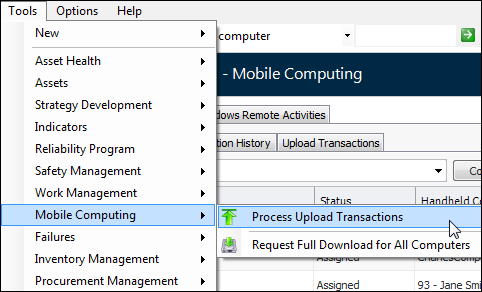
Manually Processing Uploaded Activities
Tip: You can set up the Upload Transaction Broker to process upload transactions automatically at regular intervals. See “Setting up APM Mobile Apps” in APM Installation Guide.To Manually Process Uploaded Activities for a Site
1. On the Site window, click the Tools menu, select Mobile Computing, and then Process Upload Transactions.Tip: You can also select the site’s Mobile Computing view, Activities (iOS or Android) tab, and the Upload Transactions tab. By default, this tab displays the “Upload transactions that are waiting to be processed” configuration. You can either select transactions and click Process Selected or click Process All.
• Retry – The system tries to process the transaction again. For example, you might select this option if the error message indicates that another user has the object locked. You can retry a transaction as many times as you want, but until the problem has been fixed, the transaction will continue to fail.
• Accept – The transaction is marked as “Failed” and the next transaction is processed. You might use this response, for example, for a transaction that failed because it was trying to update an object that has since been deleted. Accepting failed transactions can lead to other failures, if following transactions depend on the failed transaction. This option should be used with caution.
•
• Cancel – The transaction is marked as “In error” and processing stops. Transactions that have been processed up to this point are not affected. The status of all remaining transactions is left as “Waiting to be Processed”.To Manually Process Uploaded Activities for a Device
1.
3.
4. Select one or more uploaded activities, right-click, and click Process. A confirmation message appears. To process the activities, click Yes.
• Retry – The system tries to process the transaction again. For example, you might select this option if the error message indicates that another user has the object locked. You can retry a transaction as many times as you want, but until the problem has been fixed, the transaction will continue to fail.
• Accept – The transaction is marked as “Failed” and the next transaction is processed. You might use this response, for example, for a transaction that failed because it was trying to update an object that has since been deleted. Accepting failed transactions can lead to other failures, if following transactions depend on the failed transaction. This option should be used with caution.
•
• Cancel – The transaction is marked as “In error” and processing stops. Transactions that have been processed up to this point are not affected. The status of all remaining transactions is left as “Waiting to be Processed”.To View Upload Transactions in Error
1. From either the site’s Mobile Computing view, Activities (iOS or Android) tab or the Mobile Computer window’s Synchronization view, select the Upload Transactions tab.
• Click Process Now and then Accept to accept the error and remove the transaction from the list of those in error.