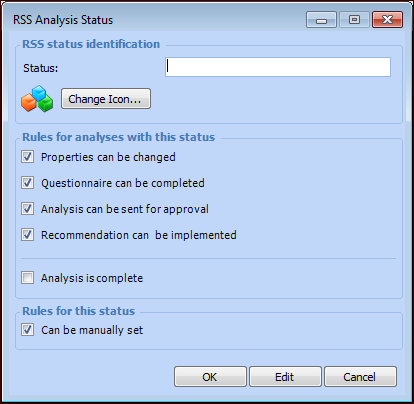
Setting up Statuses for RSS Analyses

Your organization can use analysis statuses to track the progress of RSS analyses in APM. The status can also control actions that can be performed on the analyses to which it is applied. For example, in one typical implementation, when an analysis has the status “New,” you can change its properties. When the status changes to “Implemented,” the analysis becomes read-only. When the appropriate status setting is enabled, you can apply the status manually to an analysis.
Analysis statuses and system events work together. You can link statuses to events such as “creation” or “sent for approval”. The status changes automatically when a linked event occurs.
Tip: Analysis status is shown in the Reliability Strategy Analysis window banner and in the site’s Strategy Development view, Reliability Strategy tab.
This topic explains how to add analysis statuses in APM. You can also revise the statuses provided by APM. For information about setting up rules for automatically assigning statuses, see Setting up RSS Events: Rules for Assigning Statuses.

To Set up Analysis Statuses

1.
On the site’s Strategy Development view, Settings tab, select the Reliability Strategy tab.
Tip: You can also select the site’s Administration menu, Strategy Development Settings, and then Reliability Strategy. The RSS Settings dialog appears.
2.
Select the Analysis Statuses tab. For example:
This tab lists the statuses available for the enterprise.
3.
Click New to add a status. The RSS Analysis Status dialog appears.
4.
5.
To change the icon displayed for this status, click Change Icon, select an image and click OK.
6.
Analyses with this status can be changed. If this option is not selected, the Properties and System Information views in the RSS Analysis window are read-only. However, comments, meeting notes, and checklist items can be changed, and attachments can be added to the analysis.
7.
If the status can be manually set for an analysis, click Can be manually set. The status can also be applied automatically if it is linked to an event.
8.
Click OK. The dialog closes and the status is added to the table.