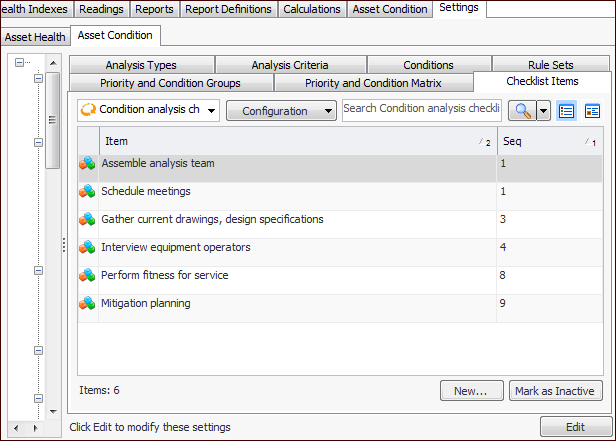
Setting up Checklist Items for Condition Analysis

An analysis checklist is a list of “things to do” to remind the team of the steps they need to consider when performing the analysis. For each item that you add to APM settings, you can specify the varieties of analysis it applies to, identify it with an icon, and provide a description.
When recording an analysis, you can mark analysis checklist items as “Performed” and provide comments for them. APM records the employee who checked off the item, the date, and time. The analysis team can view the status of checklist items in the analysis window, Properties view, Checklist tab.
This topic explains how to add checklist items for asset condition analysis.

To Set up Checklist Items

1.
On the site’s Asset Health view, select the Settings tab, the Asset Condition tab, and the Asset condition settings node in the tree.
Tip: You can also select the site’s Administration menu, Asset Health Settings, and then Condition Analyses. The Asset Condition Analysis Settings dialog appears.
2.
Select the Checklist Items tab. This tab lists the checklist items at your enterprise. For example:
Tip: Select “All analysis checklist items at your enterprise” in the configuration list to add asset prioritization and strategy development checklist items to the table.
Tip: While you are developing a checklist item, you can mark it as inactive until it is ready to be used. Select the item in the table and click Mark as Inactive. The Mark as Inactive/Active dialog appears, where you can enter a comment. When you click OK, a confirmation message appears. Click OK. When the checklist item is ready for use, select it in the table and click Mark as Active.
3.
4.
5.
Note: When items with the same sequence number apply to an analysis type, they are listed in the order in which they were added to APM settings.
6.
To change the icon displayed for this item, click Change Icon, select an image and click OK.
7.
In the Used with area, select the types of analysis to which the item applies.
8.
On the Description tab, you can add information about the item.
9.
Click OK. The dialog closes and the item is added to the table.