Issuing Consigned Inventory

Issuing consigned inventory is similar to issuing regular inventory. In both cases, the user must select the appropriate warehouse inventory group. To issue a consigned inventory item, simply select the consignment warehouse inventory group. This identifies both the warehouse and the supplier’s inventory group that the resource should be issued from.
The consignment issue transaction has the following unique characteristics:

Issuing Consigned Inventory Before Regular Inventory

If a user attempts to issue from a consignment inventory group and there is regular inventory available for the same resource, the system issues a warning message. The regular inventory might be in the same warehouse or in another warehouse at the same site. The user can accept the warning (click Yes) and complete the issue.
Issue one of your consignment warehouse items.

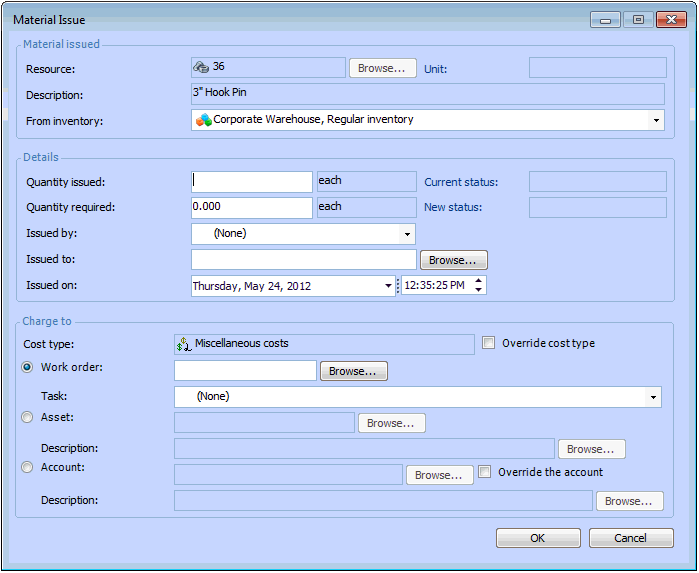
To Issue Consigned Inventory

1.
In the Site window, select the Resource Management view and then the Inventory tab.
2.
On the Warehouses tab, select the warehouse that you want to issue items from. The warehouse items stocked in this warehouse are displayed in the table on the right.
3.
Right-click the item that you want to issue and select Issue Item. The Material Issue dialog is displayed.
4.
Select the consignment warehouse inventory group in the From inventory box. This tells the system that you are issuing a consigned resource.
The system displays default values in the Resource, Description and Cost type boxes.
5.

Issue details

Quantity issued: The quantity of the item being issued. This amount is subtracted from the on-hand quantity for the warehouse. For a serialized resource, the quantity is set to 1 and cannot be changed.
Quantity required: If the amount required is different from the amount issued (for example, stock is out), enter the required amount here. For a serialized resource, the quantity is set to 1 and cannot be changed.
Issued by: The person issuing the material from stores.
Issued to: The person receiving the material.
Issued on: The date and time the material or tools were issued.

Charge to

Cost Type: This box indicates the cost type to charge. The cost type is used to summarize resource costs on a work order and for the asset charged. The system selects a default cost; however, if necessary, the cost type can be overridden.
Charge to: You can charge the costs of the material issued to a work order, an asset, or directly to an account. If you select a work order, you can charge the costs to an individual task on the work order.
If charging to a Work order, click Browse. Select the work order in the selector dialog and click OK. You can select a task on the work order from the Task list.
If charging to an Asset, click Browse. Select the asset in the selector dialog and click OK.
If charging to an Account, click Browse. Select the account in the selector dialog and click OK.
6.
You may be able to override the selected GL account. To change the GL account, select Override the account. Click Browse, select the appropriate account, and click OK.
7.
When you are finished entering information, click OK. APM posts the new transaction and makes the appropriate inventory adjustments in the warehouse.