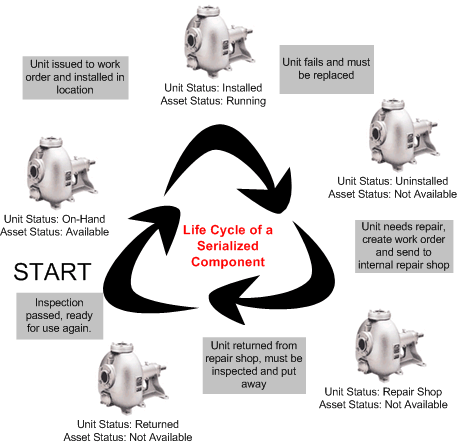
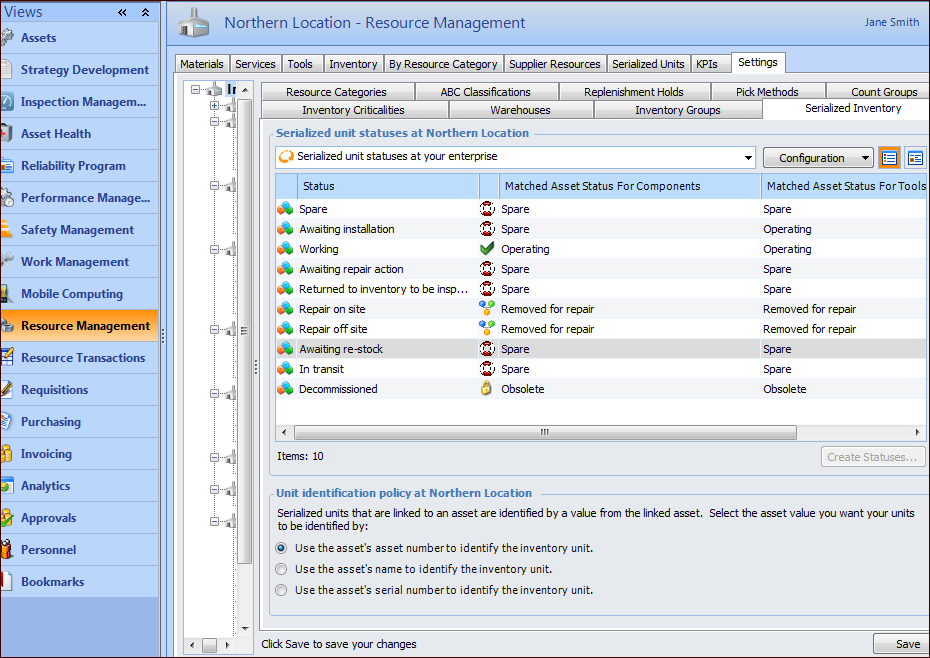
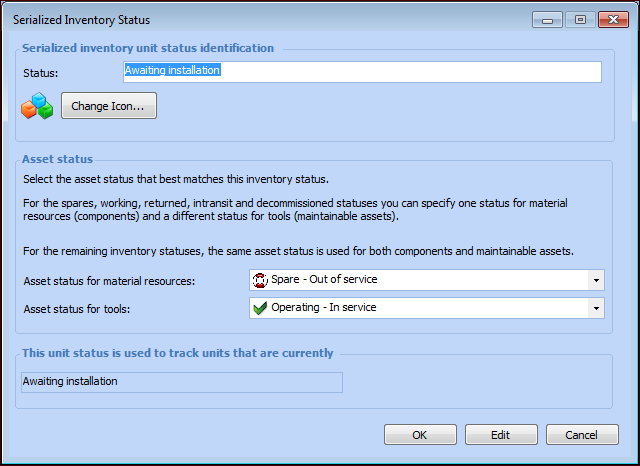
Setting up Serialized Inventory Unit Statuses for
Repairable Spares

Serialized inventory statuses track the availability of a unit for inventory purposes.
There are 10 required statuses that track serialized inventory. You can create descriptions for the unit statuses and change the name APM provides. You cannot delete any of the required 10 unit statuses nor add new statuses.
 
The following diagram gives an example of status changes over a unit’s lifetime.
When you post a resource transaction for a serialized unit, the unit status changes automatically. For example, an issue transaction changes the unit status from “Spare” to “Awaiting Installation.” When the unit’s status changes, APM changes the asset status to the one that has been set up to match the unit status.
The unit status and matching asset status must logically correspond. APM recommends that you set up an asset status to match each inventory unit status. You would match only one asset status to each one of the unit statuses. It is possible to match one asset status to multiple unit statuses. The lists are filtered to display only operational asset statuses that will work with the unit status.
For example, a component is currently installed in a location. The statuses are as follows:
The component fails and is removed. On the component’s remove transaction, the unit status “Repair On Site” is selected, which is linked to the asset status “Removed for repair.” The component’s statuses are now:
The unit statuses “Spare,” “Awaiting installation,” “Returned to inventory,” “In transit,” and “Decommissioned” must be matched to an asset status for both component assets and maintainable assets (tools).
The following table lists the 10 serialized unit statuses:
The following table lists the matching operational statuses
This topic explains how to change the default names for matching unit and asset statuses for repairable spares and tools.

To Edit Serialized Inventory Unit Statuses

1.
On the site’s Resource Management view, select the Settings tab. Select the Inventory Settings node in the tree.
Tip: You can also select the site’s Administration menu, Resource Management Settings, and then Resources. The Resource Management Settings dialog appears.
Tip: You can also access resource management settings from the Site window by clicking the Administration menu, Resource Management Settings, and then Resources. The Resource Management Settings dialog appears.
2.
Select the Serialized Inventory tab. This tab lists the serialized unit statuses and the default asset statuses. For example:
3.
4.
5.
APM recommends that you set up a separate asset status to match each inventory unit status. However, you can match one asset status to multiple unit statuses. The lists are filtered to display only operational asset statuses that will work with the unit status.
Tip: To create a new asset status, right-click the asset status box and click New.
6.
7.