Adding Indicators to a Failure Record

From the failure record, you can view and compare indicator readings related to a failure. For example, if a failure occurs on a pump, you might wish to track the pump’s pressure readings recorded over time. The failure record contains readings taken before the failure occurred, readings taken after the failure is resolved, and all of the readings taken while the failure is open. You can view individual readings and a chart of the readings over time.
When a failure record is created in the process of acknowledging an alarm, the indicator that generated the alarm is copied to the failure record. When you select an asset’s failure mode when creating a failure record, any indicators assigned to the failure mode are copied to the failure record. You can also add indicators to the failure record, as explained in this topic.
For information about viewing indicator readings related to a failure, see Viewing the Indicators and Readings that Track a Failure.

To Add Indicators to a Failure Record

1.
2.
3.
Select the Properties view and the Indicators tab. This tab lists indicators assigned to the failure record.
4.
Click Browse. The Browse Indicators dialog appears.
The default configuration lists indicators for the current site. In the configuration list, you can select the configuration for all available sites.
The list at the bottom of the dialog allows you to view indicators for the asset and below, asset and above, or the current asset only. You can also select the physical asset hierarchy or an alternative hierarchy for the site, if appropriate.
Tip: To filter the list of indicators, click 
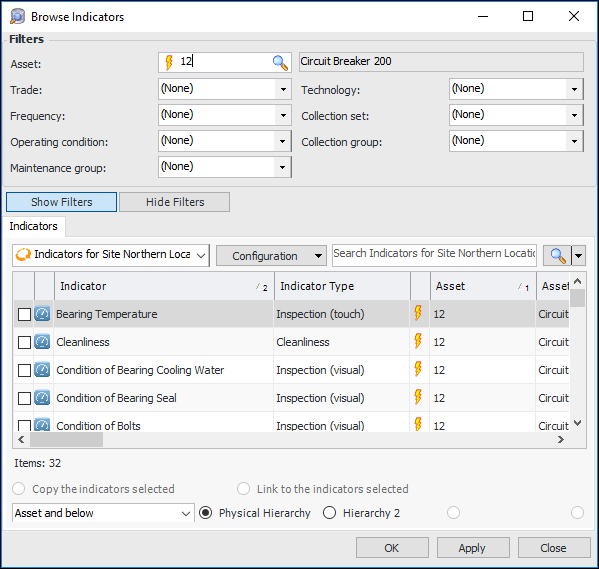
. In the filter dialog, select values for the appropriate indicator properties and click to return to the browse dialog.
5.
Select the indicators to add and click OK. The indicator is added to the Indicators tab.