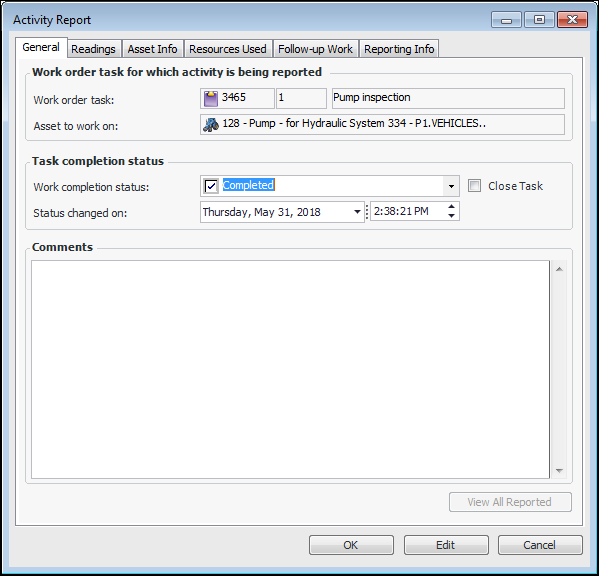
Reporting Work Activity for a Work Order Task

Once you start working on a task, you can keep track of your progress using an activity report. For example, you might need to enter indicator readings, report time worked, or enter comments. Each report that you file is saved with the task and provides an audit history for that task.
Note: If the site’s Unplanned Work Order Policy has been set to “do not allow activity on unplanned work orders,” users cannot create activity reports for the task until it moves to the “Planned” status.

To Report Work Activity for a Work Order Task

1.
2.
3.
From the Task menu, select Report Activity. The Activity Report dialog appears.
4.
Select the General tab, and then select an appropriate status from the Work completion status list.
5.
6.
If appropriate, you can close the task by selecting Close task. The work order task will be closed when the activity report is processed.
7.
Type any notes in the Comments box. Each time you report activity, you can enter a new comment. The comment will be saved with the activity report. To view all of the comments that have been entered for the work order task, click View All Reported Comments. The View Reported Comments dialog appears.
8.
Select the Readings tab. The first time you report activity against a task, this tab contains a separate reading for each indicator planned on the task.
Tip: You can enter reading values directly into the table by selecting the indicator, pressing F2, and pressing Tab to move to the Value Collected column.
Note: This tab is not visible if you have created a checksheet for the task (selecting the Tools menu, Readings, then Enter Readings option) or have assigned the checksheet to a mobile device.
When the activity report is processed, all readings for which values have been entered are posted. Readings that have been left blank are removed from the activity report.
When another activity report is entered for the same work order task, this tab only shows the remaining indicator readings (that is, the ones that do not yet have readings entered).
9.
To add an indicator reading, click New. The Report New Indicator Reading dialog appears.
10.
You can default all the readings for descriptive indicators to their “normal” value. When you click Default to Normal, the system sets the value collected for each descriptive indicator to the value that has been defined as the normal state for that indicator. If the descriptive indicator’s previous reading triggered an alarm that has not yet been acknowledged, then the reading for that indicator will remain blank. This will not overwrite any previously selected value for an indicator.
11.
To view all the readings that have been entered for a task, click View All Reported Readings. The View Reported Readings dialog appears.
12.
Select the Resources Used tab.
13.
Select the Labor tab to record the time spent working on the task. Depending on your site settings, one or more timecards might automatically be created on the activity report. When the activity report is processed, any automatically prompted labor transactions for which hours have not been entered are deleted.
Tip: You can enter timecard information directly into the table by highlighting the requirement and pressing F2. Once you have entered information in one column, press Tab to move to the next column.
14.
Click New to add a new timecard, and then enter the timecard details. When a new transaction is added, it is not posted until the activity report is processed.
15.
Click View All Reported Labor Charges to view all the timecards that have been entered for a task. The View Reported Labor Charges dialog appears.
For more information, see Completing a Timecard.
16.
Select the Asset Info tab and then the Failurestab to report resolved failures.
17.
Click New to enter a new failure. The Failure dialog appears. For more information, see Creating a Failure Record When Reporting Work Activity.
18.
Click View All Resolved Failures to view all of the failure resolutions that have been entered for a task. The View Resolved Failures dialog appears.
19.
Select the Asset Info tab and then the Downtime Incidents tab to enter downtime incidents for the task.
20.
Click New to enter information about a new downtime incident. The New Downtime Incident dialog appears. For more information, see Reporting Downtime Incidents.
21.
Click View All Reported Downtime to view all of the downtime incidents that have been entered for a task. The View Reported Downtime dialog appears.
22.
Select the Follow-up Work tab to request follow-up work by creating a new work request or work order. When the activity report is processed, the new work order or work request is created using the information entered here. For more information, see Requesting Follow-up Work for a Work Order Task.
23.
Click View All Reported Follow-up Work to view all of the follow-up work that has been requested for a task. The View Reported Follow-up Work dialog appears.
24.
When you are finished entering information, click OK. APM closes the Activity Report dialog and saves the information. Depending on your site settings, the activity report could be processed immediately, or might need to be reviewed before it can be processed.