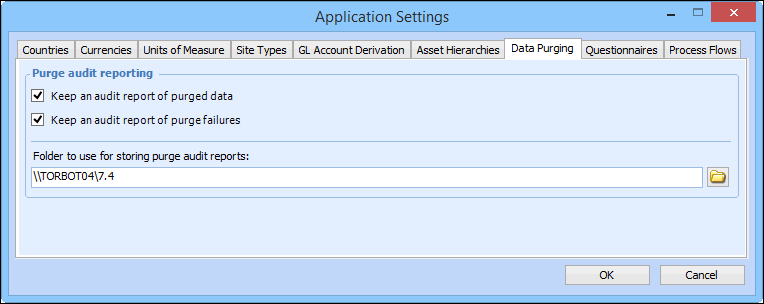
Specifying Data Purging Settings

If you wish to save audit reports when purging rules are executed, you must select administrative settings to specify which reports are saved and where the files are stored. Two types of audit reports are available: purged objects and objects that failed to be purged.
The directory in which audit reports are saved should be shared with all employees allowed to view the information. Audit reports are stored as HTML files in sub-folders that are created on an as-needed basis below the folder that you specify in the data purging settings dialog. A separate folder is created for each class of object that is purged. For example, there could be a sub-folder for purged work requests and another for purged resource transactions.
The HTML files in each folder are named by concatenating the purging rule name, the report type (that is, Purged objects or Failed deletions), and the date and time on which the purge was completed. For example, a report might be named “Labor transactions more than 7 years old - Purged objects (September 1, 2005 05:00).html”.
When data purging settings specify that audit reports are saved, you can access a purging rule’s audit information from the Data Management view, Data Purging tab, Audit Files tab.

To Specify Data Purging Settings

1.
2.
Click the Administration menu and then Application Settings. The Application Settings window appears. Select the Data Purging tab.
Tip: You can also open this dialog from the Data Management view, Data Purging tab, Purging Rules tab. Click Settings. The Data Purging Settings dialog appears.
3.
4.
Click the folder icon in the Folder to use box to locate and select the folder in which reports are to be stored.
5.
Click OK. The Audit Files tab is added to the Data Purging tab in the Data Management view.