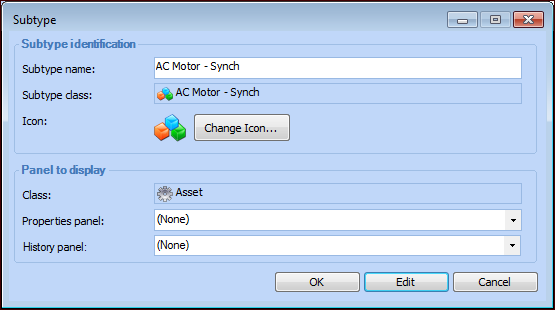
Creating Asset Subtypes

The APM Install database comes with 14 asset subtypes. When you select an APM subtype for an asset, the specifications panel for that subtype is added to the asset. This panel contains the subtype’s attributes. These can be filled in to record information about the asset.
You can also create custom asset subtypes or customize the APM asset subtypes. You can enable auditing for a custom subtype and set up its Audit Info tab so that the actions performed on the subtype are displayed in the asset’s History view.
These are the main steps to creating and using custom asset subtypes:
Note: Before you start, you must launch the product as an APM administrator.

To Create Asset Subtypes

1.
2.
Select the Customization Center view.
3.
Select the Classes tab, then the Custom tab.
4.
Click Lock for Customization.
5.
Note: If a custom Asset class does not yet exist, you will need to create it first. Click New Custom Class and Based on APM Class. Select the Asset class and then click OK.
The Class Asset window appears.

Create the Subtype Class

Note: You can customize an existing APM asset subtype by creating a prime version of the APM base subtype class (for example, the AC motor class). You can then add custom attributes to the custom subtype.
6.
In the Class Asset window, click the Tools menu and then New Subtype. The Subtype dialog appears.
7.
In the Subtype box, enter the name of your subtype and then click OK. For example, you might create a subtype called “AC Motor - Synch”. The Class window for the subtype appears.
8.

Add Attributes to the Subtype

9.
Select the Custom Attributes tab.
10.
For each attribute, click New. The Attribute dialog appears.
11.
Enter the information for the attribute and click OK. The custom attribute appears in the list.
For example, you might add attributes to record Frequency, Phase, Voltage, and Power.
For more information, see Adding an Attribute.

Enable Auditing for the Subtype (Optional)

12.
On the Properties view, select the Auditing tab.
13.
Select Audit Changes to instances of this class to enable auditing.
14.
Click Generate Audit Classes. APM creates the audit info and audit details classes that store auditing information for this class. These audit classes are also displayed in the list of customized classes.
Note: The audit info and audit details classes are not automatically deleted if their custom class is deleted.
15.
On the Data to Audit tab, click Browse to select each data element that you want to record for this class. Click OK to close the dialog. The elements appear in the list.
16.
On the Actions to Audit tab, click Browse to select each method that you want to record for this class and click OK. The actions appear in the list.

Create Panels for the Subtype

17.
In the subtype’s Class window, click the Add menu and then Panel. The Forms Editor appears.
18.
In the Toolbox panel, select the Attributes tab.
19.
20.
In the Properties panel, select the Text field and enter a name for the subtype’s specification panel.
21.
22.
If you have enabled auditing for the subtype, you must also include the audit data in the user interface in order to view the audit changes in the asset’s History view. Add another panel and name it “subtype - Audit Info”, where subtype is the subtype name.
23.
Add a notebook with the three tabs: By Event, By Data Element, and General. Design the pages according to APM standards for Audit Info panels.
Tip: Open an existing asset subtype (for example, AC Motor) and use its Audit Info panel as an example.
24.

Associate the Subtype Panels to Asset Panels

25.
In the Customization Center, open the custom Asset class. Click the Add menu and then Panel. The Forms Editor appears.
26.
In the Join Path panel, select the join path to the new subtype (for example, SubType - AC Motor - Synch).
27.
In the Toolbox panel, select the Panels tab.
28.
29.
In the Properties panel, select the Text field and enter a name for the subtype panel.
30.
31.
If you enabled auditing for the subtype, add a panel to appear on the History view. Click the Add menu and then Panel. The Forms Editor appears.
32.
In the Join Path panel, select the join path to the new subtype (for example, SubType - AC Motor - Synch).
33.
In the Toolbox panel, select the Panels tab.
34.
35.
In the Properties panel, select the Text field and enter a name for the Audit Info panel, for example “AC Motor - Synch - Audit Info”.
36.
37.

Unlock the System

38.
The system displays a message stating that it will generate schema and cache files. Click OK. This could take a few minutes to complete.
Note: If the system does not automatically generate the schema and cache, click Generate and then Schema, and Generate and then Cache Files in the Customization Center.

Assign the Subtype to Asset Types

39.
40.
Click the Administration menu, Asset Management Settings, and then Asset Management. The Asset Management Settings dialog appears.
41.
Select the Asset Types tab and double-click the asset type that will use the custom subtype. The Asset Type dialog appears. Click Edit.
42.
Select the Specifications and Subtypes tab and select the custom subtype that you created.
Tip: To support up to three default subtypes, click the appropriate settings in the Options area, including the subtypes.
43.
44.
In the Properties panel list, select the specifications panel that you created.
45.
In the History panel list, select the Audit Info panel that you created. Click OK.
46.
Click OK to close the Asset Type dialog. Click OK to close the Asset Management Settings dialog.
47.
To test this, create an asset and select the asset type that includes the new subtype. On the General tab, in a Subtypes box, select your custom subtype. The custom panel that you created should now be available in the asset’s Properties view. For example:
Select the History view and the subtype’s Audit Info tab to test it.