|
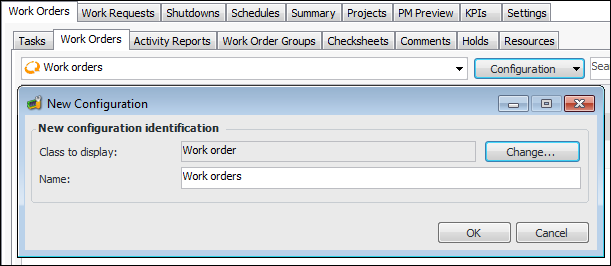
Creating a Table Configuration
A table configuration controls what information is listed in a table and how it is displayed. A table configuration is a combination of columns, filtering criteria, sorting criteria, and format choices that display specific data, such as all RCM2 analyses with a status of “New”.You can create a table configuration from scratch, as described here, or create it by copying an existing configuration and making changes. For more information, see Copying Table Configurations.To Open and Name a New Table Configuration
2. Click Configuration and then New. The New Configuration dialog appears, displaying the class displayed in the current table. For example:
•
• To display objects from a different class in the new configuration, click Change. The Change Configuration Class dialog appears:Click OK to close the Change Configuration Class dialog. Then click OK in the New Configuration dialog.Note: To use join paths, you will need to understand how the object model works. For information, see Exploring the Object Model Through the User Interface.
4. In the Browse list click Browse available columns to choose the columns you want to include in the configuration. The Browse Available Columns dialog appears. For example:
• Click OK. If you have already selected attributes from the main class, the following message appears: “You’ve made changes to the list of attributes. Would you like to maintain these changes?” Click Yes. The attributes in the join-path class now appear in the list.
7. Click OK. The attributes now appear in the list of columns. If necessary, you can change the order of the columns, change properties like column width, create data groups and count columns, and aggregate data. For more information, see Defining Column Properties.
8. Select the Filtering tab to create filtering criteria. For more information on creating filters and filter groups, see Creating Filters for Table Configurations.
9. Select the Sorting tab to set up sorting for columns in the table configuration. For more information, see Entering Sorting Criteria for Table Configurations.
11. Select the Appearance tab to define how the table configuration looks and how you can manipulate data in it. For more information, see Defining View as Table Appearance Properties, Defining View as Form Appearance Properties, Defining View as Chart Appearance Properties, and Defining View as Map Appearance Properties.
12. If you are logged on to APM as an administrator, you can select the Buttons tab to add custom buttons to the configuration. For more information, see Adding Custom Buttons to Table Configurations.
13. Select the Sharing tab to set sharing options for the configuration. For more information, see Sharing a Table Configuration.
14. If you are logged on to APM as an administrator, you can select the Options tab to set auto-refresh options. For more information, see Setting Options for Table Configurations.
15. If you are logged on to APM as an administrator, you can select the Options tab, SQL tab to add database hints. For more information, see Adding Hints to a Table Configuration.
16. If you are logged on to APM as an administrator, you can select the Options tab, EXPLink tab to generate EXPLink generic slice code. For more information, contact APM Support.
17. Select the Description tab to add notes related to the configuration.
18. If you are logged on as an administrator, you can select the Usage tab to see users who have personalized the configuration and users who have subscribed to it.
19. Click OK to save the new table configuration and close the Configuration dialog. The new configuration appears in your list of configurations. If you are running APM as an administrator, a confirmation message appears asking if you wish to make the configuration available automatically to users who have personalized their configurations list. Click Yes. The new configuration appears in the configuration list for all APM users.