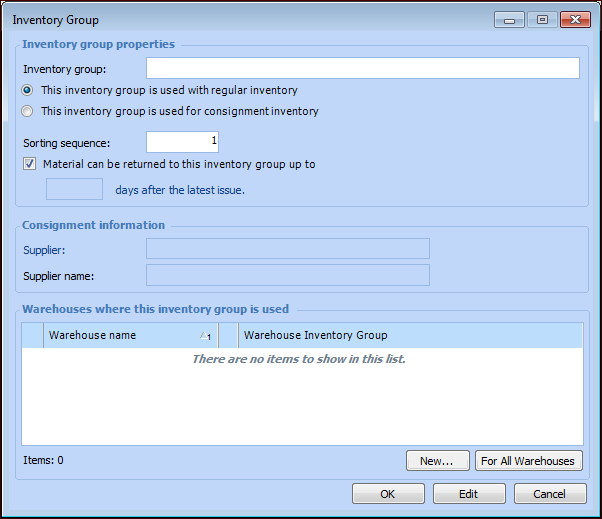
Creating a Consignment Inventory Group for a Supplier

The first steps in setting up inventory are the definition of your inventory groups, warehouses, and valid warehouse-inventory group combinations. It is easiest to define your inventory groups first. The valid warehouse-inventory group combinations can only be defined after both the warehouses and inventory groups have been defined.

Defining Inventory Groups

An inventory group allows you to define specific information about a group of items in inventory. You can indicate that items are either owned by your organization or consignment inventory. For consignment inventory groups, you must identify the consigning supplier.
You must have at least one inventory group in the system, typically, the group for your regular, owned inventory. This inventory group is used to track inventory purchased under normal purchasing agreements; that is, inventory purchased at the time of receipt.
To track consignment inventory, you must also create an inventory group for each supplier with whom you have a consignment agreement.
Inventory groups are not used on their own but must be linked to warehouses to create warehouse inventory groups.
This topic explains how to create an inventory group for a consignment supplier.

To Create an Inventory Group for a Consignment Supplier

1.
On the site’s Resource Management view, select the Settings tab. Select the Inventory Settings node in the tree.
Tip: You can also select the site’s Administration menu, Resource Management Settings, and then Resources. The Resource Management Settings dialog appears.
2.
Select the Inventory Groups tab. This tab shows a list of the inventory groups in the system.
3.
Click New. The Inventory Group dialog appears.
4.
5.
6.
7.
If your warehouses are already set up, you can choose which ones this inventory group should be linked to. To select a warehouse click New. The Warehouse Inventory Group dialog appears. Select the appropriate Warehouse and click OK.
To link this inventory group to all of the warehouses in your system, click For All Warehouses.
Note: If this inventory group will be the default group for the warehouse, you must open the Warehouse window and enter this setting in the Properties dialog.
8.
When you are finished entering information, click OK. APM creates a new inventory group and adds it to the list.
9.
Repeat steps 3 to 8 for each inventory group that you want to create.
10.
11.