|
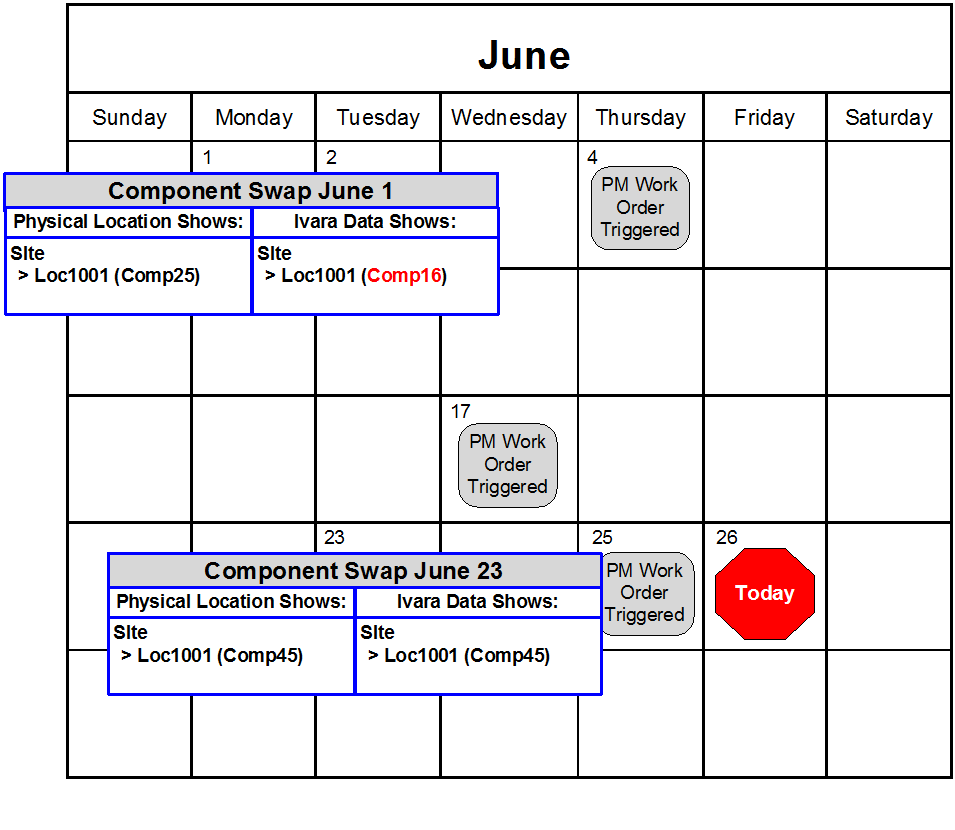
Correcting a Previous Swap
To Correct a Previous Hierarchy Error
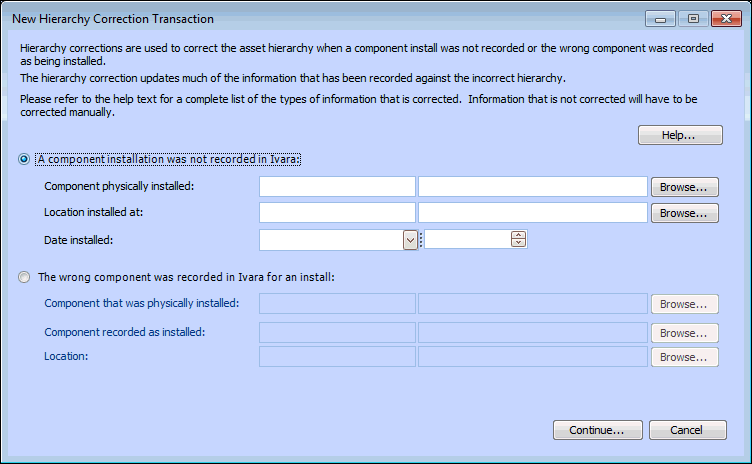
Initiating New Hierarchy Corrections
Before you complete these steps, you must read and understand the information in the introductory topic, Asset Hierarchy Corrections.To Initiate a New Hierarchy Correction
• From an asset, click the Tools menu, New, and then Hierarchy Correction. The New Hierarchy Correction Transaction dialog appears.
• From the site, click the Tools menu, New, and then Hierarchy Correction. The New Hierarchy Correction Transaction dialog appears.
2. Select the problem you are correcting: A component installation was not recorded in APM or The wrong component was recorded in APM for an install. When a component installation is not recorded, a component was physically removed and its replacement was installed but the swap was not recorded in APM. As a result, data collected and activities performed against the installed component continue to be recorded against the component that was previously installed.
5. Click Continue. The Hierarchy Correction Transaction dialog appears, open to the General tab. For example:
6.
7. Select the Install tab to enter the data that should have been entered when the physical swap occurred.
• Choose the correct New Asset Status.
8. Review all of the information on this tab to ensure it is correct, and then select the Yes, I have reviewed the information and it is correct box at the bottom of the tab.
9. Select the Remove tab to enter the removal details that should have been entered when the physical swap occurred. For example:
10. Review all of the information on this tab to ensure it is correct, and then select the Yes, I have reviewed the information and it is correct box at the bottom of the tab.
11. Select the Assets tab to review the matched assets. This tab displays the asset(s) that are being recorded as removed in APM (the left-hand table) and matches them to the asset(s) being recorded as installed in APM (the right-hand table). If an asset in the left-hand table is not matched to its replacement asset in the right-hand table, you can select the matching asset manually.
• Double-click the asset in the right-hand table to open the Match Assets dialog. Select the asset that it replaces from the list, and then click OK. Repeat for each asset that needs a match.
12. Verify that the lists of assets are matched correctly, and then select the Yes, I have reviewed the information and it is correct box at the bottom of the tab.Note: You must be absolutely sure that you have selected the correct assets. If the matched assets are not correct, click Cancel to stop this process. Determine the exact hierarchy correction error, and then start over at step 1. There is no way to undo an incorrect hierarchy correction.
13. Click the Continue button. Five new tabs appear in the dialog: Indicator Readings, Work Order Tasks, PM Work Orders, Work Requests, and Verification. These tabs provide information about the documents APM will automatically update as well as the documents that can be manually updated.
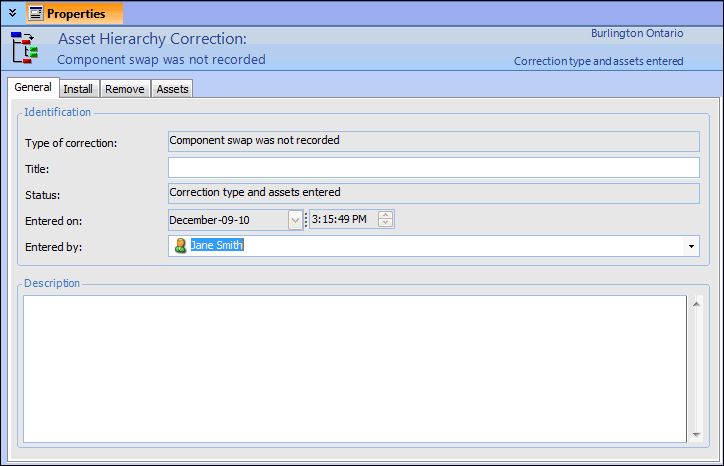
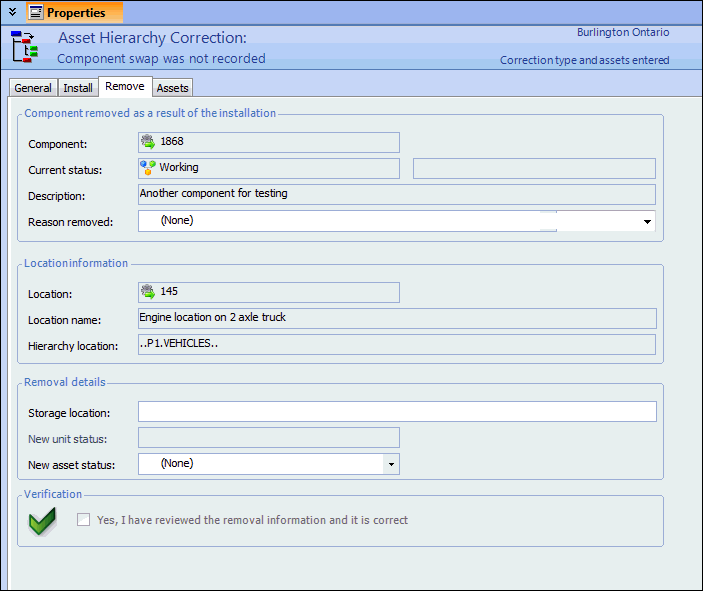
Processing Hierarchy Corrections
To Process the Hierarchy Correction
2. Select the Indicator Readings tab to review the list of indicator readings that will be corrected. For technical information on how indicator readings will be fixed, see Indicator Readings. Once you have verified the information, select the Yes, I have reviewed the information and it is correct box at the bottom of the tab.
3. Select the Work Order Tasks tab to review the list of work order tasks that will be corrected. For technical information on how work order tasks will be fixed, see Work Order Tasks. Once you have verified the information, select the Yes, I have reviewed the information and it is correct box at the bottom of the tab.
4. Select the PM Work Orders tab to review the list of all PM work orders that are affected by this hierarchy correction. APM does not review, update, or cancel these PM work orders. Make note of the work orders and standard jobs that you will need to review. Once you have verified the information, select the Yes, I have reviewed the information and it is correct box at the bottom of the tab.
5. Select the Work Requests tab to review the list of work requests that will be updated. For technical information on how work requests will be fixed, see Work Requests. Once you have verified the information, select the Yes, I have reviewed the information and it is correct box at the bottom of the tab.
6. Select the Verification tab. When you have reviewed all of the information provided on the Hierarchy Correction Transaction dialog, click the All Information Has Been Verified button. When all of the check boxes are checked, the Process Correction button becomes available.
7. Click the Process Correction button to update the asset installation history, to correct the indicator readings, and to update work requests and work order tasks.Reviewing PM Work Orders and Standard Job Triggers
PM work orders are work order that are generated from standard jobs. APM lists all of the PM work orders that you need to review in the PM Work Orders tab of the Hierarchy Correction Transaction dialog. You can note the work order numbers, flip between the Hierarchy Correction Transaction dialog and the Work Orders view to ensure you review all of the work orders, or export the list to Excel to print it.To Review PM Work Orders
1. Go to the site, and then select the Work Management view, Work Orders tab, and then the Work Orders tab.
• To verify the asset to work on, open the Properties view to the General tab. Select a different asset if necessary.
• To verify the asset to charge, select the Charging Info tab. Select a different asset if necessary.
• To verify that a planned component swap is correct, select the Component Activity tab. Select different assets if necessary.To Create an Exception Triggering Rule
5. Select the site’s Reliability Program view, and then the Jobs tab. Open the standard job that triggered the PM work order you just corrected.
6. Select the Triggering tab. Determine whether or not this standard job needs an exception triggering rule. If it does, complete steps 7 to 9. If not, skip to step 10.
7. Click Create Exception Rule. The Exception Triggering Rule dialog appears.
8. Click the box next to Next triggering uses this exception rule, and then enter the date or rule clauses needed to trigger the work order correctly. For detailed steps to create an exception triggering rule, please see Creating an Exception Triggering Rule.
9. Click OK to save the exception triggering rule and close the dialog.
11.Correcting Downtime Incidents
To Correct Downtime Incidents
1.
3. Click Edit. Verify the following information, making any necessary changes:
• Verify that the downtime is being recorded against the correct asset on the General tab. If not, select the appropriate asset. When you change the asset, APM automatically recalculates the downtime costs using the downtime rules on the new asset.
4. When you have reviewed the information, click OK to close the dialog.
5. If the incident needs to be deleted, right-click it in the list and click Delete. A message appears asking you to confirm that you want to delete this downtime incident. Click Yes.Correcting Asset Transfers
To Correct Asset Transfers
1. Go to the site’s Asset view, Utilities tab. Open the asset transfer document that transferred any of the components involved in the asset hierarchy correction during the error time frame. The Asset Transfer Document view appears, open to the General tab.
2. Select the Assets tab. Note the asset(s) listed and the transfer status.
3.
• If the transfer document has not been sent for approval or does not require approval, select Allow Editing, and then choose the correct asset.
• If the transfer document has been sent for or received approval, select the Transfer Document menu, and then Redraft. Choose the correct asset. You will need to send the transfer document for approval again.
• Meanwhile, you need to create a new transfer document listing the correct assets to transfer to the other site. Send this document for approval as usual. When you select Transfer Assets, enter the date when the assets were physically transferred.Updating Swap Info
To Update Swap Info
• From an asset, click the Tools menu, New, and then Hierarchy Correction. The New Hierarchy Correction Transaction dialog appears.
• From the site, click the Tools menu, New, and then Hierarchy Correction. The New Hierarchy Correction Transaction dialog appears.
2. Select the A component installation was not recorded in APM. Although the original swap was recorded correctly in APM, it was deleted when you fixed the hierarchy error. Now you need to update APM with the component installations that happened after the error.
4. Click the Continue button. The Hierarchy Correction Transaction dialog appears, open to the General tab.
5.
6. Select the Install tab and enter the installation details. You should enter the same asset status, asset life, and triggering information that were entered on the original component swap.
• Choose the correct New Asset Status.
7. Review all of the information on this tab to ensure it is correct, and then select the Yes, I have reviewed the information and it is correct box at the bottom of the tab.
8. Select the Remove tab to enter the removal details. Again, enter the same reason and asset status that were entered on the original component swap.
9. Review all of the information on this tab to ensure it is correct, and then select the Yes, I have reviewed the information and it is correct box at the bottom of the tab.
10. Select the Assets tab to review the matched assets. This tab displays the asset(s) that are being recorded as removed in APM (the left-hand table) and matches them to the asset(s) being recorded as installed in APM (the right-hand table). If an asset in the left-hand table is not matched to its replacement asset in the right-hand table, you can select the matching asset manually.
• Double click on the asset in the right-hand table to open the Match Assets dialog. Select the asset that it replaces from the list, and then click OK. Repeat for each asset that needs a match.
11. Verify that the lists of assets are matched correctly, and then select the Yes, I have reviewed the information and it is correct box at the bottom of the tab.
12. Click the Continue button. Five new tabs appear in the dialog: Indicator Readings, Work Order Tasks, PM Work Orders, Work Requests, and Verification.
14. Select the Verification tab. Click the All Information Has Been Verified button. When all of the check boxes are checked, the Process Correction button becomes available.
15. Click the Process Correction button to update the asset installation history, to correct the indicator readings, and to update work requests and work order tasks.
16. Repeat steps 1 to 15 for each asset that was installed after the hierarchy error that you corrected.