Importing CPR Action Plans From an Excel File

An action plan in a current practice review recommends an action to prevent a failure or mitigate its consequences. The action types are condition-based maintenance, failure-finding maintenance, scheduled restoration or discard, modification or redesign, and no scheduled action.
There are three ways to add action plans to a review:
Note: See APM Installation Prerequisites for the versions of Microsoft Excel that APM supports.
This topic explains how to import action plans. It explains:

About the Import Action Plans Wizard

Use the Import Action Plans wizard to select the Excel workbook that contains the data to import. You can then match the action plan properties with columns in the Excel file. The wizard creates a new action plan for each row in the first worksheet of the Excel Workbook. Once the import process is successfully completed, you can add information to the action plans and proceed to the implementation stage.
In the import wizard, you can match action plan properties to either column headings or sequence letters:
Column headings in the first row of the file. Each column heading in the first sheet of the workbook is matched with the property that has the same name. The match is not case-sensitive.
Column sequence. Columns on the first sheet of the workbook are matched to action plan properties based on column and property sequence numbers. For example, the first column (Column A) is matched to the Asset property (sequence number 1).
If the wizard encounters an error, it abandons that action plan and moves on to the next row in the sheet. At the end of the import process, the wizard displays the number of action plans that were created and the number that failed. It also creates a results Excel file that shows the action plans that were imported successfully and those that could not be imported, including the reason for the failure.
The Import Action Plans wizard respects your security settings. In other words, you cannot import property values that your security profile does not allow you to edit in APM. The Import Action Plans wizard uses the security profile defined for the site that owns the source action plan when determining if you have update access for each data member.
Note that if a particular user should not have access to the Import Action Plans wizard itself, it can be secured in the normal way like any other method.

Setting up the Excel Worksheet

Be sure to set up your worksheet with columns that match the properties shown in the Import Action Plans window. If you wish to match column headings, use the property names as column headings in the worksheet. If you plan to match the column sequence to action plan properties, be sure to arrange the columns in the worksheet to match the order of properties in the wizard.
It is not mandatory for all of the columns to have content. However, the content must be valid or the action plan will be rejected or the value skipped.
Information that will be recorded in the Failure mode note box and the Notes tab in the Maintenance Action Plan window
An action plan will fail to be imported if it lacks a mandatory value, in this case, the asset number. If the asset number is missing or the referenced asset is not included in the review, the import wizard skips the action plan and moves on to the next row in the worksheet.
In many cases, the values in the worksheet must match the values defined in APM. For example, if the Frequency property has a value of “60 Years” in the worksheet and that value has not been defined as a frequency in APM, the information will not be imported. In the Maintenance Action Plan window, the Frequency box will be empty.
The information that you import into text boxes is subject to the box’s length restrictions. For example, only the first 20 characters of a CMMS task are imported.

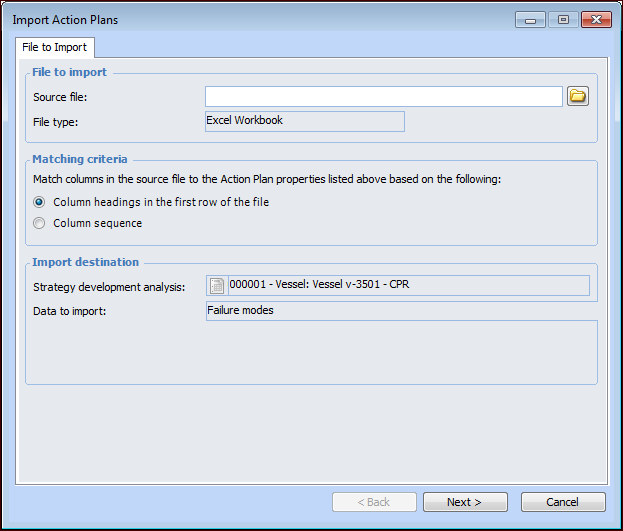
To Import Action Plans

1.
Open the review, select the Facilitation view and the Action Plans tab.
2.
3.
Click Import. The Import Action Plans wizard appears.
Note: Make sure that the source Excel file has been closed.
4.
Click in the Source file box. The Open dialog appears.
5.
Navigate to the Excel file, select it, and click Open. The Source file box displays the file path and name.
6.
Column headings in the first row of the file. Each column heading in the first sheet of the workbook is matched with the property that has the same name. The match is not case-sensitive.
Column sequence. Columns on the first sheet of the workbook are matched to action plan properties based on column and property sequence numbers. For example, the first column (Column A) is matched to the Asset property (sequence number 1).
7.
Click Next. The Columns to Import page shows the result of the matching process. If you are matching column headings, the Matching Excel Column column displays the headings that were matched in the Excel file. If you selected the column sequence option, the Matching Excel Column displays the column letters from the Excel file.
8.
9.
Click Finish. If one or more column headings could not be matched, a message appears asking if you wish to continue. Click Yes or return to the Column Matching Page and match the columns.
10.
When columns are matched and you click Finish, a confirmation message appears identifying the Excel file to be imported. Click Yes. A progress dialog appears that shows the number of items being imported and the number of successful and failed imports as it progresses.
You can stop the import process by clicking Cancel on this dialog. Action plans that have already been created are not deleted, but any remaining rows will not be imported. You can accept the items that have been successful up to that point or click Cancel in the Completion Status page to delete the imported items. Failed items are displayed in the results Excel file. The import request has the status “Stopped”.
11.
The Completion Status page shows the status of the import, the number of items processed, and the numbers of successful and unsuccessful action plan imports. The Details tab displays information about the import request, the date and time when it started and completed, and so on.
12.
Tip: You can return to the Excel file to correct the data on the failed rows and remove the successful rows. Then import the file to add the action plans that failed previously. If you successfully import the same worksheet more than once, new duplicate action plans are added.
13.
When you have finished reviewing the results of the import process, click OK. The imported action plans are saved to the current practice review and displayed in the Action Plans tab.
Note: If you click Cancel in the Import Action Plans wizard, all action plans created by the process are deleted.
Each action plan is given a reference that consists of the unique, sequential number given to the asset when it is added to the review plus the sequential number assigned to the action plan. For example, the first action plan for the 16th asset has the reference 16-1.
14.

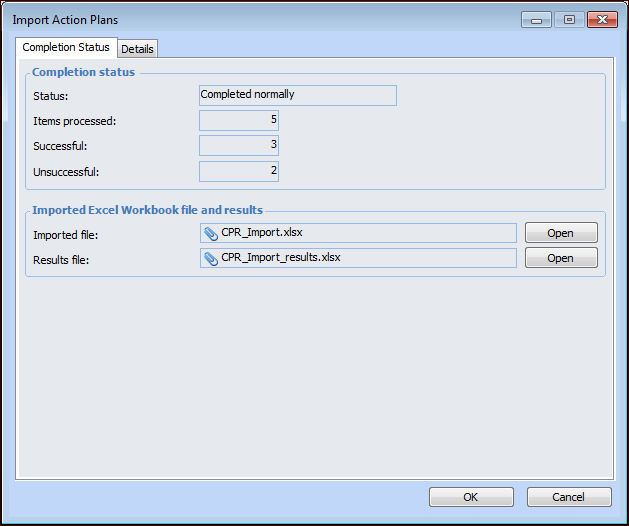
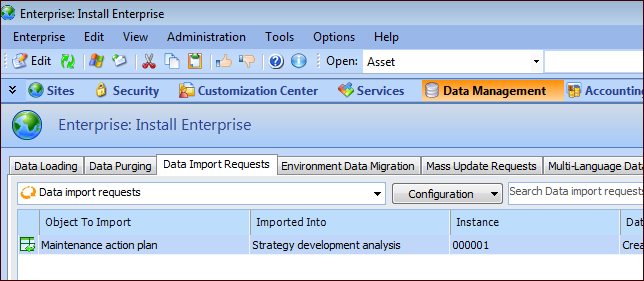
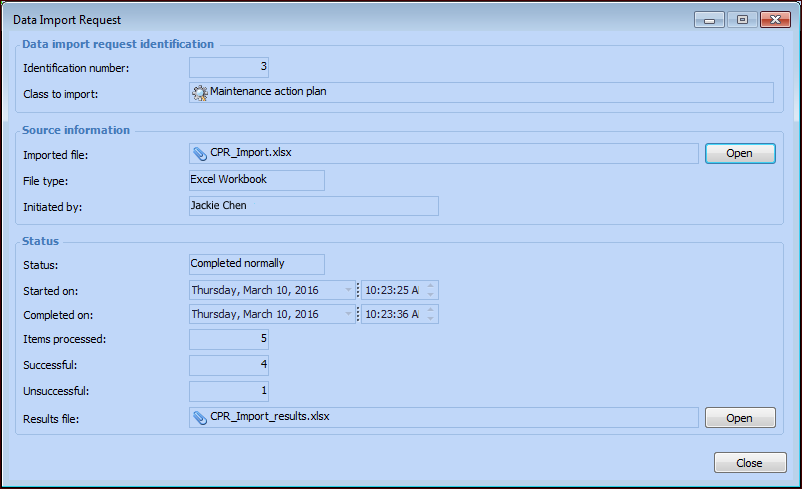
Viewing Data Import Requests

After closing the import wizard, you can view the record of the import in the Enterprise window. Select the Data Management view, Data Import Requests tab. For example:
Double-click a request to open its Data Import Request window, where you can open a copy of the source file and the results file. For example:
Note: The wizard places a copy of the source file and the results file in C:\Users\Username\AppData\Local\Temp.