Assemblies

This topic explains how to create and use assemblies in APM.

About Assemblies in APM

Assemblies are component assets that also include component assets. A component asset is simply an asset that is moved to and from various locations. Component assets are installed in component locations, as shown in the following diagram.
Whenever you use assemblies, you need to put the component’s locations (locations B and C in this example) in the physical hierarchy as children of the component location (location A). The physical hierarchy represents the static relationships between assets. Since components can move from one asset to another, they do not belong in the hierarchy. Component locations, on the other hand, do not change, so they are included.
Assemblies are fairly common in most industries. For example, an oil rig (Asset 1) has a generator set (Asset 2) as a component. The generator set, in turn, has a motor (Asset 3) and a pump (Asset 4) as components. The oil rig needs to collect costs and work history data for all of its installed components, so it includes component locations for the generator set (Location A), motor (Location B), and pump (Location C).
The two hierarchies depicted in the diagram (Asset Hierarchy and Installed Components) are called parallel hierarchies. In APM, you can have up to two levels in your parallel hierarchies, as shown in the diagram. The two location B’s and the two location C’s are called parallel component locations. You can have as many parallel component locations as necessary. The parallel component locations on the physical hierarchy are called the outer component locations. The parallel component locations on the installed components hierarchy are called the inner component locations.

Match Codes

Parallel component locations need to match. That is, the number and type of component locations on the assembly and on the location in which it is installed need to be the same. You cannot install an assembly with three components into a component location that has only two children component locations. APM uses match codes to ensure that the correct assemblies are installed in component locations.
You can assign an alphanumeric code to a component location in the physical hierarchy that represents a component location on the assembly. You can also assign the same alphanumeric code to that component location on all of the assemblies that can be installed. Each pair of parallel component locations has a unique code. For example, Location B in the physical hierarchy depicted above would have the same match code as Location B in the installed components hierarchy. Location C would have a different match code, but the Location C’s in both hierarchies would share that code.
TOP

Setup for Assemblies

Setting up assemblies is basically the same as setting up any type of asset. You need to create assets and set up the physical hierarchy. The only differences involve the number and type of assets you create and what you include in the physical hierarchy.
You need to create an asset record for every asset, component location, and component that you want to appear in both the physical hierarchy and the installed component hierarchy. The diagram in the introduction that shows both hierarchies includes nine assets: one site asset (for the top-level asset), five component location assets (for locations A, B, C under Asset 1 and locations B and C under Asset 2), and three component assets (Assets 2, 3, and 4). You can use the Copy method to create identical component locations quickly and to ensure that the parallel locations have the same match code. However, you will need to assign each location to the appropriate parent.
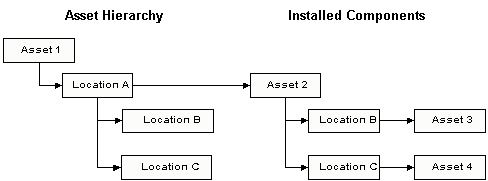
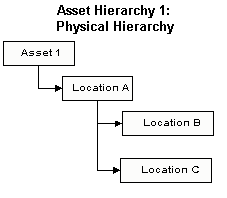
You can create the physical hierarchy in the site’s Assets view. Simply add your asset to the hierarchy and then add the component locations as children in the hierarchy. Components and parallel component locations do not appear in the physical hierarchy, which is depicted below. Instead, you can see a component’s locations by opening it to the Hierarchies view. You can see the components that are installed in a particular location by opening the location and noting the Installed Component listed on the Component Location tab of the Properties view. You cannot see the parallel hierarchies at the same time. Costs charged to installed components are also charged to the component location, enabling them to roll up the physical hierarchy.
When you work with assemblies, it is a good idea to use one of the five asset hierarchies to record asset groups and components and to allow costs to be posted to this hierarchy. An example of this hierarchy is shown below. When you write work orders for components that are not installed in any location, the component is also the asset to charge. Since components do not appear in the physical hierarchy, the costs would not be recorded there. Instead, they would appear in the asset group hierarchy. When you write work orders for installed components and both the component and the component location collect the charges, APM ensures that the cost is added only once when the costs roll up to the top asset in the hierarchies.
Alternatively, you can include an asset group, called the spares parent, in the physical hierarchy that parents all uninstalled components. When components are uninstalled, they will automatically appear in the physical hierarchy under the spares parent. You can still install and transfer components that are children of the spares parent.
TOP

Work Management

Where you choose to write standard jobs and work orders depends on the type of job you want to perform and where you want to record the costs and work history. When you write a standard job or work order, you need to select the asset to work on and the asset to charge.
You can choose to use a component location, an installed component, or an uninstalled component as the asset to work on and as the asset to charge. Work history is saved on the asset to work on. Costs are stored on the asset to charge and rolled up that asset’s hierarchy. The hierarchy or hierarchies that you use to collect costs should be organized with the following restrictions in mind: only organizational or group assets can be parents of components, and components cannot be parents of component locations. Because the physical hierarchy records all of your component locations, you can record costs assigned to component locations on that hierarchy.

Component Location

Assemblies are represented in the physical hierarchy by component locations that are children of other component locations. The component assembly is then installed in the assembly location. When this happens, the component assembly's child locations may or may not have components installed in them. If they do, the child components are also installed in the component location assembly’s matching parallel locations. Thus, before you can install an assembly, you will need to create an “assembly frame” in the physical hierarchy. This frame is made up of the component locations that will hold the assembly and its components.
Generally, if the work you want performed is related to the location in which the component is installed, then you will create the standard job and work order for the location. For example, if a component motor is being used on a primary assembly line where downtime is very expensive, you may perform additional preventive maintenance work. In this case, you would only perform these jobs because of the location in which the motor is installed, so you would create standard jobs for the location. When a work order is triggered from a standard job written to the component location and that location has an installed component, the asset to work on for each step of the work order will be the installed component, with the following two exceptions. First, if the location does not have an installed component, the location itself will be the asset to work on. Second, if a step on the standard job specifies an asset other than the location as the asset to work on, that step will not be changed. For example, if you are triggering an asset-specific standard job used to collect indicator readings, each step will still refer to the appropriate asset.
When you create a work order with a component location as the asset to work on, the work history information is also copied to the installed component and the parallel component location, if one exists. If components and component locations are organized on two asset hierarchies that both collect costs, APM will ensure that the cost for each work order is added only once to the top asset.

Installed Component

On the other hand, if every motor needs to be lubricated regularly regardless of where it is installed or even whether or not it is installed anywhere, you would create a standard job on the motor. When the component is installed in a location, the work order will show the component as the asset to work on and as the asset to charge. Work history and costs will be stored on the installed component, the component location, and the parallel component location, if one exists. Again, if components and component locations are organized on two asset hierarchies that both collect costs, APM will ensure that the cost for each work order is added only once to the top asset.

Uninstalled Component

If every motor needs to be lubricated periodically even when it is not installed in any location, you need to be able to write work orders for uninstalled components. You can write work orders with an uninstalled component as the asset to work on. Work history will appear only on the component. The component is also the asset to charge by default, and the previous location will not record the charges for the work. If you want to charge the previous location with the costs of the work, you can select it as the asset to charge. The costs will be recorded only on that location. Neither the asset to work on nor the location's current installed component will be charged with the costs.

Work Backlog for Components That Have Moved

When you uninstall a component or swap it from one location to another, you need to review the work backlog for that component and its previous component location. Open work requests and work orders for the location or the installed component might or might not need to be completed, depending on the reason the work was needed. For example, if there is an open work order to lubricate a motor that you just uninstalled to be rebuilt, you probably do not need to lubricate the motor first and then rebuild it. Instead, you can close the open work order and create a new one to rebuild the motor. When you review the work backlog, you need to ask yourself, does the work need to be done at all? If no, delete the job. If yes, does a work order for a component location need to be updated with the new installed component? Or does a work order for a component need to be updated with the new component location? You can modify the asset to work on and the asset to charge as necessary.
TOP