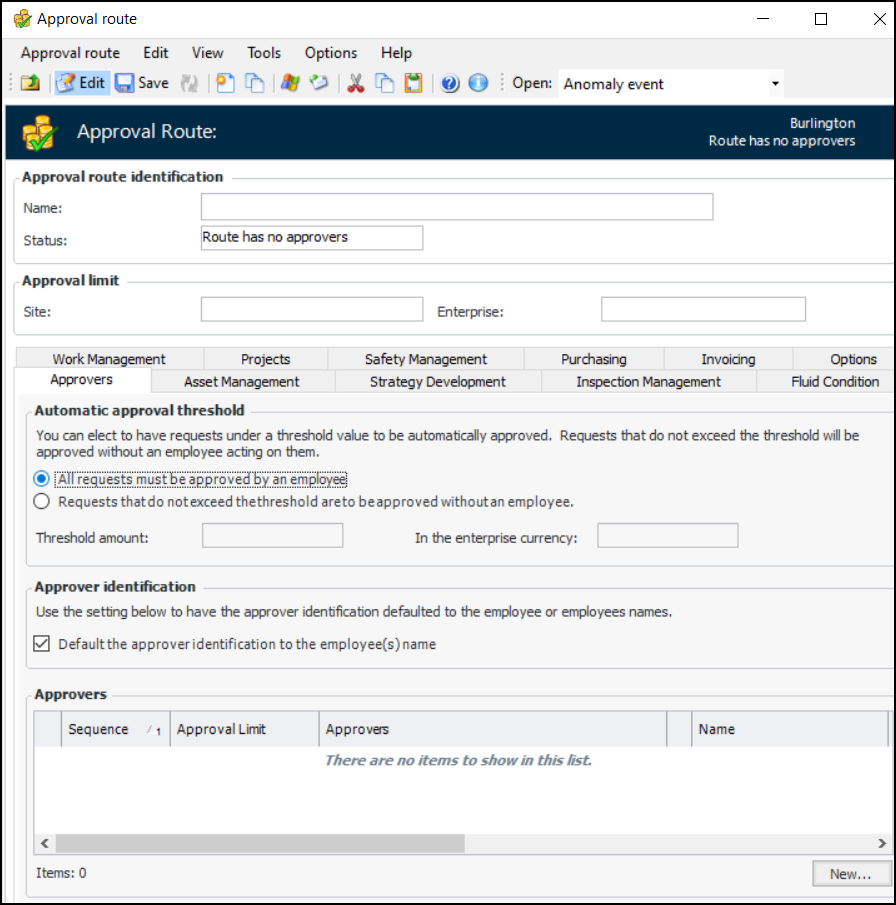
Creating Approval Routes

Approval routes are made up of one or more employees in your organization who have been set up as approvers: people authorized to handle requests for document approval. When you set up an approval route, you identify the approvers who review certain types of documents, such as work requests or purchase orders, and stipulate the maximum value these employees are authorized to approve.
This topic provides background information and explains how to create an approval route. It covers:

Approvers

On an approval route, you can define an approver as one or more employees. When two or more employees are included, approval is based on one of the following responses:
Note that when any one of the employees rejects a request, it is returned to the requestor with the status “Rejected”.

Document Types

The types of documents you can include in an approval route are determined by the approval requirements and policies configured for your site. For more information, see Setting up Document Approvals.
The site’s approval settings can specify that only work requests and work orders for assets with a certain consequence priority setting can be sent to the route. For example, you could have separate routes to approve work on high- and low-priority assets.

Approval Route’s Site

The approval route’s site is set as the current site when the route is created (that is, the site from which you have created the route) and cannot be changed. The approval route’s site affects which employees, GL accounts, assets, and currencies are used on the route, as well as the documents that the route can approve.
Employee: Only employees in the approval route’s site and its ancestor sites can be identified as approvers on the route.
GL Accounts: All GL accounts are owned at the enterprise level (top site). Therefore, all GL accounts are available for use on an approval route on any site.
Assets: Only assets at the approval route’s site and its descendant sites can be identified as being approved by the route.
Currency: A route’s maximum approval limit is recorded in the currency used by the route’s site. The limit is also converted to the enterprise currency (using the exchange rate defined in the enterprise’s international settings). Similarly, approval requests are recorded in both site and enterprise currencies. If an approval request originates in another site (with a different currency) APM compares amounts using the enterprise currency to filter the list of available routes and to route the request to the appropriate approvers.
Note: Approval routes must be set up at a site type that owns the object. For example, if projects are owned at only the “Corporate” site type, then approval routes for projects must be set up at the “Corporate” site.

Adding Assets and GL Accounts to Routes

If an approval route will be used to approve work orders, work requests, or asset transfers, you must add one or more assets to the route before it is considered a valid route. If the route will be used to approve purchasing documents, you must add one or more GL accounts before the route is considered a valid route.
If you use an approval route that is not valid for the asset or the GL account on the document being approved, automatic approvals (based on the threshold amount) will not work. The document must then be approved manually.

To Create an Approval Route

1.
Select the site’s Approvals view, Settings tab, then the Routes tab. This tab lists all of the approval routes that have been defined for the site.
2.
Click New. The Approval Route window appears. A tab is provided for each type of document that requires approval.
 
Note: The maximum approval limit is automatically set to the approval limit of the top approver on the route. APM converts the site currency to the enterprise currency using the current exchange rate defined in the enterprise’s international settings.
3.
4.
Asset management:
Strategy development:
Inspection management:
Fluid condition:
Work management when AWEIS is not active
Work management when AWEIS is active
Projects
Safety management:
Purchasing:
Invoicing:
 
5.
Select the Options tab:
Use these options to require the approver to provide a comment when the selected actions are taken. For example, if a comment is required for approvals, the approver cannot close the Approve or Reject dialog without adding text the Comments box.
6.
7.
Select the Work Management tab.
Select a priority from the Consequence priority list. Work orders or requests for assets with this priority will be sent to the route.
8.
9.
10.
11.