|
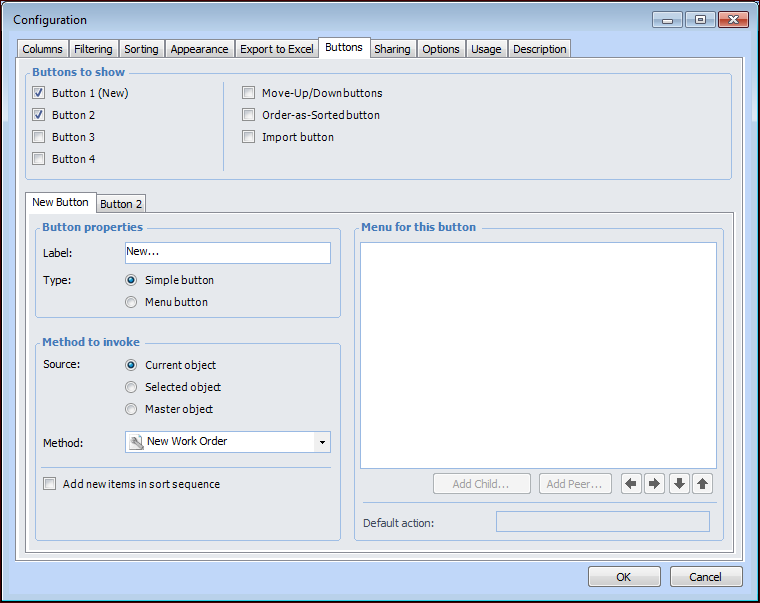
Adding Custom Buttons to Table Configurations
Once you select the appropriate method, the Label field is completed with the default information for that method.Note: If you add custom buttons with the attachment method directly to attachments-only configurations through the user interface, the buttons will not be available. Instead, add the attachment method to a button on a panel outside of the actual table configuration, through the APM Forms Editor. For more information, see Customizing the User Interface (UI).Before adding custom buttons, you must launch APM as an administrator.To Add Custom Buttons
1. Open the table configuration to which you want to add custom buttons. Click Configuration and then Open. The Configuration dialog appears, open to the Columns tab.
2. Select the Buttons tab. Select Button 1 (New) and any additional buttons required. A tab is added for each of the buttons. For example:
When you select Menu button, you can define the menu elements that you want to appear when users click the button.
• Current object: You can select methods that are owned by the class that owns the configuration. For example, if the configuration is on a site view, you will be able to select methods that are owned by the Site class.
• Selected object: You can select methods that are owned by the class of objects that are listed in the configuration. For example, if the configuration lists assets, you will be able to select methods owned by the Asset class. Users can then use the button to apply the method to one or more selected objects in the configuration.
• Master object: You can select methods that are owned by a master object. For example, in a configuration showing failure modes, the master object might be strategy development analyses.
4. If you added a simple button, you are done. You can now add another button or click OK to save the configuration.
5. If you are adding a menu button, in the Menu for this button box select the top item and click Add Child. The Menu Element dialog appears.
• Menu button: adds a label to the menu. Select this option to add a label under which you want to add child menu items.
• Separator: adds a separator line to the menu
• Method: adds a menu item that invokes a method. When you select this option, you can select from any method available in the system.Note: When you are adding a new menu element, you can select a join path to a related class. The Method to invoke list displays the methods for that class.
• Dialog: adds a menu item that displays a dialog. When you select this option, you can select any dialog that belongs to the class that owns the configuration. For example, if the configuration is on a site view, you can select any dialog owned by the Site class.
To include a mnemonic for this menu label, type an ampersand (&) in front of the character that you want to use. At run-time, the designated character will be underlined. Pressing Alt and the underlined letter selects the menu item.You can also define a shortcut to the menu item (for example, Ctrl + S to save an object). To do this, type “\t” after the menu element label followed immediately by the shortcut key sequence. This left-aligns all the shortcuts on a menu at the first tab position after the longest menu item. Do not use spaces for alignment because they may not display properly.Match key names with those commonly inscribed on the keycap. For example, for Ctrl and Shift key combinations type “Ctrl+” and “Shift+”. For example, the menu label for a Properties view might look like this:Properties Ctrl+P.
7. Click OK when you have finished defining the menu element.
8.
9.
10. Select Move Up/Down buttons to include Move Up and Move Down buttons on the table configuration.
11.
12. If you selected Move Up/Down buttons or Order as Sorted button, the Move Up/Down and Order as Sorted tab appears.
14. Select Import button to include an Import button on the configuration which invokes the Import Data dialog for loading external data from a Microsoft Excel spreadsheet. For more information, see Introduction to Data Loading.
15. Click OK to save your changes to the table configuration and close the Configuration dialog.